Hello, Pythonistas Welcome Back. Today we will see how to make a fully functional modern Radio Button in CustomTkinter.
We will use the CTkRadioButton Widget.
Contents
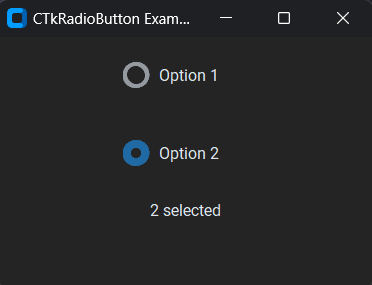
How Does CTkRadioButton Look?
Basic Code
This is how you can make a simple radio button in CustomTkinter (or CTk).
from customtkinter import CTk, CTkRadioButton, IntVar, CTkLabel

class App(CTk):
    def __init__(self):
        super().__init__()
        self.title("CTkRadioButton Example")
        self.geometry("300x200")

        # Create a variable to keep track of the radio buttons
        self.radio_var = IntVar()
        # Create the first radio button
        self.radio = CTkRadioButton(self, text="Option 1", variable= self.radio_var, value=1, command=self.radio_event)
        self.radio.pack(padx=20, pady=20)
        # Create another radio button
        self.radio1 = CTkRadioButton(self, text="Option 2", variable= self.radio_var, value=2, command=self.radio_event)
        self.radio1.pack(padx=20, pady=20)

    # Function to display the selected radio option.
    def radio_event(self):
        self.label = CTkLabel(self, text=f"{self.radio_var.get()} selected")
        self.label.pack()

app = App()
app.mainloop()
Like any other widget in CTk, it is created and then pushed to the window.
But, that’s not it. You need a StringVar or an IntVar to check its current value. You can’t use a normal Python Variable for this purpose.
The value should be unique for each radio button otherwise we won’t be able to know which one is selected.
Variable is needed because we need to group all the options under one head. And value is to give the value of that specific option(or button)
As it is like a button you can give it a command function to shoot when you select or deselect it.
It takes a compulsory argument master. This will specify where it will stay.
A Sample Modern Radio Button
We will make a gender selector with the help of CTkRadioButton.
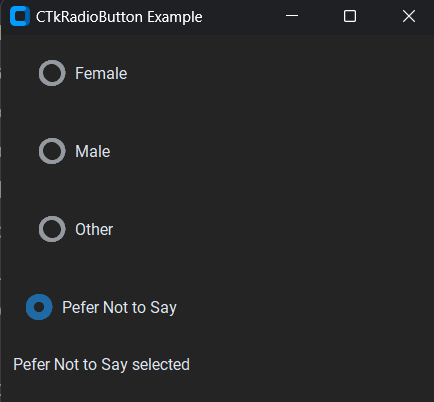
For this, we just need to:
- Create three radio buttons, group them under the same variable, and also provide them unique values.
- Now, whenever a button is selected the respective gender would be displayed on the window.
- We can either use conditional statements or use a string variable to do the same.
That’s it!
Complete Source Code(Click Here For Complete Source Code):
from customtkinter import CTk, CTkRadioButton, IntVar, CTkLabel
class App(CTk):
    def __init__(self):
        super().__init__()
        self.title("CTkRadioButton Example")
        self.geometry("350x300")

        # Create a variable to keep track of the radio buttons
        self.radio_var = IntVar()
        # Create radio button for female option
        self.female = CTkRadioButton(self, text="Female", variable= self.radio_var, value=0, command=self.radio_event)
        self.female.grid(row=0, column=0, padx=20, pady=20)
        # Create radio button for male option
        self.male = CTkRadioButton(self, text="Male", variable= self.radio_var, value=1, command=self.radio_event)
        self.male.grid(row=1, column=0, padx=20, pady=20)
        # Create radio button for other option
        self.other = CTkRadioButton(self, text="Other", variable= self.radio_var, value=2, command=self.radio_event)
        self.other.grid(row=2, column=0, padx=20, pady=20)
        # Create radio button for Pefer Not to Say option
        self.other = CTkRadioButton(self, text="Pefer Not to Say", variable= self.radio_var, value=3, command=self.radio_event)
        self.other.grid(row=3, column=0, padx=20, pady=20)

    # Function to display the selected radio
    def radio_event(self):
        dic = {0:"Female", 1:"Male", 2:"Other", 3:"Pefer Not to Say"}
        selected = self.radio_var.get()
        # Check if the label exists before removing it
        if hasattr(self, "label"):
            self.label.grid_forget()

        self.label = CTkLabel(self, text=f"{dic[selected]} selected")
        self.label.grid(row=4, column=0, )

app = App()
app.mainloop()
You can check out this amazing app made using CTkRadioButton.
All Configurations
| argument | value |
|---|---|
| master | root, tkinter.Frame or CTkFrame |
| width | width of complete widget in px |
| height | height of complete widget in px |
| radiobutton_width | width of radiobutton in px |
| radiobutton_height | height of radiobutton in px |
| corner_radius | corner radius in px |
| border_width_unchecked | border width in unchecked state in px |
| border_width_checked | border width in checked state in px |
| fg_color | foreground (inside) color, tuple: (light_color, dark_color) or single color |
| border_color | border color, tuple: (light_color, dark_color) or single color |
| hover_color | hover color, tuple: (light_color, dark_color) or single color |
| text_color | text color, tuple: (light_color, dark_color) or single color |
| text_color_disabled | text color when disabled, tuple: (light_color, dark_color) or single color |
| text | string |
| textvariable | Tkinter StringVar to control the text |
| font | button text font, tuple: (font_name, size) |
| hover | enable/disable hover effect: True, False |
| state | “normal” (standard) or “disabled” (not clickable, darker color) |
| command | function will be called when the checkbox is clicked |
| variable | Tkinter variable to control or read checkbox state |
| value | string or int value for variable when RadioButton is clicked |
I am not going to give any challenges at the end of such articles as they are just for your quick reference.
Note I haven’t included all the methods and attributes. You can always get that on the documentation.