Hello, Pythonistas Welcome Back. Today we will see how to make a fully functional modern tab view in CustomTkinter.
We will use the CTkTabview Widget.
Contents
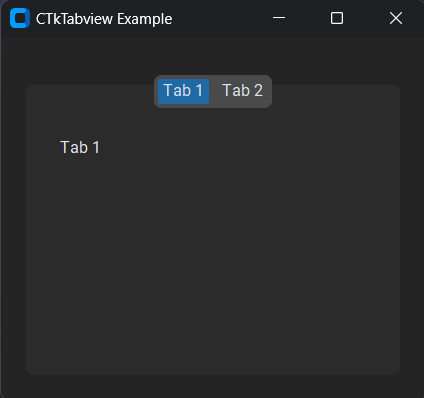
How Does CTkTabview Look?

Basic Code
This is how you can make a simple Tabview in CustomTkinter (or CTk).
from customtkinter import CTk, CTkTabview, CTkLabel
class MyTabView(CTkTabview):
    def __init__(self, master):
        super().__init__(master)

        # create tabs
        tab1 = self.add("Tab 1")
        tab2 = self.add("Tab 2")

        # add widgets on tab1
        self.label = CTkLabel(master=tab1, text="Tab 1")
        self.label.grid(row=0, column=0, padx=20, pady=10)
        # add widgets on tab2
        self.label2 = CTkLabel(master=tab2, text="Tab 2")
        self.label2.grid(row=0, column=0, padx=20, pady=10)


class App(CTk):
    def __init__(self):
        super().__init__()
        self.title("CTkTabview Example")

        self.tab_view = MyTabView(master=self)
        self.tab_view.grid(row=0, column=0, padx=20, pady=20)


app = App()
app.mainloop()
It is not compulsory to make a tabview as a separate class. You can use it simply as you use other widgets.
It is created like any other widget and displayed on the window. But as it acts like a frame you can add widgets to it.
It is like multiple frames that can be switched using a segmented button-like structure.
You can store tabs of the tab view in variables like those shown above. However, you can use them directly too.
A Sample Modern Tab View
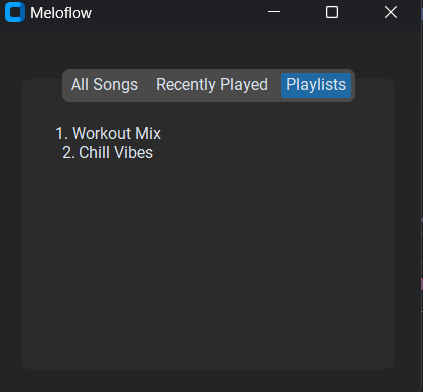
You might have used a lot of music apps, data there is separated in tabs. We will be making something like that here.

We will need to:
- Create a function that returns a dictionary of separate categories. (so that the code doesn’t clutter up)
- Now, load this dictionary and then get the titles of the tab in a separate list.
- Lastly, create three tabs and add labels to each.
- Create this class’s object in the main window class.
That’s it!!
Complete Source Code(Click Here For Complete Source Code):
from customtkinter import CTk, CTkTabview, CTkLabel
class MusicView(CTkTabview): # Inherit from CTkTabview to create a tab view
    def __init__(self, master): # Initialize the parent class
        super().__init__(master)

        self.m_dict = self.get_dict() # Get the music data dictionary
        titles = list(self.m_dict.keys()) # Get a list of tab titles

        # Create tabs and add widgets to them:
        all_tab = self.add(titles[2]) # Create the "All Songs" tab
        # Add label for "All Songs"
        self.label3 = CTkLabel(master=all_tab, text=self.m_dict[titles[2]])
        self.label3.grid(row=0, column=0, padx=20, pady=10)

        r_play = self.add(titles[0]) # Create the "Recently Played" tab
        # Add label for "Recently Played"
        self.label = CTkLabel(master=r_play, text=self.m_dict[titles[0]])
        self.label.grid(row=0, column=0, padx=20, pady=10)

        play = self.add(titles[1]) # Create the "Playlists" tab
        # Add label for "Playlists"
        self.label2 = CTkLabel(master=play, text=self.m_dict[titles[1]])
        self.label2.grid(row=0, column=0, padx=20, pady=10)

    def get_dict(self) -> dict[str]: # Function to fetch and format music data
        """Returns a dictionary of recently played songs, playlists and all songs."""
        all_songs = [
            "1. Bohemian Rhapsody - Queen",
            "2. Imagine - John Lennon",
            "3. What a Wonderful World - Louis Armstrong",
        ]
        playlists = ["1. Workout Mix", "2. Chill Vibes"]
        recently_played = [
            "1. Imagine - John Lennon",
            "2. What a Wonderful World - Louis Armstrong",
        ]

        # Format song lists as newline-separated strings for display
        recently_played = "\n".join(recently_played)
        playlists = "\n".join(playlists)
        all_songs = "\n".join(all_songs)

        return {"Recently Played":recently_played, "Playlists":playlists, "All Songs":all_songs}


class App(CTk):
    def __init__(self):
        super().__init__()
        self.title("Meloflow")

        self.tab_view = MusicView(master=self)
        self.tab_view.grid(row=0, column=0, padx=20, pady=20)


app = App()
app.mainloop()
All Configurations
| Argument | Value |
|---|---|
| master | root, frame, top-level |
| width | width in px, tabs will be slightly smaller |
| height | height in px, tabs will be slightly smaller |
| corner_radius | corner radius in px |
| border_width | border width in px |
| fg_color | foreground color of the tabview itself and the tabs, tuple: (light_color, dark_color) or single color |
| border_color | border color, tuple: (light_color, dark_color) or single color |
| command | function will be called when segmented button is clicked |
| anchor | position of the segmented button, default is “n”, values are “nw”, “n”, “ne”, “sw”, “s”, “se” |
| state | “normal” or “disabled” |
I am not going to give any challenges at the end of such articles as they are just for your quick reference.
Note I haven’t included all the methods and attributes. You can always get that on the documentation.


