Tkinter Pack
So far we have seen labels, buttons, images, etc in Python’s built-in toolkit Tkinter.
With any of the widgets, we were using a method called pack().
And if you are like me you would love to explore it further ahead.
Let’s dive deep into one of the geometry managers in Tkinter Python.
Contents
What is Tkinter Pack?
Tkinter lets you add buttons, labels, and text boxes to your apps.
To place those widgets in a window, Tkinter gives you three layout managers:
packgridplace
In this article, we’ll talk about the easiest one — pack.
Tkinter Pack Tkinter Pack
How Pack Works
Think of pack() like stacking blocks.
You can stack them top to bottom, or left to right.
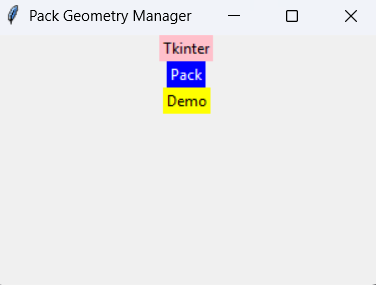
Let’s look at a simple example:
import tkinter as tk

root = tk.Tk()
root.title('Pack Geometry Manager')
root.geometry('310x200')

label1 = tk.Label(root, text='Tkinter', bg='pink')
label2 = tk.Label(root, text='Pack', bg='blue', fg='white')
label3 = tk.Label(root, text='Demo', bg='yellow')

label1.pack()
label2.pack()
label3.pack()

root.mainloop()
Output:-
Choosing the Direction with side
The side option tells Tkinter where to place your widget.
Here are your choices:
| Value | What it does |
|---|---|
top | Stacks from top to bottom (default) |
bottom | Stacks from bottom up |
left | Stacks from left to right |
right | Stacks from right to left |
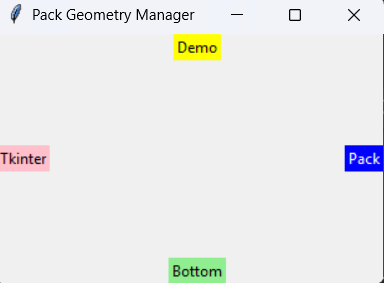
Example walkthrough:
import tkinter as tk

root = tk.Tk()
root.title('Pack Geometry Manager')
root.geometry('310x200')

label1 = tk.Label(root, text='Tkinter', bg='pink')
label2 = tk.Label(root, text='Pack', bg='blue', fg='white')
label3 = tk.Label(root, text='Demo', bg='yellow')
label4 = tk.Label(root, text='Bottom', bg='light green')

label1.pack(side=tk.LEFT)
label2.pack(side=tk.RIGHT)
label3.pack(side=tk.TOP)
label4.pack(side=tk.BOTTOM)


root.mainloop()
Output:-
Tkinter Pack Tkinter Pack
Add More Space with expand
Want widgets to take up extra space in the window?
Use expand=True.
To make it look more beautiful let’s add another label in the code above.
I gave it the side left.
As we only have 4 options: Left, Right, Top, Bottom.
It looks like this:
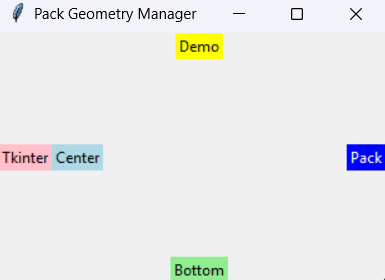
But I want the center label actually in the center.
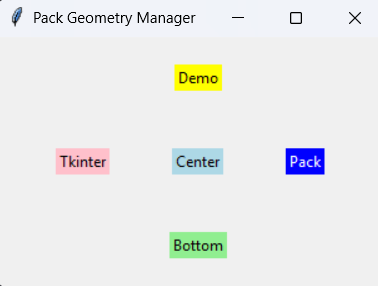
If I add expand=True to all the labels the result would be as desired.
Now, if I give a side or any side or even no side to the center label it is in the center:
import tkinter as tk

root = tk.Tk()
root.title('Pack Geometry Manager')
root.geometry('310x200')

label1 = tk.Label(root, text='Tkinter', bg='pink')
label2 = tk.Label(root, text='Pack', bg='blue', fg='white')
label3 = tk.Label(root, text='Demo', bg='yellow')
label4 = tk.Label(root, text='Bottom', bg='light green')
label5 = tk.Label(root, text='Center', bg='light blue')

label1.pack(side=tk.LEFT, expand=True)
label2.pack(side=tk.RIGHT, expand=True)
label3.pack(side=tk.TOP, expand=True)
label4.pack(side=tk.BOTTOM, expand=True)
label5.pack(expand=True)
# works the same even if it is label5.pack()


root.mainloop()
I can go on explaining and giving examples about how it works.
But the best way to get clear with this attribute is to experiment with it.
Whatever your question is experiment with that.
If you still have any doubts let me know in the comments below.
Fill the Space with fill
The fill option lets your widget fill space:
| Value | What it does |
|---|---|
none | Default. Widget stays small. |
x | Fills space left to right |
y | Fills space top to bottom |
both | Fills both ways |
import tkinter as tk

root = tk.Tk()
root.title('Pack Geometry Manager')
root.geometry('310x200')

label1 = tk.Label(root, text='Tkinter', bg='pink')
label2 = tk.Label(root, text='Pack', bg='blue', fg='white')
label3 = tk.Label(root, text='Demo', bg='yellow')
label4 = tk.Label(root, text='Bottom', bg='light green')
label5 = tk.Label(root, text='Center', bg='light blue')

label1.pack(side=tk.LEFT, expand=True, fill=tk.BOTH)
label2.pack(side=tk.RIGHT, expand=True, fill=tk.X)
label3.pack(side=tk.TOP, expand=True, fill=tk.Y)
label4.pack(side=tk.BOTTOM, expand=True)
label5.pack()


root.mainloop()
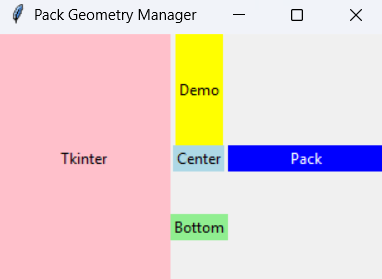
The label on the left side(Tkinter) is given tk.BOTH that’s why it occupies the complete space it gets both horizontally and vertically.
The one on the right(Pack) is given tk.X that’s why it is only occupying space horizontally.
And, the one on the top(Demo) is given tk.Y that’s why it is only occupying space vertically.
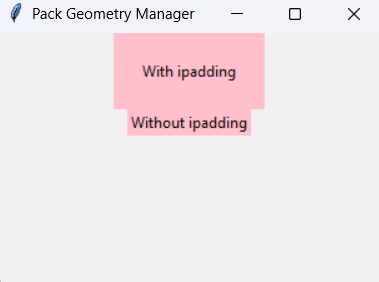
Internal Space with ipadx and ipady
These options add space inside your widget:
ipady: Adds space top and bottom
ipadx: Adds space left and right
import tkinter as tk

root = tk.Tk()
root.title('Pack Geometry Manager')
root.geometry('310x200')

label1 = tk.Label(root, text='With ipadding', bg='pink')
label2 = tk.Label(root, text='Without ipadding', bg='pink')

label1.pack(ipadx=20, ipady=20)
label2.pack()


root.mainloop()
Tkinter Pack Tkinter Pack
External Space with padx and pady
These add space outside your widget.
This keeps widgets from sticking too close to each other or the edge.
See in the above image the labels were closely packed.
But they’ll get spacious as I add padx and pady.
All 4 attributes can have different values.
import tkinter as tk

root = tk.Tk()
root.title('Pack Geometry Manager')
root.geometry('310x200')

label1 = tk.Label(root, text='With ipadding', bg='pink')
label2 = tk.Label(root, text='Without ipadding', bg='pink')

label1.pack(ipadx=30, ipady=20, padx=10, pady=25)
label2.pack()


root.mainloop()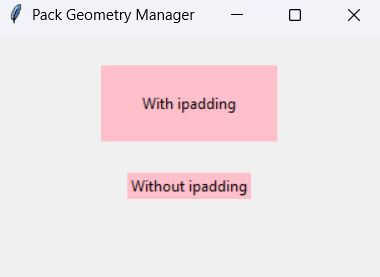
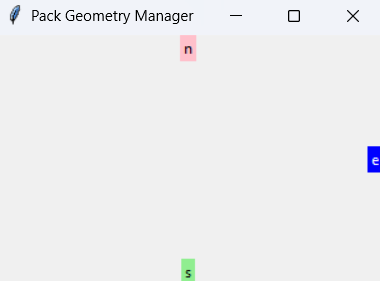
Anchor in Tkinter Pack Geometry Manager
The anchor parameter in Tkinter’s pack() method lets you control the position of the widget within its allocated space.
This is especially useful when a widget doesn’t expand to fill its space and you want to align it to a specific edge or corner.
Available Anchor Values
Each anchor value is a string corresponding to a compass direction or position. Here’s a breakdown:
| Anchor | Description |
|---|---|
'n' | North (Top Center) |
's' | South (Bottom Center) |
'e' | East (Right Center) |
'w' | West (Left Center) |
'nw' | North-West (Top Left) |
'ne' | North-East (Top Right) |
'sw' | South-West (Bottom Left) |
'se' | South-East (Bottom Right) |
'center' | Center of the available area |
Click on this image it will help you understand directions better.
import tkinter as tk

root = tk.Tk()
root.title('Pack Geometry Manager')
root.geometry('310x200')

label1 = tk.Label(root, text='n', bg='pink')
label2 = tk.Label(root, text='e', bg='blue', fg='white')
label3 = tk.Label(root, text='s', bg='light green')


label1.pack(anchor=tk.N,expand=True)
label2.pack(anchor=tk.E,expand=True)
label3.pack(anchor=tk.S,expand=True)


root.mainloop()
Output:
🤹 Quick Tips
- Use
pack()when stacking widgets in one direction. - Use
side,expand, andfillto control placement. - Try adding paddings for better design.
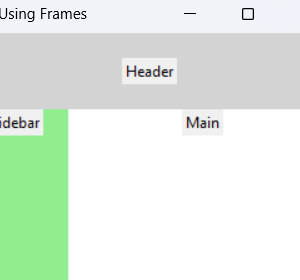
- For more complex layouts, combine
packwithFrame.