Hello Pythonistas, welcome back. Today we will see how to use the Tkinter Entry widget (input widget) in Python.
ttk.Entry is used to take user input in Tkinter.
It is just like the input method in Python or say the CTkEntry widget in CustomTkinter.
Contents
How Does ttk.Entry Look?
Basic Code
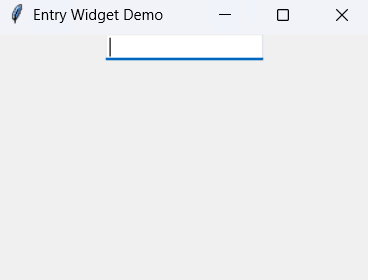
This is how you can make a simple entry widget(input widget) in Tkinter.
from tkinter import ttk
import tkinter as tk
root = tk.Tk()
root.geometry('300x200')
root.title('Entry Widget Demo')
entry = ttk.Entry(root)
entry.pack()
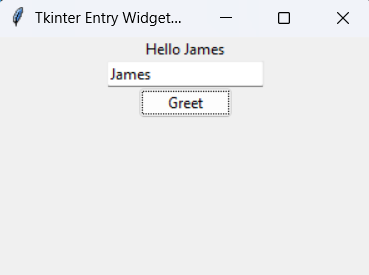
root.mainloop()Let’s Greet The Users Using Their Names
To do this along with the entry widget we will need a button and a label.
Onclick the button would get text from the entry widget and will display that on the label.
from tkinter import ttk
import tkinter as tk

root = tk.Tk()
root.geometry('300x200')
root.title('Tkinter Entry Widget Demo')

label = ttk.Label(root)
label.pack()
def greet():
    name = entry.get()
    label["text"] = "Hello "+name

entry = ttk.Entry(root)
entry.pack()

btn = ttk.Button(root, command=greet, text="Greet")
btn.pack()
root.mainloop()
Output:
Setting the Focus Automatically
Want the cursor to land in the textbox right when your app starts?
Use .focus().
name_entry.focus()entry = ttk.Entry(root)
entry.pack()
entry.focus()Now, when the app starts, users can immediately start typing into the first box.
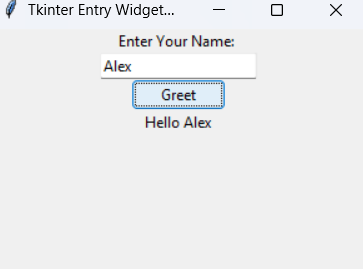
Pairing Entry with Labels
Let’s make things clear by adding labels to entry widgets:
from tkinter import ttk
import tkinter as tk
root = tk.Tk()
root.geometry('300x200')
root.title('Tkinter Entry Widget Demo With Label')
def greet():
name = entry.get()
label["text"] = "Hello "+name
# Explain what should the user enter in the Entry widget.
lbl = ttk.Label(root, text="Enter Your Name: ")
lbl.pack()
entry = ttk.Entry(root)
entry.pack()
entry.focus()
btn = ttk.Button(root, command=greet, text="Greet")
btn.pack()
# result Label shifted here for better look and feel.
label = ttk.Label(root)
label.pack()
root.mainloop()
Output:
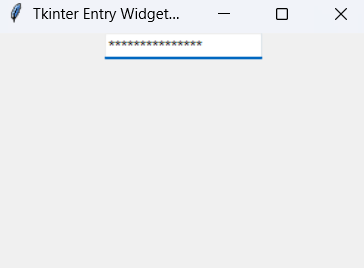
🔒 Passwords and Sensitive Info
If you want to hide the characters (like passwords), use the show option.
password_entry = ttk.Entry(root, show="*")Now anything typed shows up as *****.
StringVar: Live Updates and Two-Way Binding
Here’s where it gets even cooler.
Let’s say you want to get real-time updates when someone types.
You can bind the entry to a StringVar.
name_var = tk.StringVar()
entry = ttk.Entry(root, textvariable=name_var)
Now, name_var.get() gives you the current input.
You can even do something live like this:
output_label.config(text=name_var.get().upper())Tracing Text Changes Live
Let’s track every change and show it in uppercase:
from tkinter import ttk
import tkinter as tk

root = tk.Tk()
root.geometry('300x200')
root.title('StringVar with Entry Widget Demo')


name_var = tk.StringVar()
entry = ttk.Entry(root, textvariable=name_var)
entry.pack()

label = ttk.Label(root)
label.pack()

def update_label(*args):
    label.config(text=name_var.get().upper())

name_var.trace_add("write", update_label)

root.mainloop()
Try typing your name—you’ll see it change LIVE! 🧙♂️
We’re using a function (update_label)
This function updates the label with the uppercase version of the Entry text whenever the text changes.
trace_add("write", update_label) tells Tkinter to call update_label whenever the text changes in the name_var.
If you want to know how to make a learning diary check this out!
And that is it for today! See you in the next one till then happy coding!!