Hello, Pythonistas🙋♀️, welcome back. Today, we’re gonna be making this awesome modern-looking calculator app 🔢.
We will use the customtkinter library for making this calculator app. I strongly suggest you read the last post. Along with this read the previous post challenge of this post.
Without further ado, let’s get going…
Contents
Previous post’s challenge’s solution
The title() method is used to set up a window’s title in customtkinter.
from customtkinter import *
class App(CTk):
    def __init__(self):
        super().__init__()
        self.title("Password Checker")
        self.geometry("400x300")
        self.password = CTkEntry(self, placeholder_text="password please...")
        self.password.pack()
        self.button = CTkButton(master=self, command=self.clicked)
        self.button.pack()
        self.cp = "I don't know"
    def clicked(self):
        p = self.password.get()
        if p == self.cp:
            label = CTkLabel(self, text="Correct password")
            label.pack()
        else:
            label = CTkLabel(self, text="Incorrect password")
            label.pack()
if __name__ == "__main__":
    app = App()
    app.mainloop()
The first☝ line from customtkinter import * imports the customtkinter library and all its modules/classes.
The App class is created, which inherits(I’ll explain inheritance when we finish GUI) from the CTk class, which is a class from the customtkinter library that creates a customtkinter window 🪟.
In the __init__ method of the App class, the basic properties of the GUI window are set, like:-
- the title “Password Checker”✔️
- the geometry “400×300” which sets the width and height of the window.
Along with this in the __init__ method:-
- an instance of
CTkEntryclass (input field widget) - an instance of
CTkButton - are created and packed into the window to display them there.
cp is a variable that’s set to “I don’t know”, which is used to store the correct password.
The clicked method gets the password entered by the user and compares⚖️ it with the cp variable, which is set to “I don’t know”.
If they match:-
- it creates a
CTkLabelwidget (text label) with the text “Correct password”✔️ and packs it into the window
otherwise,
- it creates a
CTkLabelwidget with the text “Incorrect password”❌ and packs it into the window
Finally, the if __name__ == "__main__": block creates an instance of the App class, runs🏃♀️ the mainloop method.
The mainloop method is to:-
- start the GUI event loop which keeps the window
- open and
- waiting for user interactions.
Now, let’s set up a basic design for our calculator app.
Setting up a structure
Needless to mention let’s import the customtkinter library. Along with this, we’ll create a Calculator class.
This is because you should always make GUI apps using OOP. Otherwise, we would need to make a lot of variables global🌎.
Trust me it’s a spaghetti🍝 idea don’t do it. And it won’t🤢 be a tasty one.
from customtkinter import *
class App(CTk):
    pass
To use the App class in the main function, you guessed💡 it. Right?
Create its instance and use the mainloop() function to run 🏃♀️ an event loop.
if __name__ == "__main__":
    app = App()
    app.mainloop()
Let’s now give a title to our app. For this, we would need to call the __init__() of the superclass (CTk) inside our class.
Those who don’t know inheritance just do it, for now, we will see👀 it later.
def __init__(self):
super().__init__()
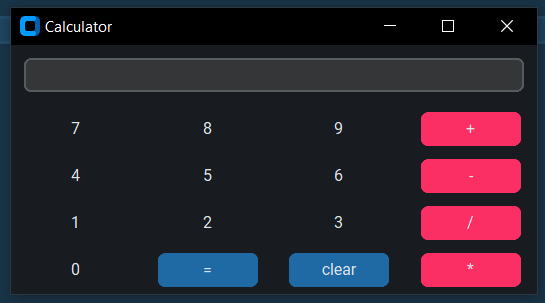
self.title("Calculator")This is how our calculator app 🖩 is going to look:-
We would need to set up variables for the colors🎨, the size of the entry and the button widgets.
We will set this inside the __init__() method.
class App(CTk):
    def __init__(self):
        super().__init__()
        self.title("Calculator")
        # width
        self.evwidth = 400 #width of entry widget
        self.bwidth1 = self.evwidth/4 - 20 #width of buttons
        # colors
        self.configure(fg_color="#181b1f") # background color of app
        self.obc = "#fb2f64" #color of +,-,*,/
        self.obch = "#cc2753" #hover color of +,-,*,/
        self.nbc = "#181b1f" #color of 0-9 same as the window's background
        self.nbch= "#14161a" #hover color of 0-9
You can for sure use some other sizes or colors🎨. This combo appealed the most to me after a lot of mind-blowing🤯 experiments.
Time to populate our window with entry and button widgets.
Making and displaying widgets
We will use the grid() function/method to display the widgets we make. It will all be inside the __init__() method
Entry
To make an entry widget we will use CTkEntry:-
self.values = CTkEntry(master=self, width=self.evwidth)
#we gave it the size we decided above
#master = self as we want it to be displayed on our window which in this case is an instance of this class
To display it on the window:-
self.values.grid(row=0, column=0, columnspan=4, padx=10, pady=10)
#grid should be imagined as an excel sheet
#row 0 means first row and column 0 means first column
#As our entry widget occupies space equating to 4 buttons(columns) I have given columnspan 4
#pady is to give spaces above and below the widget.
#padx is for left and right side spaces.
Buttons
self.button_1 = CTkButton(master=self, text="1", command=lambda: self.g_num("1"), width=self.bwidth1, fg_color=self.nbc, hover_color=self.nbch)
#text is to display 1 on the button
#command is to call a function when the button is clicked.
#As we want to pass an argument to this function we need to use lambda.
#width and colors are given as decided
To display the buttons on the window:-
self.button_1.grid(row=3, column=0, pady=5, padx=10)
#The calculators usually have 789 on top and 123 on bottom
#That's why we have set the row 3
Make all the buttons of numbers like this. We just need to change 1 to 2,3,4… and rows and columns. If you don’t want to have a headache🤕 doing that just copy the code below:-
        # number buttons
        self.button_1 = CTkButton(master=self, text="1", command=lambda: self.g_num("1"), width=self.bwidth1, fg_color=self.nbc, hover_color=self.nbch)
        self.button_2 = CTkButton(master=self, text="2", command=lambda: self.g_num("2"), width=self.bwidth1, fg_color=self.nbc, hover_color=self.nbch)
        self.button_3 = CTkButton(master=self, text="3", command=lambda: self.g_num("3"), width=self.bwidth1, fg_color=self.nbc, hover_color=self.nbch)
        self.button_4 = CTkButton(master=self, text="4", command=lambda: self.g_num("4"), width=self.bwidth1, fg_color=self.nbc, hover_color=self.nbch)
        self.button_5 = CTkButton(master=self, text="5", command=lambda: self.g_num("5"), width=self.bwidth1, fg_color=self.nbc, hover_color=self.nbch)
        self.button_6 = CTkButton(master=self, text="6", command=lambda: self.g_num("6"), width=self.bwidth1, fg_color=self.nbc, hover_color=self.nbch)
        self.button_7 = CTkButton(master=self, text="7", command=lambda: self.g_num("7"), width=self.bwidth1, fg_color=self.nbc, hover_color=self.nbch)
        self.button_8 = CTkButton(master=self, text="8", command=lambda: self.g_num("8"), width=self.bwidth1, fg_color=self.nbc, hover_color=self.nbch)
        self.button_9 = CTkButton(master=self, text="9", command=lambda: self.g_num("9"), width=self.bwidth1, fg_color=self.nbc, hover_color=self.nbch)
        self.button_0 = CTkButton(master=self, text="0", command=lambda: self.g_num("0"), width=self.bwidth1, fg_color=self.nbc, hover_color=self.nbch)
        # displaying number buttons
        self.button_1.grid(row=3, column=0, pady=5, padx=10)
        self.button_2.grid(row=3, column=1, pady=5, padx=10)
        self.button_3.grid(row=3, column=2, pady=5, padx=10)
        self.button_4.grid(row=2, column=0, pady=5, padx=10)
        self.button_5.grid(row=2, column=1, pady=5, padx=10)
        self.button_6.grid(row=2, column=2, pady=5, padx=10)
        self.button_7.grid(row=1, column=0, pady=5, padx=10)
        self.button_8.grid(row=1, column=1, pady=5, padx=10)
        self.button_9.grid(row=1, column=2, pady=5, padx=10)
self.button_0.grid(row=4, column=0, pady=5, padx=10)To create the + button:-
self.add = CTkButton(master=self, text="+", command=lambda: self.operate("+"), width=self.bwidth1, fg_color=self.obc, hover_color=self.obch)
#We have given a different color to this
#Also we have used a different function to command it.
To display it:-
self.add.grid(row=1, column=3, pady=5, padx=10)Now create the other three just like this. You need to change + to / - * and you need to change the row and columns. Again to avoid a headache:-
        # operation buttons
        self.add = CTkButton(master=self, text="+", command=lambda: self.operate("+"), width=self.bwidth1, fg_color=self.obc, hover_color=self.obch)
        self.sub = CTkButton(master=self, text="-", command=lambda: self.operate("-"), width=self.bwidth1, fg_color=self.obc, hover_color=self.obch)
        self.div = CTkButton(master=self, text="/", command=lambda: self.operate("/"), width=self.bwidth1, fg_color=self.obc, hover_color=self.obch)
        self.mul = CTkButton(master=self, text="*", command=lambda: self.operate("*"), width=self.bwidth1, fg_color=self.obc, hover_color=self.obch)
        # displaying operation buttons
        self.add.grid(row=1, column=3, pady=5, padx=10)
        self.sub.grid(row=2, column=3, pady=5, padx=10)
        self.div.grid(row=3, column=3, pady=5, padx=10)
self.mul.grid(row=4, column=3, pady=5, padx=10) self.equal = CTkButton(master=self, text="=", command=self.evaluate, width=self.bwidth1)
self.clear = CTkButton(master=self, text="clear", command=self.all_clear, width=self.bwidth1)
#We have not used lambda because these functions don't need to be called.
#They wouldn't need to take any argument(s).To display them:-
        self.equal.grid(row=4, column=1, pady=5, padx=10)
        self.clear.grid(row=4, column=2, pady=5, padx=10)
Creating functions
If you try to run 🏃♀️ the calculator app right now, it will throw an error(s)⚠. Why? Because we haven’t defined the functions yet.
Let’s define a function for the number🔢 buttons.
g_num()
When being called the function is getting supplied a string 🧵 of the number pressed.
So, we need to give a parameter to our function to catch 🎣 the number:-
    def g_num(self, n):
        #This would be made inside the class.
When the button is pressed we want to display the number on the entry widget. For this, we will use the insert() function of the entry widget
    def g_num(self, n):
        self.values.insert(0, n)
This might seem right✅ but, when you’ll insert more than one value, it will add them before the existing value.
Like, if you enter 6 first and 5 next the entry widget would have 56, not 65.
To solve this we would need to:
- first, get the existing no.,
- store it in a variable,
- delete the existing value in the widget and
- finally, add the no. to the value in the variable.
    def g_num(self, n):
        new_n = self.values.get()+n #get() gets str values
        self.values.delete(0, END) #To delete the existing value
        self.values.insert(0, new_n) #0 is index and new_n is string to be inserted.
refresh()
Let’s move on to the refresh() or the all_clear() function.
This simply needs to clear whatever is in the entry widget.
You need to use the delete() function:-
    def all_clear(self):
        self.values.delete(0, END) #0 is first index and END is last index.
operate()
Time🕛 for the operate() function.
This function will take one argument which is the operator:
    def operate(self, o):
        pass
Now, we need to get the current value in the entry widget and need to convert that to an integer.
We would store the no. and the operator in separate variables.
These would be instance variables. So that the evaluate() method can access them:
    def operate(self, o):
        self.f_num = int(self.values.get())
        self.op = o
Finally, we need to clear the value in the entry widget so that the next value can be inserted:
    def operate(self, o):
        self.f_num = int(self.values.get())
        self.op = o
        self.values.delete(0, END)
evaluate()
Okay, so the last function. This function needs to get the next no. entered, and clear the entry widget:-
    def evaluate(self):
        s_num = int(self.values.get())
        self.values.delete(0, END)
Now, based on the operator pressed by the user it needs to perform the operation. And if…elif would do that:-
    def evaluate(self):
        s_num = int(self.values.get())
        self.values.delete(0, END)
        if self.op == "+":
            self.values.insert(0, self.f_num + s_num)
        elif self.op == "-":
            self.values.insert(0, self.f_num - s_num)
        elif self.op == "*":
            self.values.insert(0, self.f_num * s_num)
        elif self.op == "/":
            self.values.insert(0, self.f_num / s_num)
Yeah,😄 we finally did it. Now, your calculator app would work just as this.
Surprise 🎁
So, the surprise 🎁 is…
Ad break.
No, we won’t have any ad breaks like that in TV📺 shows just before revealing a mystery.
We will be converting this calculator app file📁 to a desktop application📱. Yeah, just like the one you have on your desktop/laptop.
I first thought that for the surprise I should tell you how to enter values by pressing numbers on the keyboard. But, then the post would be super long and maybe quite boring💤.
However, If you want me to add this or any other functionality just let me know in the comment section below.
Here are the steps you need to follow:-
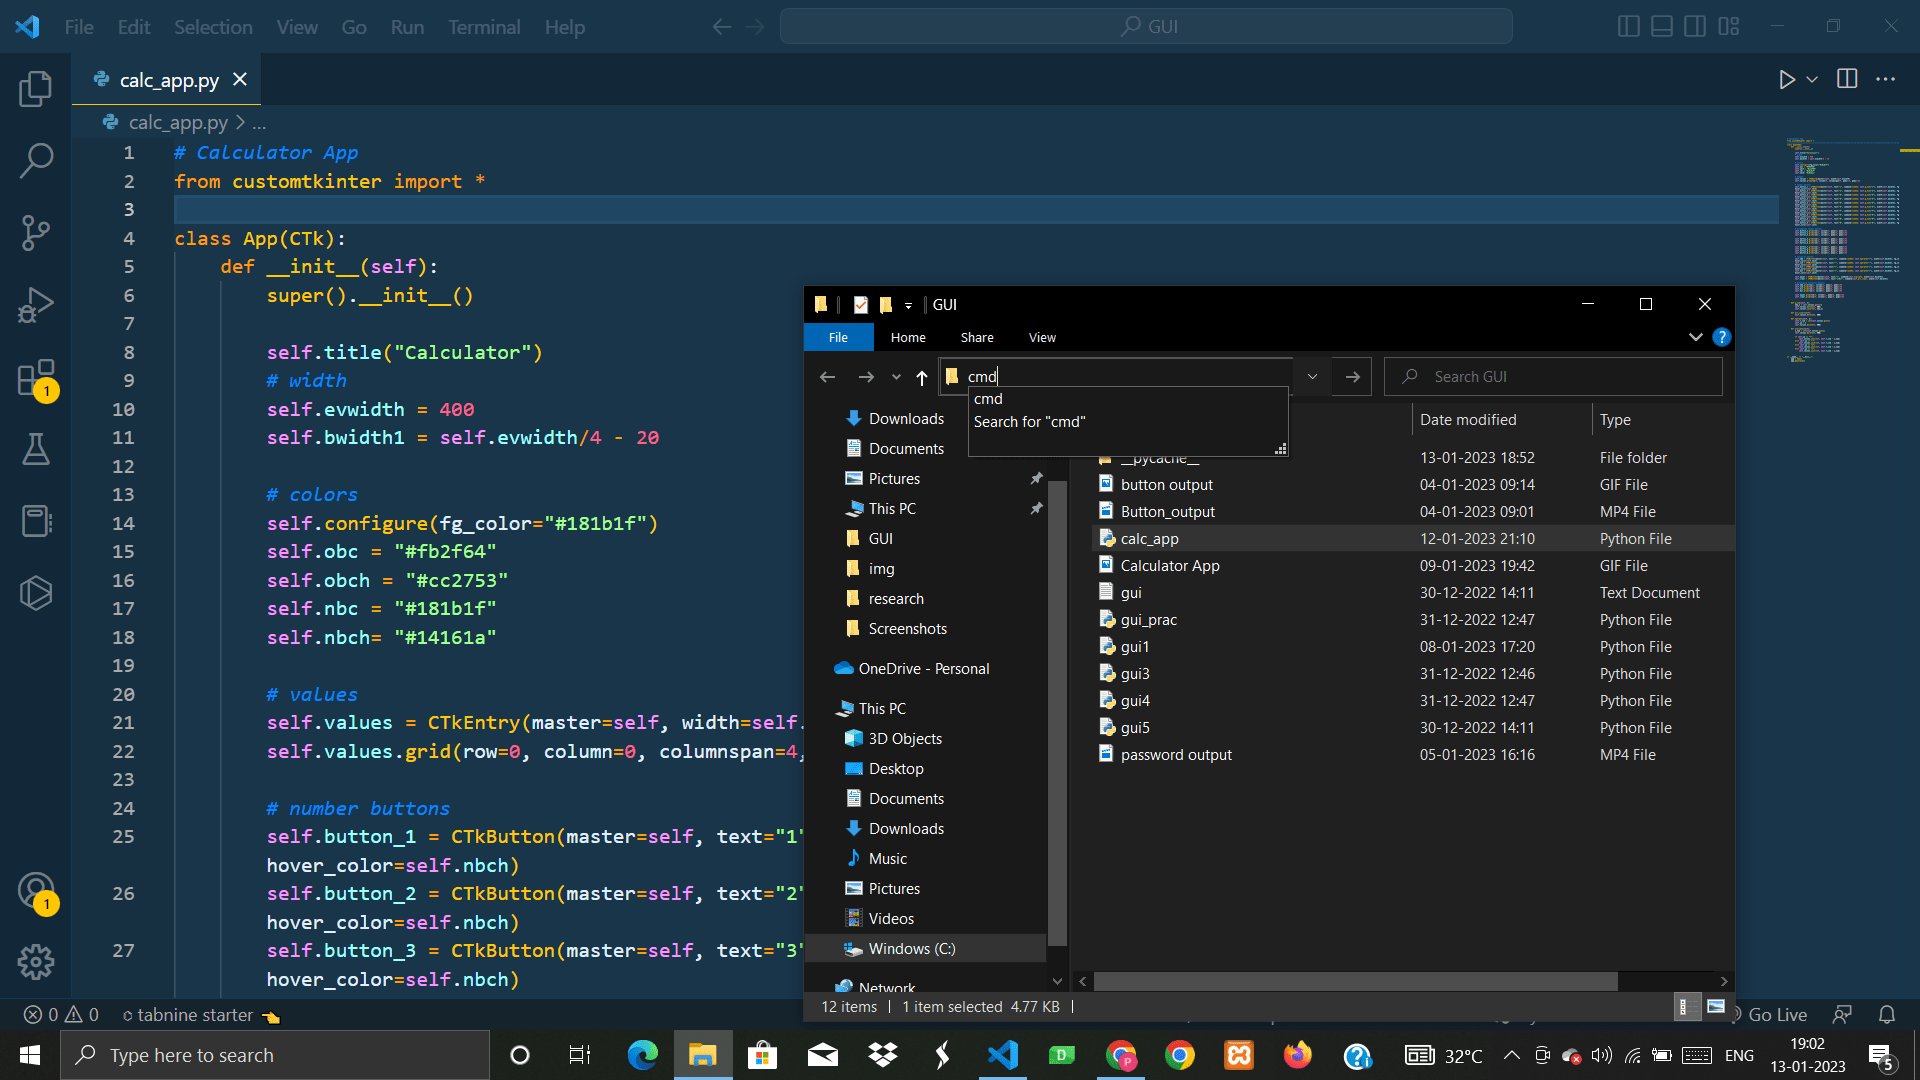
- First of all open a terminal in the folder where you have this file. To do it in VS Code just right click on the file and click reveal in file explorer:-

- Type cmd on location bar:- and press enter. Command Prompt will open.
- Install the
auto-py-to-exelibrary by typing in the terminal:-pip install auto-py-to-exe
- To use this library type:-
auto-py-to-exe- A new window like this would open:-
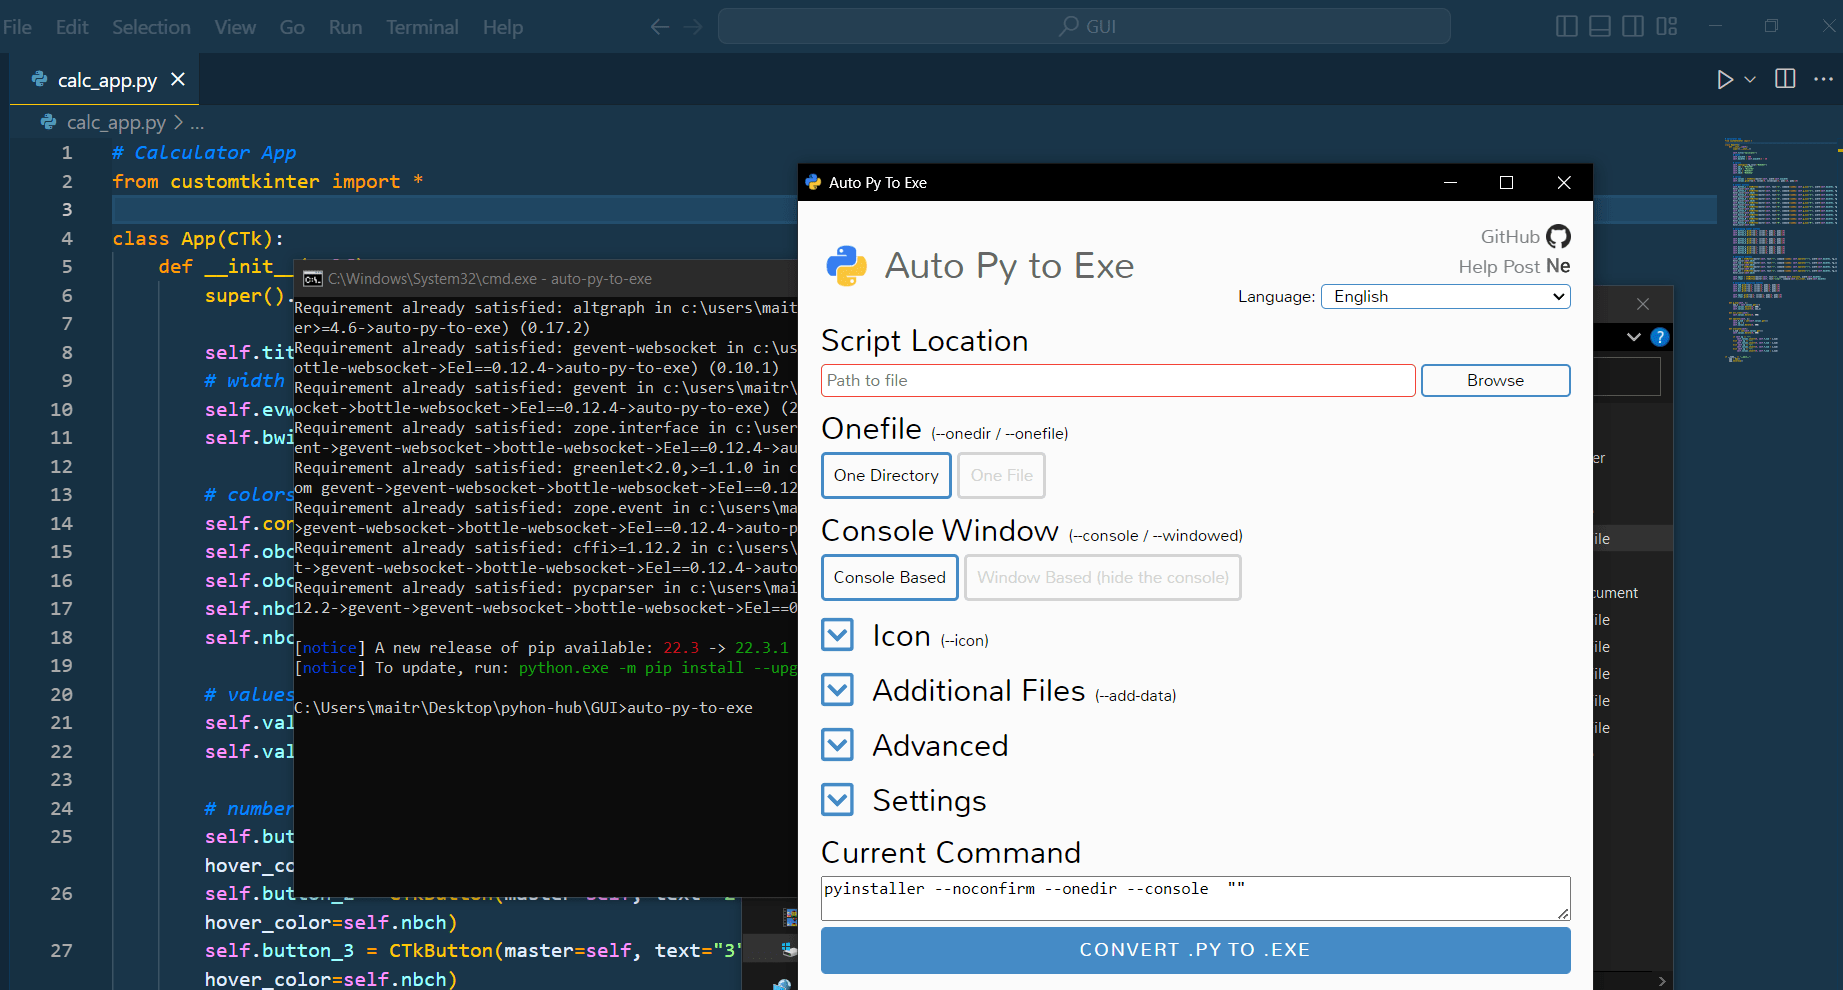
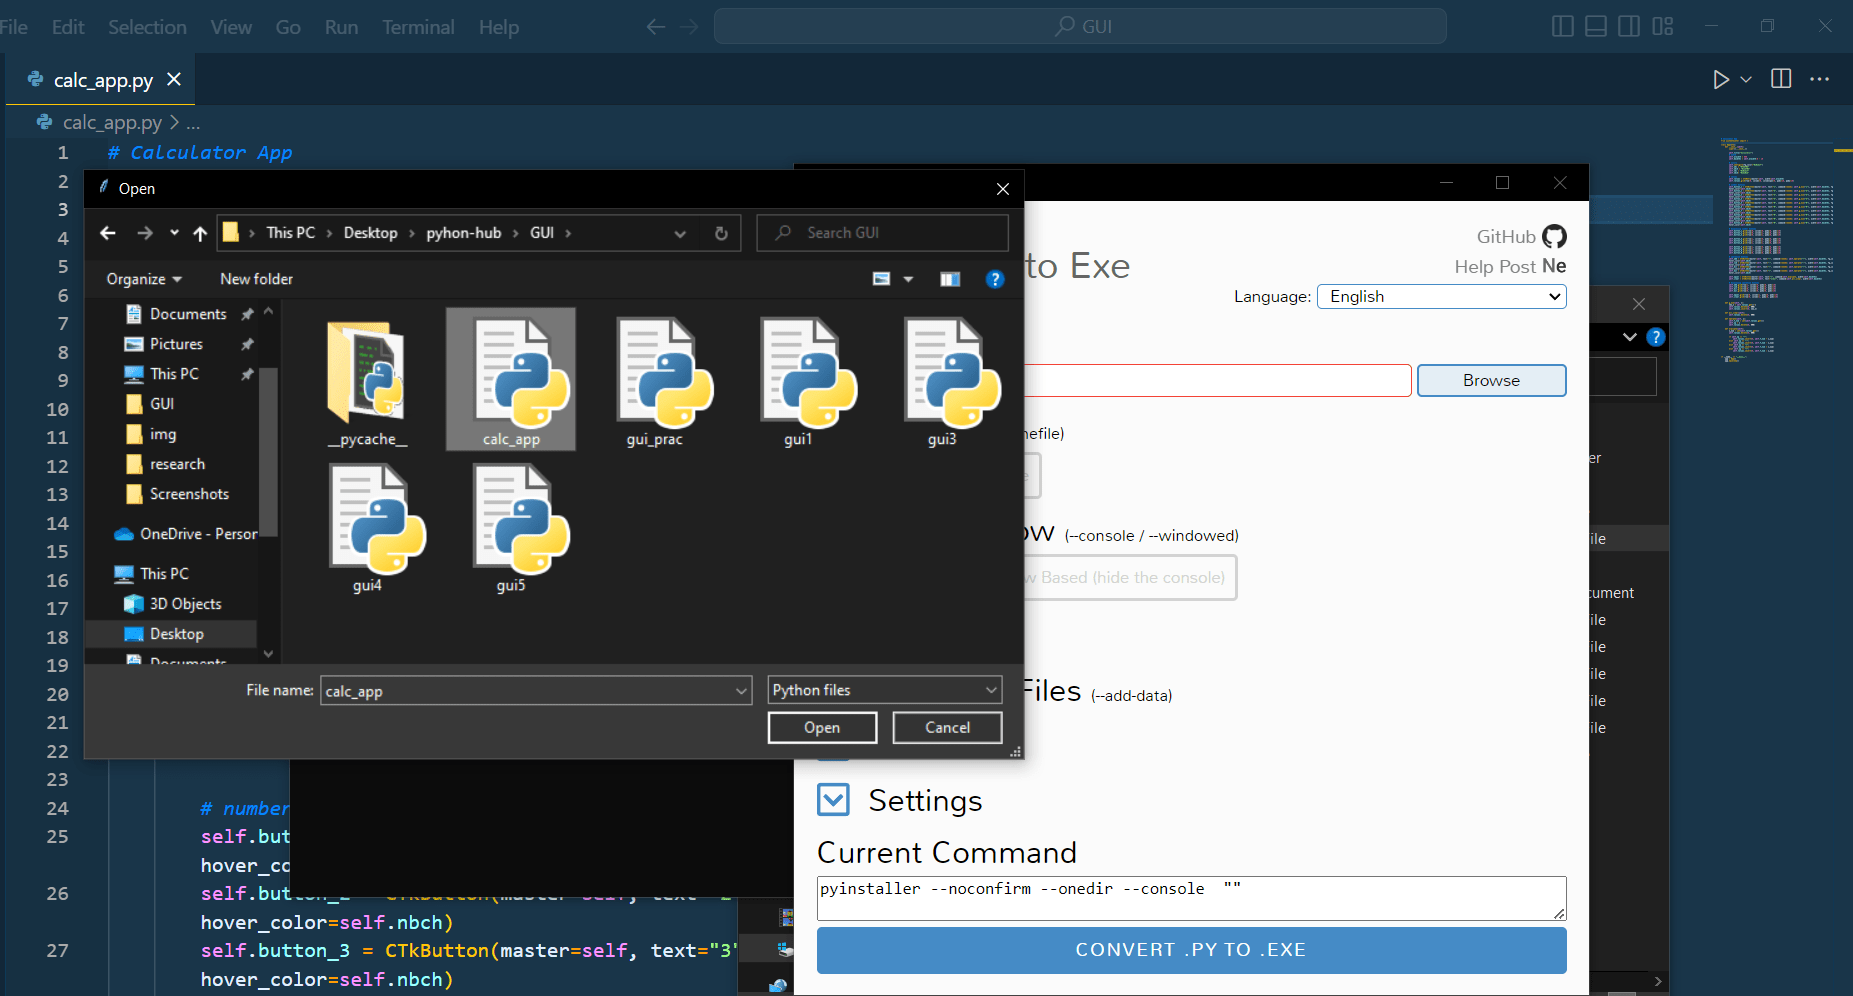
- Click on browse and find the file in which you have this code:-
- Next, click on Window based (hide the output) under console window
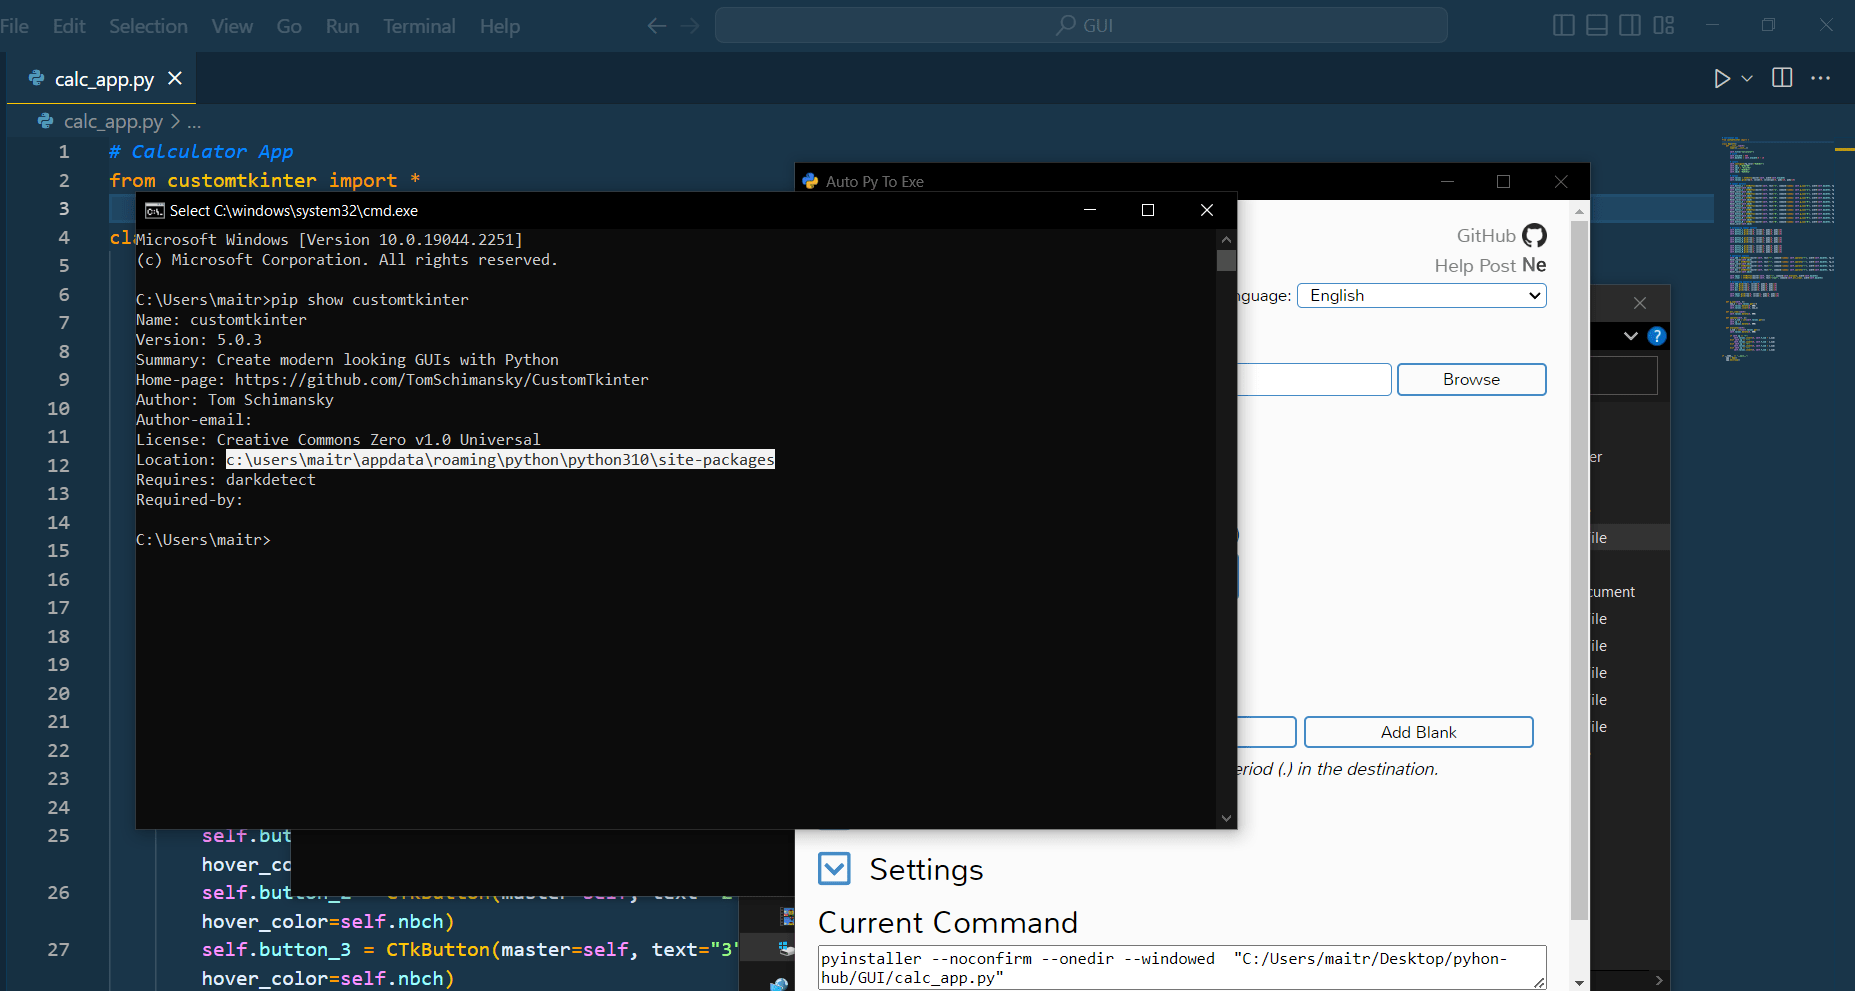
- Open a new window of the terminal and type:-
pip show customtkinter- copy the path shown in location:-
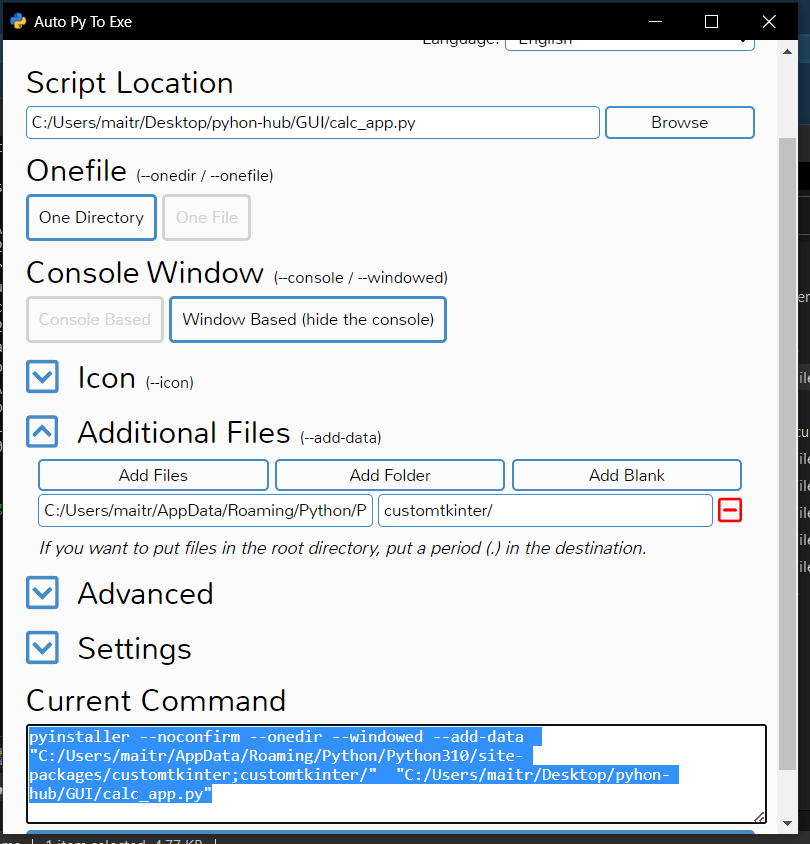
- Click on Add folder under additional files and paste this path on the location/path bar. Look for customtkinter folder and select it.

- This is how it should look. If it does click on “Convert .PY to .EXE” and wait:-
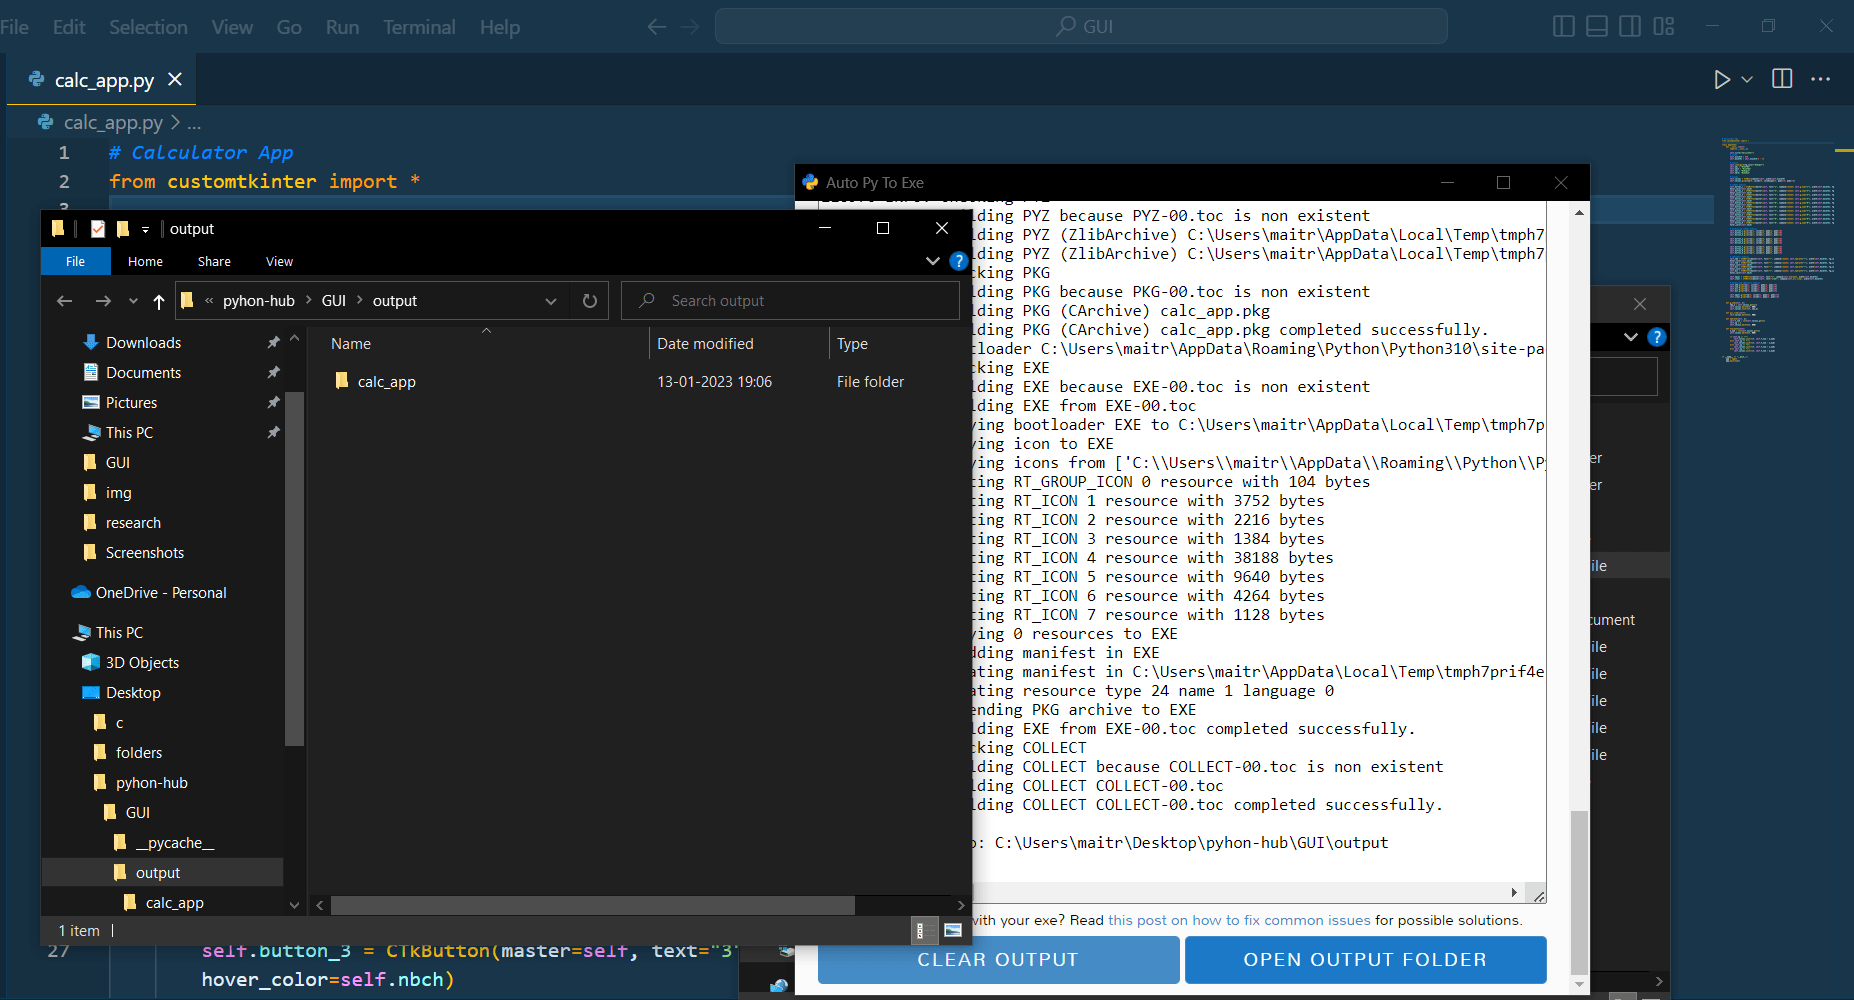
- When its done click on “Open Output Folder”
- In this folder search for the application file. Open it and your calculator app will function fine.

Now, you can share this folder with your friends and they can use this calculator app even if they don’t have python in their system.
Hope you all liked it (don’t say no🥺🙏)
Official documentation to convert a .py with customtkinter to an .exe
Full source code
Click here to view the full code.
# Calculator App
from customtkinter import *
class App(CTk):
    def __init__(self):
        super().__init__()
        self.title("Calculator")
        # width
        self.evwidth = 400
        self.bwidth1 = self.evwidth/4 - 20
        # colors
        self.configure(fg_color="#181b1f")
        self.obc = "#fb2f64"
        self.obch = "#cc2753"
        self.nbc = "#181b1f"
        self.nbch= "#14161a"
        # values
        self.values = CTkEntry(master=self, width=self.evwidth)
        self.values.grid(row=0, column=0, columnspan=4, padx=10, pady=10)
        # number buttons
        self.button_1 = CTkButton(master=self, text="1", command=lambda: self.g_num("1"), width=self.bwidth1, fg_color=self.nbc, hover_color=self.nbch)
        self.button_2 = CTkButton(master=self, text="2", command=lambda: self.g_num("2"), width=self.bwidth1, fg_color=self.nbc, hover_color=self.nbch)
        self.button_3 = CTkButton(master=self, text="3", command=lambda: self.g_num("3"), width=self.bwidth1, fg_color=self.nbc, hover_color=self.nbch)
        self.button_4 = CTkButton(master=self, text="4", command=lambda: self.g_num("4"), width=self.bwidth1, fg_color=self.nbc, hover_color=self.nbch)
        self.button_5 = CTkButton(master=self, text="5", command=lambda: self.g_num("5"), width=self.bwidth1, fg_color=self.nbc, hover_color=self.nbch)
        self.button_6 = CTkButton(master=self, text="6", command=lambda: self.g_num("6"), width=self.bwidth1, fg_color=self.nbc, hover_color=self.nbch)
        self.button_7 = CTkButton(master=self, text="7", command=lambda: self.g_num("7"), width=self.bwidth1, fg_color=self.nbc, hover_color=self.nbch)
        self.button_8 = CTkButton(master=self, text="8", command=lambda: self.g_num("8"), width=self.bwidth1, fg_color=self.nbc, hover_color=self.nbch)
        self.button_9 = CTkButton(master=self, text="9", command=lambda: self.g_num("9"), width=self.bwidth1, fg_color=self.nbc, hover_color=self.nbch)
        self.button_0 = CTkButton(master=self, text="0", command=lambda: self.g_num("0"), width=self.bwidth1, fg_color=self.nbc, hover_color=self.nbch)
        # displaying number buttons
        self.button_1.grid(row=3, column=0, pady=5, padx=10)
        self.button_2.grid(row=3, column=1, pady=5, padx=10)
        self.button_3.grid(row=3, column=2, pady=5, padx=10)
        self.button_4.grid(row=2, column=0, pady=5, padx=10)
        self.button_5.grid(row=2, column=1, pady=5, padx=10)
        self.button_6.grid(row=2, column=2, pady=5, padx=10)
        self.button_7.grid(row=1, column=0, pady=5, padx=10)
        self.button_8.grid(row=1, column=1, pady=5, padx=10)
        self.button_9.grid(row=1, column=2, pady=5, padx=10)
        self.button_0.grid(row=4, column=0, pady=5, padx=10)

        # operation buttons
        self.add = CTkButton(master=self, text="+", command=lambda: self.operate("+"), width=self.bwidth1, fg_color=self.obc, hover_color=self.obch)
        self.sub = CTkButton(master=self, text="-", command=lambda: self.operate("-"), width=self.bwidth1, fg_color=self.obc, hover_color=self.obch)
        self.div = CTkButton(master=self, text="/", command=lambda: self.operate("/"), width=self.bwidth1, fg_color=self.obc, hover_color=self.obch)
        self.mul = CTkButton(master=self, text="*", command=lambda: self.operate("*"), width=self.bwidth1, fg_color=self.obc, hover_color=self.obch)
        self.equal = CTkButton(master=self, text="=", command=self.evaluate, width=self.bwidth1)
        self.clear = CTkButton(master=self, text="clear", command=self.all_clear, width=self.bwidth1)
        # displaying operation buttons
        self.add.grid(row=1, column=3, pady=5, padx=10)
        self.sub.grid(row=2, column=3, pady=5, padx=10)
        self.div.grid(row=3, column=3, pady=5, padx=10)
        self.mul.grid(row=4, column=3, pady=5, padx=10)
        self.equal.grid(row=4, column=1, pady=5, padx=10)
        self.clear.grid(row=4, column=2, pady=5, padx=10)

    def g_num(self, n):
        new_n = self.values.get()+n
        self.values.delete(0, END)
        self.values.insert(0, new_n)
    def all_clear(self):
        self.values.delete(0, END)
    def operate(self, o):
        self.f_num = int(self.values.get())
        self.op = o
        self.values.delete(0, END)
    def evaluate(self):
        s_num = int(self.values.get())
        self.values.delete(0, END)
        if self.op == "+":
            self.values.insert(0, self.f_num + s_num)
        elif self.op == "-":
            self.values.insert(0, self.f_num - s_num)
        elif self.op == "*":
            self.values.insert(0, self.f_num * s_num)
        elif self.op == "/":
            self.values.insert(0, self.f_num / s_num)
if __name__ == "__main__":
    app = App()
    app.mainloop()
Conclusion
In this post, we made a calculator app🧮. We used CTk library for this purpose.
We made our calculator app in three major steps:-
- Setting up a basic structure,
- Creating the entry widget and buttons, and
- Making all the functions.
As a part of the surprise, we converted this to a desktop application that can be used even when python is not installed in the system.
Hope 🤞 you all enjoyed making this calculator app with me.😊
Challenge 🧗♀️
Your challenge is to create a Login form CustomTkinter.
You need to input mail ID and password.
Then match this with the correct ones when button is pressed.
Keep it simple no need to deal with multiple IDs and passwords.
Hints:
You will need:
- 2 entry widgets
- 1 Button
- And a function to compare the ID and password with the correct ones.
- use pack and don’t give any custom size or color.
I’ll see you in the next post with some more exciting things that you can do with this library.
Till then solve the challenge and have a great time😊. Bye Bye👋


Very cool
Glad you liked it 😊.
Hello world hahaha