Hello, Pythonistas Welcome Back. Today we will see how to make modern checkboxes in Python CustomTkiner.
We will use the CTkCheckBox Widget.
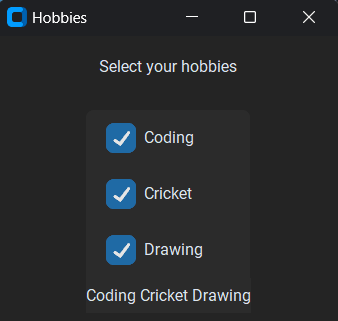
We will make a simple hobby selector for showcasing its use case.
Contents
How Does It Look?

Basic Code
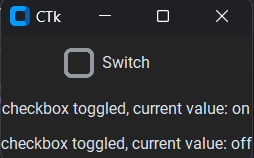
This is how you can make a simple CheckBox in CustomTkinter (or CTk).
# Create a custom application class "App" that inherits from CTk (Custom Tkinter)
class App(CTk):
    # Constructor of the class
    def __init__(self):
        # Call the constructor of the parent class (CTk) using super()
        super().__init__()

        # Create a StringVar to hold the value (initially empty)
        self.check_var = StringVar()
        # Create a CTkCheckBox widget with text "Switch"
        # When the checkbox is toggled, the self.checkbox_event method will be called
        # The checkbox's variable is self.check_var, and its values are "on" (checked) and "off" (unchecked)
        self.checkbox = CTkCheckBox(self, text="Switch", command=self.checkbox_event,
                                            variable=self.check_var, onvalue="on", offvalue="off")
        # Pack the checkbox widget, adding padding around it
        self.checkbox.pack(padx=10, pady=10)

    # Method to handle the checkbox toggle event
    def checkbox_event(self):
        # Create a new CTkLabel widget and display the current value of the checkbox
        label = CTkLabel(self, text=f"checkbox toggled, current value: {self.check_var.get()}")
        label.pack()

# Create an instance of the custom application class "App"
app = App()
app.mainloop()
Like any other widget in CTk, it is first created and then it is pushed to the window.
But, that’s not it. You need a StringVar or an IntVar To keep a check on its current value. You can’t use a normal Python Variable for this purpose.
As it is like a button you can give it a command function to shoot when you check or uncheck it.
It takes a compulsory argument master. This will specify where it will stay.
A Sample Modern CTkCheckBox
We will see how we can make a simple program that displays selected hobbies.

We would need:
- A label to let the user know what to do
- A frame to hold checkboxes
- 3 checkboxes (You can have more or less)
- A label to display selected hobbies.
Simple that’s all!
# Create a custom application class "Hobbies" that inherits from CTk (Custom Tkinter)
class Hobbies(CTk):
    # Constructor of the class
    def __init__(self):
        # Call the constructor of the parent class (CTk) using super()
        super().__init__()
        self.title("Hobbies")

        # Create a label to display "Select your hobbies"
        self.display_label = CTkLabel(self, text="Select your hobbies")
        self.display_label.pack(padx=10, pady=10)

        # Create a frame to hold the checkboxes
        self.frame =CTkFrame(self)
        self.frame.pack(padx=70, pady=10)

        # Create a StringVar to store the value of the first hobby (initially empty)
        self.hobby1 = StringVar()
        # Create a CTkCheckBox for "Coding"
        # When the checkbox is toggled, the self.hobby() method will be called
        # The checkbox's variable is self.hobby1, and its values are "Coding" (checked) and "" (unchecked)
        self.hobby1_cb = CTkCheckBox(self.frame, text="Coding", command=self.hobby,
                                            variable=self.hobby1, onvalue="Coding", offvalue="")
        self.hobby1_cb.grid(row=0, padx=10, pady=10)

        # Create a StringVar to store the value of the second hobby (initially empty)
        self.hobby2 = StringVar()
        # Create a CTkCheckBox for "Cricket"
        # When the checkbox is toggled, the self.hobby() method will be called
        # The checkbox's variable is self.hobby2, and its values are "Cricket" (checked) and "" (unchecked)
        self.hobby2_cb = CTkCheckBox(self.frame, text="Cricket", command=self.hobby,
                                            variable=self.hobby2, onvalue="Cricket", offvalue="")
        self.hobby2_cb.grid(row=1, padx=10, pady=10)

        # Create a StringVar to store the value of the third hobby (initially empty)
        self.hobby3 = StringVar()
        # Create a CTkCheckBox for "Drawing"
        # When the checkbox is toggled, the self.hobby() method will be called
        # The checkbox's variable is self.hobby3, and its values are "Drawing" (checked) and "" (unchecked)
        self.hobby3_cb = CTkCheckBox(self.frame, text="Drawing", command=self.hobby,
                                            variable=self.hobby3, onvalue="Drawing", offvalue="")
        self.hobby3_cb.grid(row=2, padx=10, pady=10)

        # Create a label to display the selected hobbies
        self.label= CTkLabel(self.frame, text="")
        self.label.grid(row=3)

    # Method to handle the checkbox toggle event
    def hobby(self):
        # Destroy the existing label to clear its contents
        self.label.destroy()

        # Create a new label to display the selected hobbies
        self.label = CTkLabel(self.frame, text=f"{self.hobby1.get()} {self.hobby2.get()} {self.hobby3.get()}")
        self.label.grid(row=3)

# Create an instance of the custom application class "Hobbies"
app = Hobbies()
# Start the main event loop of the application
app.mainloop()
You can also add these configurations using the configure() method of CTkCheckBox. Provide attributes in attribute=”value”. Only if the value will be a string.
All Configurations
Here are a few configurations you can add:
| argument | value |
|---|---|
| master | Where to place it. (window, or frame) |
| width | width of complete widget (in px) |
| height | height of complete widget (in px) |
| fg_color | color of the box |
| border_color | color of box’s border |
| hover_color | color of box when you hover over it |
| text_color | color of the text displayed on its side |
| text_color_disabled | color of text when you have disabled the box. Which means it can no longer be selected |
| textvariable | The variable we defined here to keep track of checkbox state. (This can keep track of StringVar only) |
| hover | to decide whether you want to enable hover effects or not. Set True (default) if yes else False. |
| state | To make the box selectable or not. NORAML(default) for allowing selection and DISABLED for not allowing selection. |
| command | function will be called when the box or text on its side is clicked |
| variable | It is used to keep track of the state. (on or off) just like textvariable. But supports IntVar too. |
| onvalue | string or int for variable in checked state |
| offvalue | string or int for variable in unchecked state |
I am not going to give any challenges at the end of such articles as they are just for your quick reference.
Note I haven’t included all the methods and attributes. You can always get that on the documentation.


whoah this blog is fantastic i like reading your articles. Keep up the great work! You realize, lots of people are hunting around for this information, you could help them greatly.
My brother recommended I might like this blog.
He was totally right. This post actually made my day.
You cann’t imagine simply how much time I had spent for this information! Thanks!
thanks a lot!
I likewise believe thus, perfectly composed post! .
Thank you!