Hello, Pythonistas Welcome Back. Today we will see how to make a fully functional modern Button in CustomTkinter.
We will use the CTkButton Widget.
Contents
How Does It Look?
Basic Code
This is how you can make a simple button in CustomTkinter (or CTk).
from customtkinter import *

# Either this way
app = CTk()
button = CTkButton(app)
button.pack(padx = 10, pady = 10)
app.mainloop()

# Or this way
# In OOP
class App(CTk):
    def __init__(self):
        super().__init__()

        self.button = CTkButton(self)
        self.button.pack(padx = 10, pady = 10)


if __name__ == "__main__":
    app = App()
    app.mainloop()
Don’t write both together.
Here I have shown how to make and display a button in CTk.
Like any other widget in CTk, a button is first created and then it is pushed to the window.
It takes a compulsory argument master. This will specify where the button will stay.
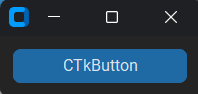
A Sample Modern CTkButton
We will see how you can make a button similar to the one on this website’s homepage using CTkButton.
We would need to set a few configurations to make it done:
class App(CTk):
    def __init__(self):
        super().__init__()

        self.button = CTkButton(
            self, text="Blogs", #Text to be displayed
            fg_color="#ec3642", #color of the button
            hover_color="white", #color of the button when mouse is over
            font=("Montserrat", 16), #font used
            corner_radius=12, width=100, #radius of edges and total width
            command=self.open) #Command to run when button is clicked
        self.button.pack(padx = 10, pady = 10)

    def open(self):
        import webbrowser #library to open a specific URL
        # Opening the given link.
        webbrowser.open("https://python-hub.com/")

if __name__ == "__main__":
    app = App()
    app.mainloop()
You can also add these configurations using the configure() method of CTkButton. Provide attributes in attribute=”value”. Only if the value will be a string.
You can add any of the functions to be executed in the command argument.
To make it an exit button you can write self.quit.
All Configurations
Here are a few configurations you can add to the button:
| Argument | Value |
|---|---|
| master | This is where the button will be displayed |
| width | provide width in px |
| height | provide height in px |
| corner_radius | provide corner radius in px |
| border_width | button border’s width in px |
| fg_color | button’s color |
| hover_color | button’s color on mouse hover |
| border_color | border’s color |
| text_color | Color of text in the button |
| text_color_disabled | text color when button is disabled |
| text | text color when the button is disabled |
| font | font of button text, tuple: (“font_name”, size) |
| image | To put an image on the button, it removes the text, image must be an instance of the class PhotoImage |
| state | “normal” or “disabled” (can’t click it, darker in color) |
| hover | To all effects on hover: True, else False |
| command | function to be executed on button click |
I am not going to give any challenges at the end of such articles as they are just for your quick reference.
Note I haven’t included all the methods and attributes. You can always get that on the documentation.
To see the button widget in the tkinter click here.