Bringing Conversations to Connect: Implementing Comments & Fixing Bugs!
Contents
Bringing Conversations to Connect: Implementing Comments & Fixing Bugs!
🚀 Planning the Revamp of Connect
We’re giving Connect a fresh identity! Instead of being just another social app, Connect will now be a photo progress-sharing platform.
Why the Change?
I find that regular social apps already fulfill their purpose. What I plan to do is create a space to document my journey in an *aesthetic* and structured way.
So, whether you’re:
🎨 Painting, 💻 Coding, 📚 Studying, or 🏋️♂️ Working out—Connect will help you visually track your progress, stay accountable, and get inspired by others.
New Features Coming Soon:
✅ Collections – Categorize your photos into different progress journals
🔒 Privacy Controls – Make posts public or private (private posts are only visible to followers)
🧭 Better Navigation – Smoother UI & UX for an intuitive experience
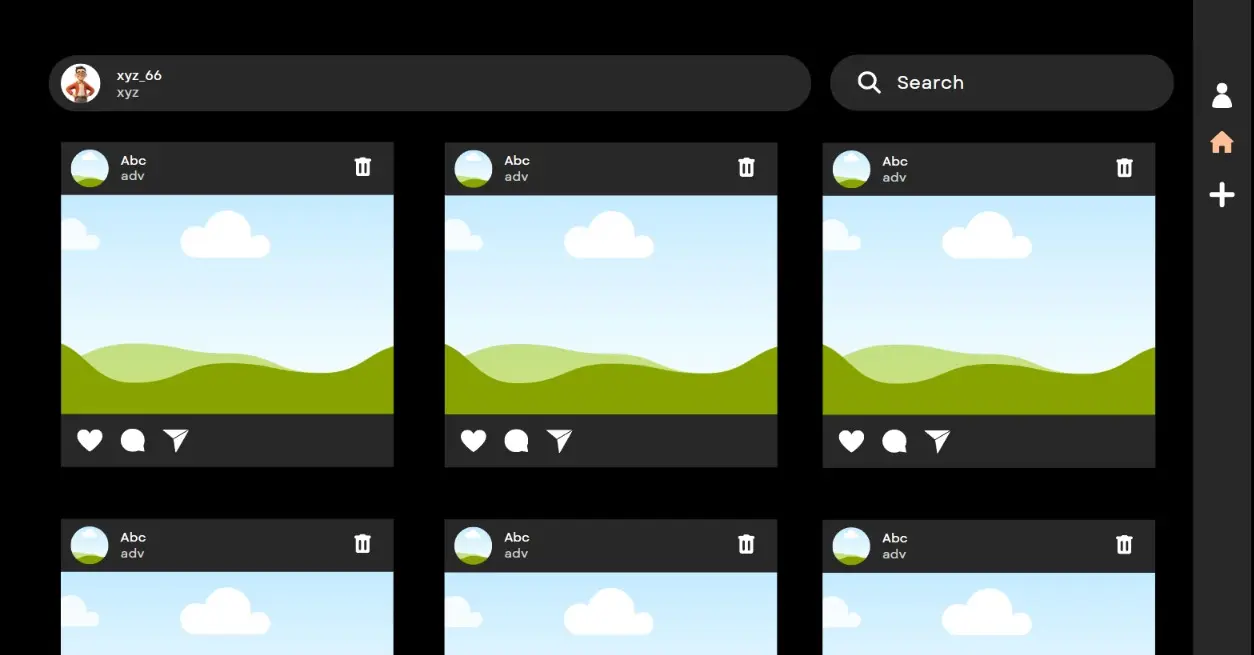
🚀 Here’s a sneak peek at what’s changing:
Have any suggestions? Drop them in the comments! I’d love to hear your thoughts.
🐞 Step 1: Bug Fixes & Log Out Button
Bringing Conversations to Connect: Implementing Comments & Fixing Bugs! Bringing Conversations to Connect: Implementing Comments & Fixing Bugs! Bringing Conversations to Connect: Implementing Comments & Fixing Bugs! Bringing Conversations to Connect: Implementing Comments & Fixing Bugs!
1️⃣ Fixing the Like Feature
I made a silly mistake by calling fetchallposts in the UI components of posts.
Remove that.
Also, the like feature was causing bugs.
- The first thing I forgot to mention was that add likes field to all the existing posts in firebase database manually.
- Then modify the
copywithmethod as we will be toggling likes also modifyfromjsonto handle empty likes.
//copywith
likes: likes ?? this.likes,
//fromjson
likes: List<String>.from(json['likes'] ?? []),
The likes feature should work fine after this.
2️⃣ Adding the Log Out Button
To allow users to log out, just add this to the sidebar:
SidebarXItem(
          icon: Icons.logout,
          label: 'Log Out',
          onTap: () {
            context.read<CAuthCubit>().logout();
          },
        )
✅ Test it on both web and mobile to make sure it works!
💬 Step 2: Creating the Comment Entity
Bringing Conversations to Connect: Implementing Comments & Fixing Bugs! Bringing Conversations to Connect: Implementing Comments & Fixing Bugs! Bringing Conversations to Connect: Implementing Comments & Fixing Bugs! Bringing Conversations to Connect: Implementing Comments & Fixing Bugs!
Instead of adding comments directly inside the Post Entity, we’ll create a separate Comment Entity to keep things clean.
Comment Entity Fields:
🆔 id – Unique comment ID
📌 postId – ID of the post the comment belongs to
👤 userId – ID of the user who commented
✏️ commentText – The actual comment
⏳ timestamp – When the comment was posted
➡️Click To View The Comment Entity
import 'package:cloud_firestore/cloud_firestore.dart';

class CComment {
  final String id;
  final String postId;
  final String userId;
  final String userName;
  final String text;
  final DateTime timestamp;

  CComment({
    required this.id,
    required this.postId,
    required this.userId,
    required this.userName,
    required this.text,
    required this.timestamp,
  });

  // comment to json
  Map<String,dynamic> toJson() {
    return {
      'id':id,
      'postId': postId,
      'userId': userId,
      'userName': userName,
      'text':text,
      'timestamp': Timestamp.fromDate(timestamp),
    };
  }

  // json to comment
  factory CComment.fromJson(Map<String, dynamic> json) {
    return CComment(
      id: json['id'],
      postId: json['postId'],
      userId: json['userId'],
      userName: json['userName'],
      text: json['text'],
      timestamp: (json['timestamp'] as Timestamp).toDate()
    );
  }
}
📝 Step 3: Adding Comments to the Post Entity
Now that we have a Comment Entity, let’s modify the Post Entity to hold comments.
1️⃣ Add an empty comments list to all existing posts in Firebase.
2️⃣ Modify the Post Entity to include comments
3️⃣ Update the constructor, copyWith, toJson, and fromJson methods to handle comments correctly
4️⃣ Update fromJson to convert Firebase’s list of maps into a list of Comment objects
CPost copyWith({String? imageUrl, String? imageId, List<String>? likes, List<CComment>? comments}) {
    return CPost(
      id: id,
      userId: userId,
      userName: userName,
      text: text,
      imageUrl: imageUrl ?? this.imageUrl,
      imageId: imageId ?? this.imageId,
      timestamp: timestamp,
      likes: likes ?? this.likes,
      comments: comments?? this.comments,
    );
  }

  Map<String, dynamic> toJson() {
    return {
      'id':id,
      'userId':userId,
      'userName':userName,
      'text':text,
      'imageUrl':imageUrl,
      'imageId':imageId,
      'timestamp':Timestamp.fromDate(timestamp),
      'likes': likes,
      'comments': comments.map((comment) => comment.toJson()).toList(),
    } ;
  }

  factory CPost.fromJson(Map<String,dynamic> json) {
    final List<CComment> comments = (json['comments'] as List<dynamic>?)?.map((commentJson)=> CComment.fromJson(commentJson)).toList()??[];

    return CPost(
      id: json['id'],
      userId: json['userId'],
      userName: json['userName'],
      text: json['text'],
      imageUrl: json['imageUrl'],
      imageId: json['imageId'],
      timestamp: (json['timestamp'] as Timestamp).toDate(),
      likes: List<String>.from(json['likes'] ?? []),
      comments: comments,
    );
  }
Bringing Conversations to Connect: Implementing Comments & Fixing Bugs! Bringing Conversations to Connect: Implementing Comments & Fixing Bugs! Bringing Conversations to Connect: Implementing Comments & Fixing Bugs! Bringing Conversations to Connect: Implementing Comments & Fixing Bugs!
5️⃣ Modify the Create Post Page to ensure all new posts are created with an empty list of comments
comments: [],✅ Test if everything loads properly without producing any errors.
🔥 Step 4: Adding Comment Functionality in Firebase Repo
Time to make comments work!
We’ll add two new methods in the Post Repo:
1️⃣ addComment(postId, comment) – Fetch the post, add the new comment, and update Firestore.
2️⃣ deleteComment(postId, commentId) – Remove the selected comment from Firestore.
Now let’s implement these methods in Firebase post repo.
@override
  Future<void> addComment(String postId, CComment comment) async {
    try {
      // get the post doc
      final postDoc = await postsCollection.doc(postId).get();

      if(postDoc.exists) {
        // json to object
        final post = CPost.fromJson(postDoc.data() as Map<String, dynamic>);

        // add the comment
        post.comments.add(comment);

        // update in firebase
        await postsCollection.doc(postId).update({
          'comments': post.comments.map((comment) => comment.toJson()).toList()
        });
      }
      else {
        throw Exception("Post not Found");
      }
    }
    catch (e) {
      throw Exception("Error adding comment: $e");
    }
  }

  @override
  Future<void> deleteComment(String postId, String commentId) async {
    try {
      // get the post doc
      final postDoc = await postsCollection.doc(postId).get();

      if(postDoc.exists) {
        // json to object
        final post = CPost.fromJson(postDoc.data() as Map<String, dynamic>);

        // add the comment
        post.comments.removeWhere((comment) => comment.id == commentId);

        // update in firebase
        await postsCollection.doc(postId).update({
          'comments': post.comments.map((comment) => comment.toJson()).toList()
        });
      }
      else {
        throw Exception("Post not Found");
      }
    }
    catch (e) {
      throw Exception("Error deleting comment: $e");
    }
  }
✅ Update Firestore: Add an empty comments array in all existing posts.
🔍 Test if adding and deleting comments works fine!
🖥️ Step 5: Building the Comment UI (Mobile & Desktop)
Now, let’s bring comments to life in the UI!
1️⃣ Post Cubit Updates:
- Add methods to add and delete comments.
// add a comment to the post
  Future<void> addComment(String postId, CComment comment) async {
    try {
      await postRepo.addComment(postId, comment);
      await fetchAllPosts();
    }
    catch (e) {
      emit(CPostsErrorState("Failed to add comment: $e"));
    }
  }

  // delete a comment from the post
  Future<void> deleteComment(String postId, String commentId) async {
    try {
      await postRepo.deleteComment(postId, commentId);
      await fetchAllPosts();
    }
    catch (e) {
      emit(CPostsErrorState("Failed to delete comment: $e"));
    }
  }
2️⃣ Implement Comment UI:
- Open a dialog box when the user clicks on the comment icon.
- Take the comment input and send it to the cubit’s method.
- Dynamically update the comment count.
➡️Click To View The Methods And Variables
late String currentUserId;
  late String ccurrentUserId;
  late String currentUserName;
  late final CPostCubit postCubit;
  final commentController = TextEditingController();

  @override
  void initState() {
    super.initState();
    // Get current user's ID from Firebase Auth
    currentUserId = FirebaseAuth.instance.currentUser?.uid ?? "";
    postCubit = context.read<CPostCubit>();
    final authCubit = context.read<CAuthCubit>();
    final user = authCubit.currentUser;
    ccurrentUserId = user?.uid ?? "";
    currentUserName = user?.name ?? "Anonymous";
  }

  void openNewCommentBox() {
    showDialog(
        context: context,
        builder: (context) => AlertDialog(
              content: CBioInputField(
                bioController: commentController,
                text: "Type a Comment",
              ),
              actions: [
                // cancel
                TextButton(
                    child:  Text("Cancel", style: TextStyle(color: Theme.of(context).colorScheme.inversePrimary)),
                    onPressed: () => Navigator.of(context).pop()),
                // save
                TextButton(
                    onPressed: () {
                      addComment();
                      Navigator.of(context).pop();
                    },
                    child:  Text("Save", style: TextStyle(color: Theme.of(context).colorScheme.inversePrimary))),
              ],
            ));
  }

  void addComment() {
    // make a comment
    final newComment = CComment(
        id: DateTime.now().millisecondsSinceEpoch.toString(),
        postId: widget.post.id,
        userId: currentUserId,
        userName: currentUserName,
        text: commentController.text,
        timestamp: DateTime.now());

    // add comment using cubit
    if (commentController.text.isNotEmpty) {
      postCubit.addComment(widget.post.id, newComment);
    }
  }
Add a caption Section:
// add this below the existing post_desktop_ui
// Caption:
Row(
  children: [
     Text(
      widget.post.userName,
      style: TextStyle(fontWeight: FontWeight.bold),
     ),
     SizedBox(
      width: 10,
     ),
     Text(widget.post.text)
   ],
),
Now let’s add a comment section:
➡️Click To View The Code
// comment section
          BlocBuilder<CPostCubit, CPostState>(builder: (context, state) {
          if (state is CPostsLoadedState) {
            final post = state.posts.firstWhere((p) => p.id == widget.post.id);
            if (post.comments.isNotEmpty) {
              int commentCount = post.comments.length;

              int showCommentCount = post.comments.length;
              if(showCommentCount >1) {
                showCommentCount = 1;
              } // Show only first

              return Column(
                children: [
                  ListView.builder(
                    shrinkWrap: true,
                    physics: NeverScrollableScrollPhysics(),
                    itemCount: showCommentCount,
                    itemBuilder: (context, index) {
                      final comment = post.comments[index];
                       return CCommentTile(
                        comment: comment,
                        currentUserId: currentUserId,
                        postId: widget.post.id,
                      );
                    },
                  ),
                  if (commentCount > 1)
                    TextButton(
                      onPressed: () => showAllCommentsDialog(post.comments),
                      child: Text("Read More", style: TextStyle(color: Theme.of(context).colorScheme.inversePrimary),),
                    ),
                ],
              );
            }
          }
          return SizedBox();
        }),
➡️Click To View Explanation
1️⃣ Using BlocBuilder to Fetch Comments Dynamically
BlocBuilder<CPostCubit, CPostState>(builder: (context, state) {- This
BlocBuilderlistens for changes inCPostCubit. - It rebuilds the comment section whenever there’s a change in the post’s state (e.g., when a new comment is added or deleted).
2️⃣ Getting the Current Post from the State
if (state is CPostsLoadedState) {
final post = state.posts.firstWhere((p) => p.id == widget.post.id);- First, it checks if the posts have been successfully loaded (
CPostsLoadedState). - It then finds the specific post matching
widget.post.idfrom the list of posts. - This ensures the comment section displays the correct comments for the corresponding post.
3️⃣ Counting & Displaying Comments
if (post.comments.isNotEmpty) {
  int commentCount = post.comments.length;
  int showCommentCount = post.comments.length;
  if (showCommentCount > 1) {
    showCommentCount = 1;
} // Show only first - It checks if there are any comments. If not, it doesn’t display anything.
commentCountholds the total number of comments.showCommentCountdetermines how many comments to initially display (only one comment for now).- If there are multiple comments, it restricts the default view to only one to keep the UI clean.
4️⃣ Displaying the First Comment
ListView.builder(
  shrinkWrap: true,
  physics: NeverScrollableScrollPhysics(),
  itemCount: showCommentCount,
  itemBuilder: (context, index) {
    final comment = post.comments[index];
    return CCommentTile(
      comment: comment,
      currentUserId: currentUserId,
      postId: widget.post.id,
    );
  },
),
- Uses
ListView.builderto dynamically generate the comment list. shrinkWrap: trueprevents unnecessary scrolling inside another scrollable widget.NeverScrollableScrollPhysics()ensures that the list does not interfere with the main post scroll.- It loops through the available comments (only one is shown by default).
- Each comment is passed to the
CCommentTilecomponent for rendering.
5️⃣ “Read More” Button for Additional Comments
if (commentCount > 1)
  TextButton(
    onPressed: () => showAllCommentsDialog(post.comments),
    child: Text("Read More", style: TextStyle(color: Theme.of(context).colorScheme.inversePrimary)),
  ),
Clicking this button calls showAllCommentsDialog(post.comments), which likely opens a dialog box displaying all comments for the post.
If there are more than 1 comments, a “Read More” button appears.
Here’s the comment Tile:
import 'package:connect/features/post/domain/entities/comment.dart';
import 'package:connect/features/post/presentation/cubits/post_cubit.dart';
import 'package:flutter/material.dart';
import 'package:flutter_bloc/flutter_bloc.dart';

class CCommentTile extends StatelessWidget {
  final CComment comment;
  final String currentUserId; // Pass current user ID
  final String postId; // Post ID is needed to delete the comment

  const CCommentTile({
    super.key,
    required this.comment,
    required this.currentUserId,
    required this.postId,
  });

  @override
  Widget build(BuildContext context) {
    return Row(
      children: [
        // Name
        Text(comment.userName, style: TextStyle(fontWeight: FontWeight.bold)),
        const SizedBox(width: 10),

        // Comment Text
        Text(comment.text),

        // Delete Button (only visible if the current user is the author)
        if (comment.userId == currentUserId)
          IconButton(
            icon: Icon(Icons.delete, color: Colors.red),
            onPressed: () {
              context.read<CPostCubit>().deleteComment(postId, comment.id);
            },
          ),
      ],
    );
  }
}
Do the same for the mobile layout.
👀 Testing: Check if comments show up properly!