Hello Pythonistas🙋♀️, do you have some beautiful🤩 memories captured in your small cam 📷?
Is it lost somewhere in your phone’s gallery or is it transferred to a Pendrive💾?
Get them back because today we’re gonna be making a 💫 Reminisce app with python GUI using the customtkinter library.
We will be learning how to deal with images🖼️, add an exit 🏃 button and status⏳ bar, and a lot more on the way.
Excited🥳?
Let’s get started…
Contents
Let’s first take a look at the previous post’s challenge’s solution.
Previous post’s challenge’s solution
from customtkinter import *
class Login(CTk):
    def __init__(self):
        super().__init__()
        self.geometry("400x300")
        self.c_uid = "[email protected]"
        self.c_p = "I always forget it :("
        self.user_id = CTkEntry(self, placeholder_text="Enter your Username")
        self.user_id.pack(pady=10)
        self.password = CTkEntry(self, placeholder_text="Enter your Password")
        self.password.pack(pady=10)
        self.login = CTkButton(self, text="Login", command=self.verify, width=100, height=40)
        self.login.pack(pady=30)
    def verify(self):
        u_id = self.user_id.get()
        u_p = self.password.get()
        if u_id == self.c_uid:
            if u_p == self.c_p:
                label = CTkLabel(self, text="Successfully logged in\nNothing to display yet...")
            else:
                label = CTkLabel(self, text="Incorrect Password")
        else:
            label = CTkLabel(self, text="Incorrect Username")

        label.pack()
if __name__ == "__main__":
    app = Login()
    app.mainloop()
We have created a simple GUI that asks for a User ID🆔 and a Password🔏. If they match, the user is allowed to Login and, if not, is told that he/she has given an incorrect❌ id or password, whichever is wrong.
We have 3 widgets:-
- 2 Entry widgets:
- ID
- Password
- 1 Button: to check whether the inputs are correct or not.
- Whichever is the case it is informed📢 with a Label widget.
If you still have any doubts ask them in the comment section below👇🏻.
Adding Icon to the window
Till now our app has an icon which is a square blue thing. It looks good👍 but, what if you want to customize it?
Say, you want to make a restaurant🏨 management system, would you not want something like this as your icon:

So how to add such icons to your app?
First, you need an image with an .ico extension. Don’t worry if you don’t have one.
Just take up any png or jpg or whatever file type your .file_type to .ico converter in google and use any free one.
Or you can go to this website it’s a good one, I have used it quite a few times. You can select next to any such websites.
Now that you have your icon let’s set up our basic code structure and write this line to change the icon:-
from customtkinter import *
class App(CTk):
    def __init__(self):
        super().__init__()
        self.geometry("400x400")
        self.iconbitmap("waffle.ico")
if __name__ == "__main__":
    app = App()
    app.mainloop()
You need to give the full path of the image(ok icon) if it is not in the same directory(folder).
Remember: You should give a path like this: C:\\Users\\maitr\\Downloads\\waffle.ico I mean by adding an extra \ because it is an escape sequence.
The iconbitmap() function takes up a .ico and sets it as the window’s icon.
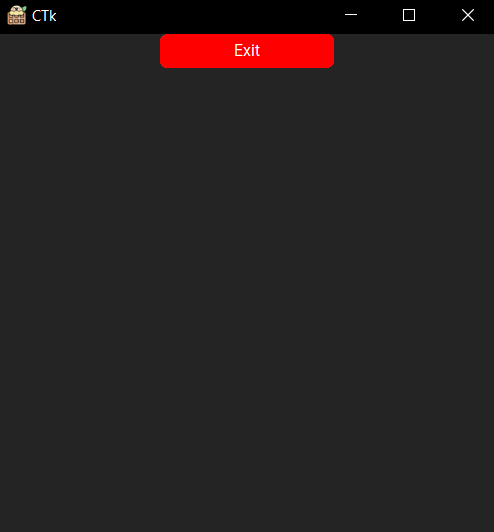
Making an exit button
Now let’s make an exit🏃 button for our app.
I mean ya we have the close❌ button on the corner but a button on the window would definitely be handier🤙.
To make such a button that closes the app on being clicked. We just need to give a command as self(or whatever the name of the master is).quit:
        self.qb = CTkButton(self, text="Exit", command=self.quit)
        self.qb.pack()
We would definitely need to give it some text and a master.
I think it would be good👌 if our button is red🔴 instead of blue🔵. I’ll also change the text and hover color of the button. It should look like what it is.
        self.qb = CTkButton(self, text="Exit", fg_color="red", hover_color="pink", text_color="white", command=self.quit)
        self.qb.pack()
This is how our app looks right now:
Time to add an image🖼️.
Adding images
For every widget in customtkinter we need to follow a ✌️ two-step process:
- make the widget and
- put it on the window
For image we have a 3️⃣ three-step process:
- Open the image,
- make the widget and
- put it on the window
To open any image🖼️ we need to install and import the 🛏 pillow library.
Now, this is not the only library📚 to deal with images in python but, it is the easiest for our purpose.
To install pillow:
pip install PillowTo import the pillow library(we only need its Image module):
from PIL import ImageYou first need to decide👩🏼⚖️ whether you want the image in dark or light mode.
Then use the Image module’s open function the open the image:
self.waffle_img = CTkImage(light_image=Image.open("C:\\Users\\maitr\\Downloads\\waffle.png"),size=(300,300))We have also given it size. So that it’s big enough.
Now, to make the widget you can use nearly any widget, be it a button or a label anyone.
I’ll go with the label for it’s easiest to work with.
We need to give the label widget a master, the image🖼️ we opened, and a blank text(So that CTkLabel doesn’t appear on the image):
self.il = CTkLabel(self, image=self.waffle_img, text="")Just pack it now:
        self.il.pack(pady=10)
#pady=10 is to give some space from top and bottom
Full code till now:
from customtkinter import *
from PIL import Image
class App(CTk):
def __init__(self):
super().__init__()
self.geometry("400x400")
self.iconbitmap("C:\\Users\\maitr\\Downloads\\waffle.ico")
self.waffle_img = CTkImage(light_image=Image.open("C:\\Users\\maitr\\Downloads\\waffle.png"),size=(300,300))
self.il = CTkLabel(self, image=self.waffle_img, text="")
self.il.pack(pady=10)
self.qb = CTkButton(self, text="Exit", fg_color="red", hover_color="pink", text_color="white", command=self.quit)
self.qb.pack()
if __name__ == "__main__":
app = App()
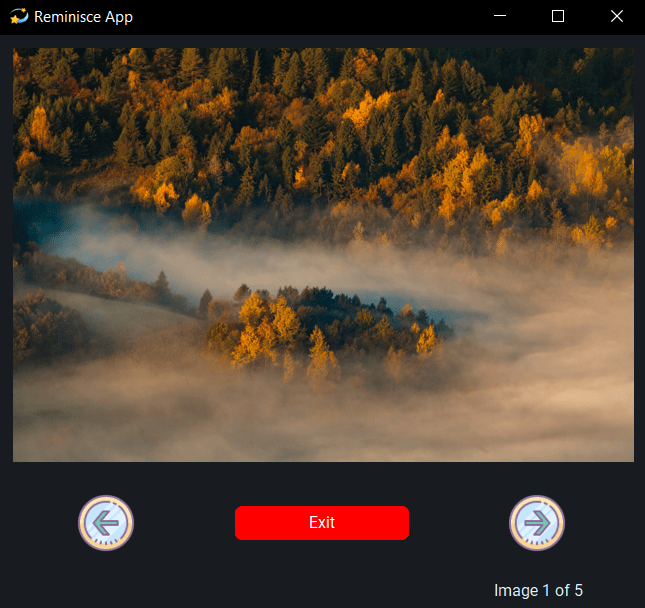
app.mainloop()Making of our 💫 Reminisce app
The basic structure and the exit button
First, we need to write the basic structure with an exit 🏃 button provided. We will set its background color to this #181b1f:
from customtkinter import *
from PIL import Image
class App(CTk):
    def __init__(self):
        super().__init__()
        self.title("Reminisce App")
        self.iconbitmap("images\\reminisce.ico")
        self.configure(fg_color="#181b1f")

        self.qb = CTkButton(self, text="Exit", fg_color="red", hover_color="pink", text_color="white", command=self.quit)
        #we will display this button in center after the image
        self.qb.grid(row=1, column=1, padx=10, pady=10)
        #padx and pady is to give spaces around the button
if __name__ == "__main__":
    app = App()
    app.mainloop()
Opening all the images, storing them in a list, and setting up a counter variable
Now, we need to open all the images and store them in a list. We will also set a counter variable to store the current image no.
We will set two other images forward_img and backward_img for our buttons:
        super().__init__()
        # setting up counter and images
        self.counter = 0
        self.images = [CTkImage(light_image=Image.open("images\\forest.jpg"),size=(496.9,331.3)),
                       CTkImage(light_image=Image.open("images\\moon.jpg"),size=(390.6,260.4)),
                       CTkImage(light_image=Image.open("images\\mountain.jpg"),size=(654.1,436.1)),
                       CTkImage(light_image=Image.open("images\\stone.jpg"),size=(593.7,416)),
                       CTkImage(light_image=Image.open("images\\tree.jpg"),size=(624,416))]

        #we will not include them in list so that the functions can be made easier.
        self.forward_img = CTkImage(light_image=Image.open("images\\forward.png"), size=(50,50))
        self.backward_img = CTkImage(light_image=Image.open("images\\backward.png"), size=(50,50))

        #exit button
        self.qb = CTkButton(self, text="Exit", fg_color="red", hover_color="pink", text_color="white", command=self.quit)
        self.qb.grid(row=1, column=1, padx=10,pady=10)
You’ll notice that I have given all images a different size. This is to maintain their original aspect(16:9 and all) ratio while making them big.
Go to this website to get free sample images. You can choose anyone I used this one.
I haven’t given the window any size so that it can keep on changing its size according to the image.
To download the button images:
Displaying the first image and creating previous and next buttons
Now, we will show the first image, this would be the default 😐 image on our app:
        # showing the first image
        self.il = CTkLabel(self,text="",image=self.images[self.counter])
        self.il.grid(row=0, column=0, columnspan=3, padx=10, pady=10)
We have given columnspan = 3 as there will be 3 buttons below this image label. self.counter’s value is 0.
Let’s make the back and front buttons:
        # previous and next button
        self.front = CTkButton(self, text="", image=self.forward_img, fg_color="#181b1f", hover_color="#181b1f", command=self.next_command)
        self.back = CTkButton(self, text="", image=self.backward_img, fg_color="#181b1f", hover_color="#181b1f", command=self.previous)
        self.front.grid(row=1, column=2, padx=10, pady=10)
        self.back.grid(row=1, column=0, padx=10, pady=10)
We have given it fg_color and hover_color the same as the background color of the app so that our button images appear correctly.
The images we stored in this step are used in the buttons.
The buttons are given different commands.
The next_command function
Now, to understand this function let’s first take this simple example:
my_list = ["apple", "banana", "cherry"]
counter = 0
for i in range(6):
    print(my_list[counter])
    counter = (counter + 1) % len(my_list)
In this example, the list contains 3 items:
- “apple”,
- “banana”, and
- “cherry”.
The counter variable starts from 0. This means that inside the loop it will first print "apple". As the counter changes the value printed will be changed.
We have given counter = counter + 1 % len(my_list).
The values of the counter will be as follows:
| iteration(i’s value) | counter’s value | formula |
|---|---|---|
| 0 | 0 | my_list[0] 0 = (0+1) % 3 ->1 |
| 1 | 1(from the previous formula) | my_list[1] 1 = (1+1) % 3 ->2 |
| 2 | 2(from the previous formula) | my_list[2] 2 = (2+1) % 3 ->0 |
| 3 | 0(from the previous formula) | my_list[0] 0 = (0+1) % 3 ->1 |
| 4 | 1(from the previous formula) | my_list[1] 1 = (1+1) % 3 ->2 |
| 5 | 2(from the previous formula) | my_list[2] 2 = (2+1) % 3 ->0 |
We will use the same logic 🧠 in our next_command and previous functions.
We have a list self.images we want to infinitely go through that list. We also have our counter variable.
Here’s how the function will look🧐:
    def next_command(self):
        self.counter = (self.counter + 1) % len(self.images)
        self.update()
We don’t want it to loop through the list until or unless we click the button that is why we have put it in a function.
The update() that we are going to define is needed because we need to change the image based on the counter variable.
This is all for the next_command function of our reminisce app.
The Previous function
In our previous function, we will decrement the counter by 1 instead of incrementing it. Everything else would be the same.
    def previous(self):
        self.counter = (self.counter - 1) % len(self.images)
        self.update()
The update function
Okay, so moving on to the update🔄 function.
In this function, we need to replace the current image.
For that, we will first remove 🧹 it:
    def update(self):
        self.il.grid_forget()
Now, we will display 🖼️ it again.
    def update(self):
        self.il.grid_forget()
        #updating the image
        self.il = CTkLabel(self,text="",image=self.images[self.counter])
        self.il.grid(row=0, column=0, columnspan=3, padx=10, pady=10)
And that’s it our 💫 reminisce app is ready!!
We will optimize ⚡ our reminisce app even more when we will study encapsulation💊.
Giving our Reminisce app a status bar
Let’s add a ⏳ status bar to our reminisce app.
It would say something like:- “Image 1 of 5”
This means we need to display a string. And the best thing I can think 🤔 of is a Label for this purpose.
Let’s define this status bar in the __init__() method:
        self.status = CTkLabel(self, text=f"Image {self.counter + 1} of {len(self.images)}")
        self.status.grid(row=2, column=2, padx=25)
In the text argument, we have given an f-string: f"Image {self.counter + 1} of {len(self.images)}".
self.counter + 1 is because the indexes of images go from 0 to 4 but we want it to be 1 to 5.
This same code needs to be written inside of the update function. Because we need to update the status bar whenever the button(s) is clicked.
Full source code
Click here to view the full code.
from customtkinter import *
from PIL import Image
class App(CTk):
    def __init__(self):
        super().__init__()
        self.title("Reminisce App")
        self.iconbitmap("images\\reminisce.ico")
        self.configure(fg_color="#181b1f")
        # setting up counter and images
        self.counter = 0
        self.images = [CTkImage(light_image=Image.open("images\\forest.jpg"),size=(496.9,331.3)),
                       CTkImage(light_image=Image.open("images\\moon.jpg"),size=(390.6,260.4)),
                       CTkImage(light_image=Image.open("images\\mountain.jpg"),size=(654.1,436.1)),
                       CTkImage(light_image=Image.open("images\\stone.jpg"),size=(593.7,416)),
                       CTkImage(light_image=Image.open("images\\tree.jpg"),size=(624,416))]

        # images for buttons
        self.forward_img = CTkImage(light_image=Image.open("images\\forward.png"), size=(50,50))
        self.backward_img = CTkImage(light_image=Image.open("images\\backward.png"), size=(50,50))
        # label to show images
        self.il = CTkLabel(self,text="",image=self.images[self.counter])
        self.il.grid(row=0, column=0, columnspan=3, padx=10, pady=10)
        # buttons
        self.front = CTkButton(self, text="", image=self.forward_img, fg_color="#181b1f", hover_color="#181b1f", command=self.next_command)
        self.back = CTkButton(self, text="", image=self.backward_img, fg_color="#181b1f", hover_color="#181b1f", command=self.previous)
        self.front.grid(row=1, column=2, padx=10, pady=10)
        self.back.grid(row=1, column=0, padx=10, pady=10)
        # exit button
        self.qb = CTkButton(self, text="Exit", fg_color="red", hover_color="pink", text_color="white", command=self.quit)
        self.qb.grid(row=1, column=1, padx=10, pady=10)
        # status bar
        self.status = CTkLabel(self, text=f"Image {self.counter + 1} of {len(self.images)}")
        self.status.grid(row=2, column=2, padx=25)
    def next_command(self):
        self.counter = (self.counter + 1) % len(self.images)
        self.update()
    def previous(self):
        self.counter = (self.counter - 1) % len(self.images)
        self.update()
    def update(self):
        self.il.grid_forget()
        # updating image
        self.il = CTkLabel(self,text="",image=self.images[self.counter])
        self.il.grid(row=0, column=0, columnspan=3, padx=10, pady=10)
        # updating status bar
        self.status = CTkLabel(self, text=f"Image {self.counter + 1} of {len(self.images)}")
        self.status.grid(row=2, column=2, padx=25)
if __name__ == '__main__':
    app = App()
    app.mainloop()
Conclusion
We learned how to add an icon 🌟 to our window.
Next, we saw how to make an exit 🏃 button.
Followed by this we added an image 🖼️ to our window.
Finally, we went on to make our 💫 reminisce(gallery) app. We saw a detailed description of the whole logic.
The final look of our reminisce app
Hope you all enjoyed 😄 learning with me today.
Challenge 🧗♀️
Your challenge is to create a Greetings 🙌 app. It should look like this:

Hints:
from customtkinter import *
class Greetings_app(CTk):
    def __init__(self):
        super().__init__()
        self.title("Greeting App")
        self.geometry("400x300")
        #Create all the widgets
    def show_greeting(self):
        pass
if __name__ == '__main__':
    app = Greetings_app()
    app.mainloop()

Really Appreciate this post, can you make it so I receive an alert email every time you write a new post?
Sure I will soon add this feature…
I like this web site its a master peace ! Glad I found this on google .
Thank you so much😊. Stay tuned for more…
I couldn’t resist commenting
Thanks a lot. Stay tuned for more…
Very good website you have here but I was curious about if you knew of any user discussion forums that cover the same topics discussed in this article? I’d really love to be a part of online community where I can get opinions from other experienced individuals that share the same interest. If you have any recommendations, please let me know. Appreciate it!
I don’t know about it. However, I’ll try creating one here soon…
I’d have to examine with you here. Which is not one thing I usually do! I take pleasure in reading a post that may make folks think. Additionally, thanks for permitting me to comment!
Whats Going down i’m new to this, I stumbled upon this I’ve found It absolutely helpful and it has helped me out loads. I hope to contribute & help other customers like its aided me. Good job.
This design is incredible! You obviously know how to keep a reader entertained. Between your wit and your videos, I was almost moved to start my own blog (well, almost…HaHa!) Excellent job. I really enjoyed what you had to say, and more than that, how you presented it. Too cool!
Thank you!!