Hangman Game in Python Using CustomTkinter
Welcome to the Build & Challenge Series!
In this first project, we’re creating a classic favorite—Hangman, but with a cool twist!
Using Python and the customtkinter library, you’ll learn how to build a fun, interactive game with a simple GUI.
Whether you’re new to coding or sharpening your GUI skills, this project has something for everyone!
Contents
Hangman Game in Python Using CustomTkinter
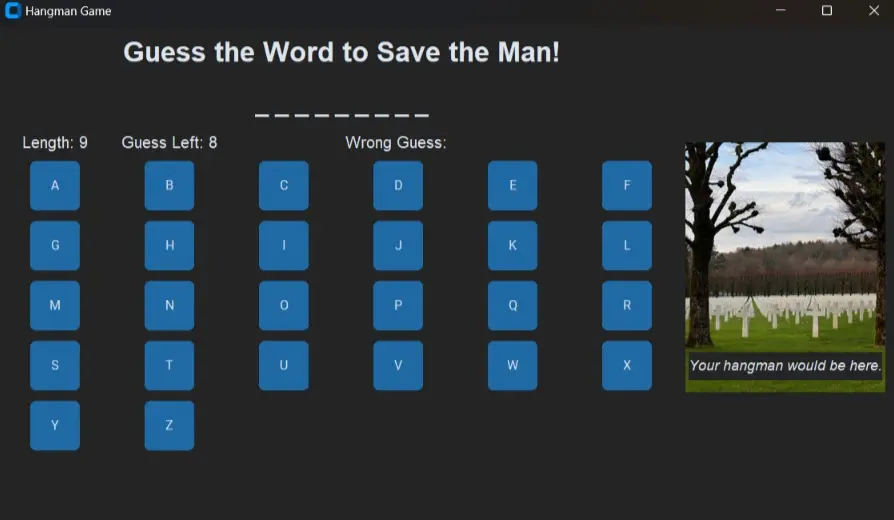
What you’ll build:
Step 1: Set Up the GUI with a Class
We’ll create a class that inherits from CTk, which is the base window for our GUI.
Inside the class, we’ll set the title of the window, size, and initial labels.
Hangman Game in Python Using CustomTkinter Hangman Game in Python Using CustomTkinter Hangman Game in Python Using CustomTkinter Hangman Game in Python Using CustomTkinter
➡️ Click for code
import random
from customtkinter import *
from PIL import Image, ImageTk  # For handling images

class Hangman(CTk):  # Inheriting from CTk to make a custom window
    def __init__(self):
        super().__init__()  # Call the parent constructor to initialize the window

        # Set window title and size
        self.title("Hangman Game")
        self.geometry("900x500")  # Window size set to 900x500 pixels

        # Add a title above the game
        self.title_label = CTkLabel(self, text="Guess the Word to Save the Man!", font=("Arial", 28, "bold"))
        self.title_label.grid(row=0, column=0, columnspan=7, pady=10)  # Place label at the top
- Class: We’re creating a
Hangmanclass that inherits fromCTk, giving us the window setup. - Title/Geometry: We define the title of the window as “Hangman Game” and set the window size to 900×500 pixels.
- Label: The title label “Guess the Word to Save the Man!” is placed at the top of the screen.
Step 2: Randomly Choose a Word from a List
We’ll define a:
- list of words,
- select one at random, and
- set up variables to store the word’s length,
- correct guesses (represented by underscores),
- wrong guesses, and
- remaining guesses.
➡️ Click for code
        # List of words to choose from
        self.word_list = ["PYTHON", "CUSTOMTKINTER", "HANGMAN", "DEVELOPER", "PROGRAMMING"]
        self.selected_word = random.choice(self.word_list)  # Randomly select a word
        self.word_length = len(self.selected_word)

        # Variables to store the current state of the game
        self.correct_guesses = ['_'] * self.word_length  # List of underscores for each letter
        self.wrong_guesses = []
self.guess_left = 8 # Total allowed wrong guessesword_list: List of words that the game can randomly pick from.selected_word: A random word is chosen usingrandom.choice.word_length: Stores the length of the word.correct_guesses: A list of underscores to represent letters that haven’t been guessed yet.wrong_guesses: Keeps track of all the incorrect guesses.guess_left: The number of wrong guesses the player is allowed (starting at 8).
Hangman Game in Python Using CustomTkinter Hangman Game in Python Using CustomTkinter Hangman Game in Python Using CustomTkinter Hangman Game in Python Using CustomTkinter Hangman Game in Python Using CustomTkinter
Step 3: Display the Hangman Image and Labels
We’ll set up labels to show:
- the hangman’s image,
- a word display (showing underscores), and
- information like the
- word length,
- remaining guesses, and
- wrong guesses.
➡️ Click for code
        # Hangman's image label (starts with the first image)
        self.hangman_images = [CTkImage(light_image=Image.open(f"C:\\Users\\maitr\\Desktop\\Build_And_Challenge\\hangman_images\\{i}.png"), size=(200, 250)) for i in range(0, 9)]
        self.image_label = CTkLabel(self, image=self.hangman_images[0], text="")
        self.image_label.grid(row=1, rowspan=7, column=7, pady=10)

        # Word display
        self.word_label = CTkLabel(self, text=" ".join(self.correct_guesses), font=("Arial", 24))
        self.word_label.grid(row=1, column=0, columnspan=6, pady=10)

        # Info labels (Length, Guesses Left, Wrong Guesses)
        self.length_label = CTkLabel(self, text=f"Length: {self.word_length}", font=("Arial", 16))
        self.length_label.grid(row=2, column=0, padx=5)

        self.guess_left_label = CTkLabel(self, text=f"Guess Left: {self.guess_left}", font=("Arial", 16))
        self.guess_left_label.grid(row=2, column=1, padx=5)

        self.wrong_guess_label = CTkLabel(self, text="Wrong Guess: ", font=("Arial", 16))
        self.wrong_guess_label.grid(row=2, column=2, columnspan=3, padx=5)
hangman_images: This loads a series of images that change as wrong guesses are made.image_label: Displays the hangman image, starting with the first image.word_label: Shows the guessed letters and underscores for the unguessed ones.length_label,guess_left_label,wrong_guess_label: Show the word’s length, remaining guesses, and wrong guesses.
Step 4: Create the Virtual Keyboard
Let’s create an on-screen keyboard using buttons. Each button corresponds to a letter of the alphabet.
➡️ Click for code
    def create_keyboard(self):
        # Create the keyboard as buttons
        letters = 'ABCDEFGHIJKLMNOPQRSTUVWXYZ'
        row = 3
        col = 0
        for i, letter in enumerate(letters):
            button = CTkButton(self, text=letter, width=50, height=50, command=lambda l=letter: self.on_key_press(l))
            button.grid(row=row, column=col, padx=5, pady=5)
            col += 1
            if col > 5:  # Move to next row after 6 letters
                col = 0
row += 1letters: Contains all 26 letters of the alphabet.CTkButton: Creates a button for each letter with a callback function (on_key_press).- Row/Column: We place buttons in rows of 6 for better layout.
This function creates an interactive keyboard where each button represents a letter. The button layout shifts to a new row after six letters.
Step 5: Handle Keyboard Button Press
When a letter is pressed, the function checks whether it’s in the selected word.
If it is, the letter is revealed; otherwise, it counts as a wrong guess.
➡️ Click for code
    def on_key_press(self, letter):
        # Check if the letter is in the word
        if letter in self.selected_word:
            # If correct, update the correct guesses
            for index, char in enumerate(self.selected_word):
                if char == letter:
                    self.correct_guesses[index] = letter
            self.word_label.configure(text=" ".join(self.correct_guesses))  # Update displayed word

            # Check if the player has won (all letters guessed)
            if "_" not in self.correct_guesses:
                self.end_game(win=True)
        else:
            # If wrong, update the wrong guesses and reduce guesses left
            if letter not in self.wrong_guesses:
                self.wrong_guesses.append(letter)
                self.guess_left -= 1
                self.wrong_guess_label.configure(text=f"Wrong Guess: {', '.join(self.wrong_guesses)}")
                self.guess_left_label.configure(text=f"Guess Left: {self.guess_left}")

                # Update hangman image based on wrong guess count
                self.image_label.configure(image=self.hangman_images[8 - self.guess_left])

                # Check if the player has lost (no guesses left)
                if self.guess_left == 0:
self.end_game(win=False)- Correct Guess: If the letter is in the word, it updates the
correct_guesseslist and refreshes the displayed word. - Wrong Guess: If incorrect, it updates the wrong guesses, decreases
guess_left, and changes the hangman image.
Step 6: Check Win or Loss
After each guess, we check if the player has guessed the entire word (win) or if they’ve run out of guesses (loss).
end_game: Displays a message depending on whether the player won or lost, and disables the buttons.
➡️ Click for code
    def end_game(self, win):
        if win:
            message = "Congratulations! You've won!"
        else:
            message = f"Game Over! The word was {self.selected_word}."

        # Display message and reset game (or quit)
        self.word_label.configure(text=message)
        for widget in self.winfo_children():
            if isinstance(widget, CTkButton):
                widget.configure(state="disabled")  # Disable all buttons after game ends
Step 7: Handle the Hangman Image
The game starts with a graveyard image and then the hangman starts getting built as guesses run out.
As wrong guesses are made, we update the hangman image.
➡️ Click for code
# Images stored in self.hangman_images; first image is blank, last one is the full hangman
self.image_label.configure(image=self.hangman_images[8 - self.guess_left])
Hangman Game in Python Using CustomTkinter Hangman Game in Python Using CustomTkinter Hangman Game in Python Using CustomTkinter Hangman Game in Python Using CustomTkinter
Step 8: Run the Application
The final step is running the main loop, which opens the window and starts the game.
➡️ Click for code
# Run the application
if __name__ == "__main__":
    app = Hangman()
    app.mainloop()
Ending Challenge
Congratulations on building your very own Hangman game! But now, it’s time to level up. Here’s your Challenge:
- Challenge 1: Add a difficulty setting where the player can choose between easy, medium, and hard levels. This could impact the number of guesses or the complexity of words selected.
- Challenge 2: Add a scoreboard! Implement a feature that tracks wins and losses over multiple rounds.
- Challenge 3: Customize the stick figure—allow the player to add accessories (hat, scarf, etc.) to the stick figure as they make progress. Can you use your creativity to make the game even more engaging?
Full Source Code
Once you’ve nailed these challenges, share your updated version here in the project’s repository GitHub! Let’s grow the project together and learn as a community.
The complete source code is in the GitHub link provided above.