Hello, Pythonistas Welcome Back. Today we will see how to make a fully functional modern segmented button in CustomTkinter.
We will use the CTkSegmentedButton Widget.
Contents
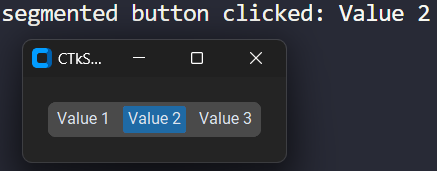
How Does CTkSegmentedButton Look?
Basic Code
This is how you can make a simple segmented button in CustomTkinter (or CTk).
# Importing necessary module
from customtkinter import CTk, CTkSegmentedButton

# Creating an App class that inherits from CTk (Custom Tkinter)
class App(CTk):
    def __init__(self):
        super().__init__() # Calling the constructor of the superclass (CTk)
        self.title("SegmentedButton Example")

        # Creating a CTkSegmentedButton instance within the window, specifying values and a callback function
        self.se = CTkSegmentedButton(self, values=["Value 1", "Value 2", "Value 3"],
                                                     command=self.callback)
        self.se.pack(padx=20, pady=20)

    # Callback function to handle segmented button clicks
    def callback(self, value):
        print("segmented button clicked:", value)

app = App()
app.mainloop()
Like any other widget in CTk, it is created and pushed to the window.
Instead of providing just one value a list of values is provided. Each item in the list forms an button.
As it is like a button you can give it a command function to shoot when you click a particular button.
It takes a compulsory argument master. This will specify where it will stay.
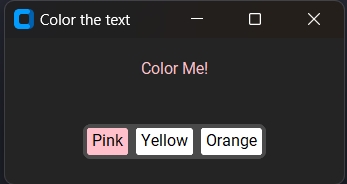
A Sample Modern Segmented Button
We will make an A Dynamic Text Styler!
It will be a graphical interface where a label’s text color changes dynamically based on the selection made in a segmented button.
All you need to do is:
- Create a dictionary of color names and their codes.
- Create a simple label.
- Create a segmented button having color names as values. (I have set colors for a better interface)
- Now create a function that changes the
selected_colorof the segmented button andtext_colorof the label, using theconfiguremethod.
That’s it!
Complete Source Code(Click Here For Complete Code)
# Importing necessary module
from customtkinter import CTk, CTkSegmentedButton, CTkLabel

# Creating an App class that inherits from CTk (Custom Tkinter)
class App(CTk):
    def __init__(self):
        super().__init__() # Calling the constructor of the superclass (CTk)
        self.title("Color the text")
        self.colors = {"Pink": "#FFC0CB", "Yellow": "#BED754", "Orange": "#E3651D"}

        self.color_me = CTkLabel(self, text="Color Me!")
        self.color_me.pack(pady=10)
        # Creating a CTkSegmentedButton instance within the window, specifying values, callback function, text_color, and unselected_color.
        self.se = CTkSegmentedButton(self, values=["Pink", "Yellow", "Orange"],
                                                    command=self.callback,unselected_color="White", text_color="Black")
        self.se.pack(padx=20, pady=20)

    # Callback function to handle segmented button clicks
    def callback(self, value):
        self.se.configure(selected_color=self.colors[value], selected_hover_color=self.colors[value])
        self.color_me.configure(text_color=self.colors[value])

app = App()
app.mainloop()
All Configurations
| argument | value |
|---|---|
| master | root, frame, top-level |
| corner_radius | corner radius in px |
| values | list of string values for the buttons, can’t be empty |
| variable | StringVar to control the current selected value |
| state | “normal” (standard) or “disabled” (not clickable, darker color) |
| command | function will be called when the dropdown is clicked manually |
| dynamic_resizing | enable/disable automatic resizing when text is too big to fit: True (standard), False |
I am not going to give any challenges at the end of such articles as they are just for your quick reference.
Note I haven’t included all the methods and attributes. You can always get that on the documentation.