Hello, Pythonistas Welcome Back. Today we will see how to make a fully functional modern Text Box in CustomTkinter.
We will use the CTkTextbox Widget.
Contents
How Does CTkTextbox Look?
Basic Code
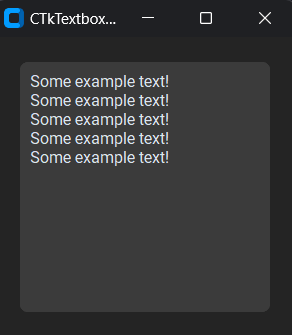
This is how you can make a simple Text Box in CustomTkinter (or CTk).
from customtkinter import CTk, CTkTextbox
class App(CTk):
    def __init__(self):
        super().__init__()
        self.title("CTkTextbox Example")

        # create a text box
        self.te = CTkTextbox(self)
        # Enter some text to it. You can also type after you run the code.
        self.te.insert("0.0", "Some example text!\n" * 5)
        self.te.pack(padx=20, pady=20)

app = App()
app.mainloop()
Like any other widget in CTk, it is created and pushed to the window.
You can insert text before or after packing(At your convenience).
Now, it is to take user input but you can also type in stuff before or after the existing text using the insert method.
It takes two arguments:
- Position of insertion,
- Text to be inserted (We have inserted 5 lines of text.)
It gets an automatic vertical scrollbar if the text is overflowing from the widget size.
A Textbox like this is used whenever you need to take multiple lines of input from the user.
Say for example, when making an app like Notepad, or while taking feedback from the user, or anything that takes up long lines from the user.
A Sample Modern Text Box
Let’s make a simple form that takes up user’s feedback on a particular movie.
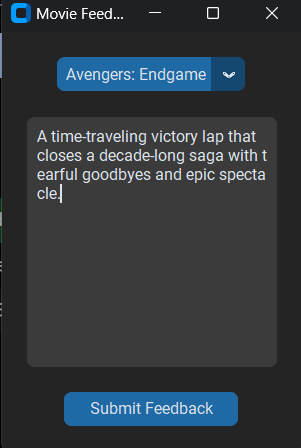
This will be stored in a new file in a particular folder after submission.
This will be an anonymous feedback.
We need to follow the following steps:
- Create a ComboBox/OptionMenu for movie options.
- Then create a text box and a button.
- Now, create a function that stores text in a new file as
movieName=Review\Feedback. - Simply, connect this function to the button. Also, to ensure a unique filename every time set up a counter.
That’s it!
You can also add images of the movies to make it more interesting!
Completer Code(Click For Complete Code):
from customtkinter import CTk, CTkTextbox, CTkOptionMenu, CTkButton, StringVar
class App(CTk):
    def __init__(self):
        super().__init__()
        self.title("Movie Feedback")

        # Create a StringVar to keep track of the selected movie
        self.movie_var = StringVar(value="Oppenheimer")
        # Create option for movies
        self.movie = CTkOptionMenu(self, values=["Oppenheimer", "Avatar", "Avengers: Endgame"], variable=self.movie_var)
        self.movie.pack(pady=20)

        # create a text box
        self.feedback = CTkTextbox(self)
        self.feedback.pack(padx=20)

        # Create a button to save the feedback to a new file
        self.submit = CTkButton(self, text="Submit Feedback", command=self.saveFeed)
        self.submit.pack(padx=20, pady=20)

    def saveFeed(self):
        # Get current time to create a unique filename
        from datetime import datetime
        now = datetime.now()
        now = str(now.strftime("%H_%M_%S"))

        # Create a file path using the current time
        filePath = f"feedback\\{now}.txt"

        with open(filePath, "w") as f:
             # Get the selected movie name and the user feedback from the UI elements
            movie_name = self.movie_var.get()
            user_feedback = self.feedback.get('0.0', 'end')  # Retrieve the text from the CTkTextbox

            # Construct the content to be written to the file
            text = f"{movie_name} = {user_feedback}"
            f.write(text)
        print("Feedback saved successfully!!")
        self.quit()


app = App()
app.mainloop()
It surely needs a lot of other features to be a good application but, this much is enough for understanding the widget.
All Configurations
| argument | value |
|---|---|
| master | root, frame, top-level |
| width | box width in px |
| height | box height in px |
| corner_radius | corner radius in px |
| border_width | border width in px |
| fg_color | main widget color, tuple: (light_color, dark_color) or single color or “transparent” |
| state | “normal” (standard) or “disabled” (not clickable, read-only) |
| wrap | how to wrap text at end of line, default is ‘char’, other options are ‘word’ or ‘none’ for no wrapping at all and horizontal scrolling |
I am not going to give any challenges at the end of such articles as they are just for your quick reference.
Note I haven’t included all the methods and attributes. You can always get that on the documentation.


Prompt reply, attribute of mind 🙂