Generate a QR Code for a Website in Python
Imagine this: You’re hosting an epic event, and you want to send out invites in a way that’s not only tech-savvy but also super convenient.
You decide to use QR codes, because why not?
They’re cool, easy to scan, and perfect for sharing important links, like your registration page, event details, or even a location map.
All your guests need to do is point their phone at the code, and voilà — they’re connected!
In this article, we’ll walk you through building a Python desktop app that can generate custom QR codes for your event (or anything, really) with just a few clicks.
We’ll even include an option to upload your event logo to personalize the QR code.
Let’s break it down!
Generate a QR Code for a Website in Python Generate a QR Code for a Website in Python Generate a QR Code for a Website in Python
Contents

Step 1: Setting Up the User Interface (UI)
Our app will have a simple and clean interface, allowing users to input the URL or text they want to convert into a QR code.
We’ll use customtkinter for the UI design because it provides a modern look without much hassle.
from customtkinter import *
class App(CTk):
    def __init__(self):
        super().__init__()
        self.title("QR Generator")
        self.geometry("500x300")

        self.url_label = CTkLabel(self, text="Enter URL or Text:")
        self.url_label.grid(row=1, column=0, padx=10, pady=10)

        self.url_entry = CTkEntry(self, width=200)
        self.url_entry.grid(row=1, column=1, padx=10, pady=10)

        self.logo_upload = CTkButton(master=self, text="Upload Your Logo")
        self.logo_upload.grid(row=2, column=0, padx=40, pady=10)

        self.generate_qr_code = CTkButton(master=self, text="Generate")
        self.generate_qr_code.grid(row=2, column=1, padx=10, pady=10)
We have done nothing fancy so far.
Just a label to let the user know what to do.
An entry widget to input the URL/text.
A button to allow users to upload the logo.
And another button to generate the QR code.
You can go through this customtkinter guide if you cannot understand any of these. And if you don’t know the grid system read this.
Generate a QR Code for a Website in Python Generate a QR Code for a Website in Python Generate a QR Code for a Website in Python
Step 2: Uploading a Logo
What’s better than a regular QR code?
A QR code with your event’s logo in the center!
We’ll add an option for users to upload a logo, which will be embedded into the generated QR code.
from tkinter import filedialog
#IN THE INIT METHOD
# Initialize logo path
self.logo_path = None
def upload_logo(self):
        self.logo_path = filedialog.askopenfilename(filetypes=[("Image files", "*.jpg *.jpeg *.png")])
        if self.logo_path:
            self.status_label.configure(text="Logo uploaded successfully", fg_color="green")
        else:
            self.status_label.configure(text="No logo selected", fg_color="red")
This function allows the user to browse their system for an image file, which will later be added to the QR code if selected.
It’s optional but can give your QR code a personalized touch, especially if you’re organizing a branded event!
Step 3: Generating the QR Code
Generate a QR Code for a Website in Python Generate a QR Code for a Website in Python Generate a QR Code for a Website in Python Generate a QR Code for a Website in Python
Now comes the fun part: generating the actual QR code!
We’ll use the qrcode library, which makes it super easy to create high-quality QR codes.
You can customize the QR code with error correction and colors, and even add a logo if one was uploaded.
import qrcode
from PIL import Image
#IN THE INIT METHOD
# Status label
self.status_label = CTkLabel(self, text="")
self.status_label.grid(row=3, column=0, columnspan=2, pady=10)
def generate_qr(self):
data = self.url_entry.get()
if not data:
self.status_label.configure(text="Please enter a URL or text", fg_color="red")
return
# Create qr codes directory if it doesn't exist
if not os.path.exists("qr codes"):
os.makedirs("qr codes")
# Generate QR code
qr = qrcode.QRCode(error_correction=qrcode.constants.ERROR_CORRECT_H)
qr.add_data(data)
qr.make(fit=True)
qr_img = qr.make_image(fill='black', back_color='white').convert('RGB')
# Add logo if available
if self.logo_path:
logo = Image.open(self.logo_path)
qr_size = qr_img.size
logo_size = int(qr_size[0] * 0.3)
logo = logo.resize((logo_size, logo_size))
pos = ((qr_size[0] - logo_size) // 2, (qr_size[1] - logo_size) // 2)
qr_img.paste(logo, pos)
# Save QR code
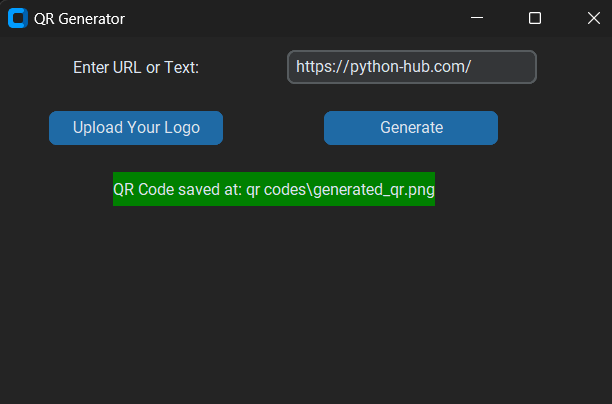
file_path = os.path.join("qr codes", "generated_qr.png")
qr_img.save(file_path)
self.status_label.configure(text=f"QR Code saved at: {file_path}", fg_color="green")
Breaking it Down:
- Basic QR Code Generation: We take the URL or text input by the user and generate a basic QR code. The
qrcodelibrary makes this straightforward. - Adding a Logo: If the user has uploaded a logo, we resize it and position it in the center of the QR code, making sure it doesn’t overpower the QR code’s scannability.
- Saving the QR Code: Finally, the generated QR code is saved in a folder called “qr codes” with the name
generated_qr.png.
Full Source Code: QR Code for a Website in Python
Click to view the full code
from customtkinter import *
from tkinter import filedialog
import qrcode
from PIL import Image

class App(CTk):
    def __init__(self):
        super().__init__()
        self.title("QR Generator")
        self.geometry("500x300")

        self.url_label = CTkLabel(self, text="Enter URL or Text:")
        self.url_label.grid(row=1, column=0, padx=10, pady=10)

        self.url_entry = CTkEntry(self, width=200)
        self.url_entry.grid(row=1, column=1, padx=10, pady=10)

        self.logo_upload = CTkButton(master=self, text="Upload Your Logo", command=self.upload_logo)
        self.logo_upload.grid(row=2, column=0, padx=40, pady=10)

        self.generate_qr_code = CTkButton(master=self, text="Generate", command=self.generate_qr)
        self.generate_qr_code.grid(row=2, column=1, padx=10, pady=10)

        # Initialize logo path
        self.logo_path = None

        # Status label
        self.status_label = CTkLabel(self, text="")
        self.status_label.grid(row=3, column=0, columnspan=2, pady=10)

    def generate_qr(self):
        data = self.url_entry.get()

        if not data:
            self.status_label.configure(text="Please enter a URL or text", fg_color="red")
            return

        # Create qr codes directory if it doesn't exist
        if not os.path.exists("qr codes"):
            os.makedirs("qr codes")

        # Generate QR code
        qr = qrcode.QRCode(error_correction=qrcode.constants.ERROR_CORRECT_H)
        qr.add_data(data)
        qr.make(fit=True)
        qr_img = qr.make_image(fill='black', back_color='white').convert('RGB')

        # Add logo if available
        if self.logo_path:
            logo = Image.open(self.logo_path)
            qr_size = qr_img.size
            logo_size = int(qr_size[0] * 0.3)
            logo = logo.resize((logo_size, logo_size))

            pos = ((qr_size[0] - logo_size) // 2, (qr_size[1] - logo_size) // 2)
            qr_img.paste(logo, pos)

        # Save QR code
        file_path = os.path.join("qr codes", "generated_qr.png")
        qr_img.save(file_path)

        self.status_label.configure(text=f"QR Code saved at: {file_path}", fg_color="green")

    def upload_logo(self):
        self.logo_path = filedialog.askopenfilename(filetypes=[("Image files", "*.jpg *.jpeg *.png")])
        if self.logo_path:
            self.status_label.configure(text="Logo uploaded successfully", fg_color="green")
        else:
            self.status_label.configure(text="No logo selected", fg_color="red")


if __name__ == "__main__":
    app = App()
    app.mainloop()
Challenge 🧗
For a fun challenge, why not extend this project by adding even more customization options?
Here are some ideas:
- Change QR Code Colors: Let users pick custom colors for the QR code, instead of the default black and white.
- Custom File Names: Allow users to specify a custom file name for their QR code instead of the default.
- QR Code Size: Provide an option for users to choose the size of the QR code.