/Responsive Flutter Login Page with Source Code
A well-designed and responsive login page is crucial for any Flutter application, ensuring a seamless user experience across different devices.
In this guide, we will build a beautiful, responsive Flutter login page with source code, following clean architecture principles using Bloc.
By the end, you’ll have a fully functional authentication system that is scalable and efficient.
This is Day 3 in building the Connect app.
Responsive Flutter Login Page with Source Code
If you would like to know more about bloc click here ➡️
Although bloc architecture is super useful, it can be tough to understand initially.
I would like to give a very brief idea.
Most of you must know the MVC(model view controller framework) architecture.
Bloc is used to do the same job making the code clean by separating UI from Business logic. But, in it’s own way.
MVC (Model-View-Controller) Overview:
- Model: This holds the data and the business logic.
- View: This is the UI that displays the data and receives user inputs.
- Controller: This acts as the middleman between the Model and the View, handling the logic when a user interacts with the View.
Now, let’s compare Bloc with MVC:
In Bloc, the Bloc is like the Controller: it listens for events from the UI, processes the logic (based on those events), and then updates the State, which the UI listens to and reacts upon. The Bloc doesn’t deal with the UI directly—it only manages the business logic and state.
Model in MVC vs. State in Bloc:
- In MVC, the Model is responsible for the data and business logic.
- In Bloc, the State represents the data that the app displays, and the Bloc itself handles the business logic of how the state changes based on events.
View in MVC vs. UI in Bloc:
- In MVC, the View displays the data to the user and captures user input.
- In Bloc, the UI still does the same thing (displays the data and captures user input), but instead of directly modifying the state, it communicates with the Bloc to send events and listens for state updates.
Controller in MVC vs. Bloc in Bloc Architecture:
- In MVC, the Controller acts as the middleman between the Model and View. It listens to user input (from the View), performs logic (possibly modifying the Model), and updates the View.
If this gave you a brief idea of what bloc is great. If not no worries you’ll get it on the way.
Responsive Flutter Login Page with Source Code
Contents
Step 1: Define States
Head over to the presentation folder inside it create two folders:
- cubits
- pages
Cubit is the little sibling of the bloc. It is simple and only works with states, no events.
For that let’s start by creating our authentication states.
Inside the cubits folder create auth_states.dart
This is to manage states of authentication.
There can be 4 such states:
- Initial state
- Loading state
- authenticated state
- unauthenticated state
Then we will leave room for errors in the error state. You can consider this to be the 5th state.
Create an abstract class CAuthState.
Extend it in these 5 states.
➡️Click to view auth_states.dart
import 'package:connect/features/auth/domain/entities/app_user.dart';

abstract class CAuthState {}

// initial
class CAuthInitialState extends CAuthState {}

// loading
class CAuthLoadingState extends CAuthState {}

// Authenticated
class CAuthAuthenticatedState extends CAuthState {
    final CAppUser user;
    CAuthAuthenticatedState(this.user);
}

// unauthenticated
class CAuthUnauthenticatedState extends CAuthState {}

// errors...
class CAuthErrorState extends CAuthState {
    final String message;
    CAuthErrorState(this.message);
}
Responsive Flutter Login Page with Source Code Responsive Flutter Login Page with Source Code Responsive Flutter Login Page with Source Code Responsive Flutter Login Page with Source Code Responsive Flutter Login Page with Source Code Responsive Flutter Login Page with Source Code
These are the different possible states in the process of authentication.
Now moving on to the bloc part of it.
Step 2: Define Cubit
Install this package:
flutter pub add flutter_blocInside the cubit folder create auth_cubit.dart
The purpose of this cubit is to manage different states.
➡️Click To View The Code of auth_cubit.dart
import 'package:connect/features/auth/domain/entities/app_user.dart';
import 'package:connect/features/auth/domain/repos/auth_repo.dart';
import 'package:connect/features/auth/presentation/cubits/auth_states.dart';
import 'package:flutter_bloc/flutter_bloc.dart';

class CAuthCubit extends Cubit<CAuthState> {
  final CAuthRepo authRepo;
  CAppUser? _currentUser;

  CAuthCubit({required this.authRepo}) : super(CAuthInitialState());

  // check if user is already authenticated
  void checkAuth() async {
    final CAppUser? user = await authRepo.getCurrentUser();
    if(user!=null){
      _currentUser = user;
      emit(CAuthAuthenticatedState(user));
    }
    else {
      emit(CAuthUnauthenticatedState());
    }
  }

  // get current user
  CAppUser? get currentUser => _currentUser;

  // login with email and password
  Future<void> login(String email, String password) async {
    try {
      emit(CAuthLoadingState());
      final user = await authRepo.loginWithEmailPassword(email, password);
      if(user != null) {
        _currentUser = user;
        emit(CAuthAuthenticatedState(user));
      }
      else {
        emit(CAuthUnauthenticatedState());
      }
    }
    catch(e) {
      emit(CAuthErrorState(e.toString()));
      emit(CAuthUnauthenticatedState());
    }
  }

  // register with email and password
  Future<void> register(String name, String email, String password) async {
    try {
      emit(CAuthLoadingState());
      final user = await authRepo.registerWithEmailPassword(name, email, password);
      if(user != null) {
        _currentUser = user;
        emit(CAuthAuthenticatedState(user));
      }
      else {
        emit(CAuthUnauthenticatedState());
      }
    }
    catch(e) {
      emit(CAuthErrorState(e.toString()));
      emit(CAuthUnauthenticatedState());
    }
  }

  // logout
  Future<void> logout() async {
    _currentUser = null;
    await authRepo.logout();
    emit(CAuthUnauthenticatedState());
  }
}
➡️Click To See The Explanation if you Can’t Understand Any Particular Thing
Imports
app_user.dart→ Defines theCAppUserentity, which represents a user.auth_repo.dart→ DefinesCAuthRepo, an authentication repository that provides methods for login, registration, and logout.auth_states.dart→ Defines different authentication states used in thisCubit.flutter_bloc.dart→ Provides theCubitclass, used for state management.
Class Definition
- This class extends
Cubit<CAuthState>, meaning it manages authentication states. - The states are defined in
auth_states.dart.
Properties
authRepo: A repository instance that provides authentication-related methods._currentUser: A private variable that stores the currently logged-in user.
Constructor
- Takes
authRepoas a required parameter. - Initializes the
CubitwithCAuthInitialState()(default state when the app starts).
Check Authentication
- Calls
authRepo.getCurrentUser()(asynchronously) to check if a user is already logged in. - If a user exists:
_currentUseris updated.- Emits
CAuthAuthenticatedState(user).
- If no user is found, emits
CAuthUnauthenticatedState().
📌 When does this function run?
- When the app starts to check if the user is already logged in.
Get Current User
- Provides a getter method to access
_currentUser.
Login with Email and Password
- Emits
CAuthLoadingState()(to indicate the loading state). - Calls
authRepo.loginWithEmailPassword(email, password). - If authentication is successful:
- Updates
_currentUser. - Emits
CAuthAuthenticatedState(user).
- Updates
- If authentication fails, emits
CAuthUnauthenticatedState(). - If an error occurs (e.g., network failure, incorrect credentials):
- Emits
CAuthErrorState(e.toString()). - Then resets the state to
CAuthUnauthenticatedState().
- Emits
📌 Handles error gracefully and prevents app crashes.
Register with Email and Password
- Similar to
login(), but callsauthRepo.registerWithEmailPassword(name, email, password). - If registration is successful, updates
_currentUserand emitsCAuthAuthenticatedState(user). - If registration fails, emits
CAuthUnauthenticatedState(). - If an error occurs, it catches the exception and emits
CAuthErrorState(e.toString()).
📌 Ensures state transitions are smooth even in case of errors.
Logout
- Calls
authRepo.logout(), which clears the user session. - Emits
CAuthUnauthenticatedState()to update the UI.
📌 After logout, _currentUser remains unchanged in memory. If needed, it should be reset to null.
Summary
| Function | Purpose | State Emitted |
|---|---|---|
checkAuth() | Check if a user is logged in | CAuthAuthenticatedState / CAuthUnauthenticatedState |
login(email, password) | Logs in a user | CAuthLoadingState, CAuthAuthenticatedState, CAuthUnauthenticatedState, CAuthErrorState |
register(name, email, password) | Registers a new user | CAuthLoadingState, CAuthAuthenticatedState, CAuthUnauthenticatedState, CAuthErrorState |
logout() | Logs out the user | CAuthUnauthenticatedState |
currentUser | Retrieves logged-in user | – |
How It Works in the App
CAuthUnauthenticatedState() is emitted.
On App Start
checkAuth() runs to check if the user is logged in.
If authenticated → CAuthAuthenticatedState(user).
Else → CAuthUnauthenticatedState().
On Login
The user enters their email & password.
login(email, password) is called.
If correct → CAuthAuthenticatedState(user).
If incorrect → CAuthUnauthenticatedState().
On Registration
The user enters name, email & password.
register(name, email, password) is called.
If successful → CAuthAuthenticatedState(user).
If error → CAuthErrorState(error).
On Logout
logout() is called.
Responsive Flutter Login Page with Source Code Responsive Flutter Login Page with Source Code Responsive Flutter Login Page with Source Code Responsive Flutter Login Page with Source Code Responsive Flutter Login Page with Source Code Responsive Flutter Login Page with Source Code
Finally, we are all set for the UI of our Login Page.
Step 3: Create a Login Page And Connect It To main.dart
Create login_page.dart in the lib/features/auth/presentation/pages folder.
➡️Click To View login_page.dart
login_page.dartimport 'package:flutter/material.dart';
class CLoginPage extends StatefulWidget {
const CLoginPage({super.key});
@override
State<CLoginPage> createState() => _CLoginPageState();
}
class _CLoginPageState extends State<CLoginPage> {
@override
Widget build(BuildContext context) {
return Scaffold();
}
}Create a themes folder in lib folder.
Add light_mode.dart in this folder:
➡️Click To View light_mode.dart
import 'package:flutter/material.dart';

ThemeData lightMode = ThemeData(
  colorScheme: ColorScheme.light(
    surface: Colors.white,
    primary: Color(0xFFFCE4EC),  // Button background color
    secondary: Colors.black,      // Button text color
    tertiary: Colors.grey.shade400, // Hint text color
    inversePrimary: Colors.black,  // Focused text field border
  ),
  scaffoldBackgroundColor: Colors.white,
  elevatedButtonTheme: ElevatedButtonThemeData(
    style: ElevatedButton.styleFrom(
      backgroundColor: Color(0xFFFCE4EC),
      padding: const EdgeInsets.symmetric(vertical: 16),
      shape: RoundedRectangleBorder(
        borderRadius: BorderRadius.circular(8),
      ),
    ),
  ),
  inputDecorationTheme: InputDecorationTheme(
    hintStyle: TextStyle(color: Colors.grey.shade400),
    enabledBorder: UnderlineInputBorder(
      borderSide: BorderSide(color: Colors.grey.shade200),
    ),
    focusedBorder: const UnderlineInputBorder(
      borderSide: BorderSide(color: Colors.black),
    ),
  ),
);
➡️Call these in the main.dart
import 'package:connect/features/auth/presentation/pages/login_page.dart';
import 'package:connect/firebase_options.dart';
import 'package:connect/themes/light_mode.dart';
import 'package:firebase_core/firebase_core.dart';
import 'package:flutter/material.dart';

void main() async {
  // firebase setup
  WidgetsFlutterBinding.ensureInitialized();
  await Firebase.initializeApp(options: DefaultFirebaseOptions.currentPlatform);
  // run app
  runApp(const MyApp());
}

class MyApp extends StatelessWidget {
  const MyApp({super.key});

  @override
  Widget build(BuildContext context) {
    return MaterialApp(
      debugShowCheckedModeBanner: false,
      theme:lightMode,
      home: const CLoginPage(),
    );
  }
}
Step 4: Design The Login Page
Create an assets folder in the main project directory.
Now, create an images folder inside it.
Add this illustration or any illustration inside it.
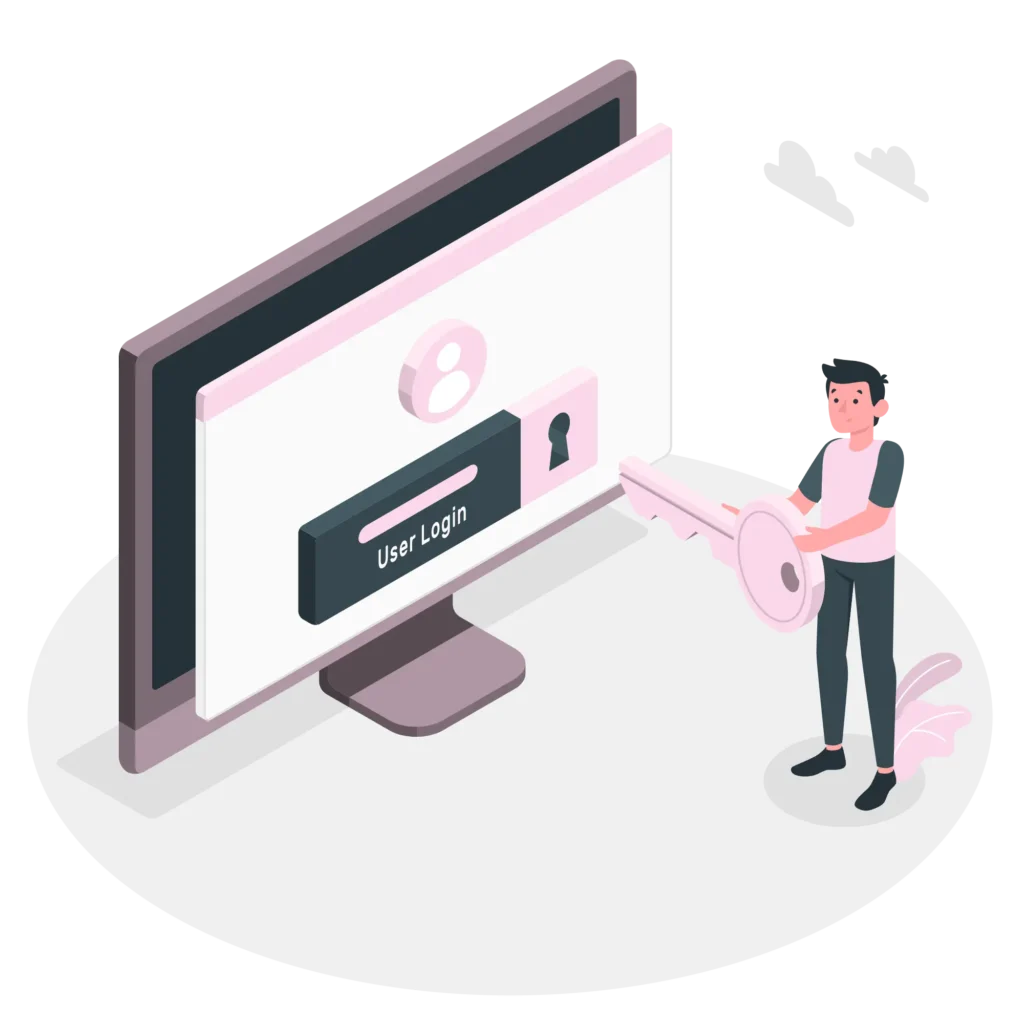
You can get a lot of such for free in Freepik or any other such platform.
Now head over to pubspec.yaml and add this file therein.
# To add assets to your application, add an assets section, like this:
  assets:
    - assets/images/
Inside the lib folder create a utils folder. Inside that create a responsive_helper.dart
➡️Click To View responsive_helper.dart
import 'package:flutter/material.dart';

class ResponsiveHelper {
  final BuildContext context;
  late double screenWidth;
  late double screenHeight;

  ResponsiveHelper(this.context) {
    screenWidth = MediaQuery.of(context).size.width;
    screenHeight = MediaQuery.of(context).size.height;
  }

  // Font size based on screen width
  double fontSize(double percentage) {
    return screenWidth * (percentage / 100);
  }

  // Spacing based on screen height
  double height(double percentage) {
    return screenHeight * (percentage / 100);
  }

  // Padding based on screen width
  double width(double percentage) {
    return screenWidth * (percentage / 100);
  }
}
Responsive Flutter Login Page with Source Code Responsive Flutter Login Page with Source Code Responsive Flutter Login Page with Source Code Responsive Flutter Login Page with Source Code Responsive Flutter Login Page with Source Code Responsive Flutter Login Page with Source Code
Go on to create a components folder inside the presentation layer.
Create two files:
c_button.dartc_text_field.dart
➡️Click To View c_button.dart
import 'package:flutter/material.dart';
import 'package:connect/utils/responsive_helper.dart';

class CButton extends StatelessWidget {
  final String text;
  final void Function()? onPressed;

  const CButton({super.key, required this.text, required this.onPressed});

  @override
  Widget build(BuildContext context) {
    final res = ResponsiveHelper(context); // Initialize responsive helper

    return SizedBox(
      width: res.width(100), // 100% of screen width
      child: ElevatedButton(
        onPressed: onPressed,
        style: ElevatedButton.styleFrom(
          backgroundColor: Theme.of(context).colorScheme.primary,
          padding: EdgeInsets.symmetric(vertical: res.height(2)), // 2% of screen height
          shape: RoundedRectangleBorder(
            borderRadius: BorderRadius.circular(res.width(3)), // 3% of screen width
          ),
        ),
        child: Text(
          text,
          style: TextStyle(
            color: Colors.black,
            fontSize: res.fontSize(4.5), // 4.5% of screen width
          ),
        ),
      ),
    );
  }
}
➡️Click To View c_text_field.dart
c_text_field.dartimport 'package:flutter/material.dart';
import 'package:connect/utils/responsive_helper.dart';
class CTextField extends StatelessWidget {
final String hintTxt;
final bool ispass;
const CTextField({super.key, required this.hintTxt, required this.ispass});
@override
Widget build(BuildContext context) {
final res = ResponsiveHelper(context); // Initialize responsive helper
return TextField(
obscureText: ispass,
decoration: InputDecoration(
hintText: hintTxt,
hintStyle: TextStyle(
color: Colors.grey.shade400,
fontSize: res.fontSize(4), // 4% of screen width
),
enabledBorder: UnderlineInputBorder(
borderSide: BorderSide(color: Colors.grey.shade200),
),
focusedBorder: UnderlineInputBorder(
borderSide: BorderSide(color: Theme.of(context).colorScheme.inversePrimary),
),
),
);
}
}
Finally, modify login_page.dart, and add the image, text, text fields, and button.
➡️Click To View login_page.dart
import 'package:flutter/material.dart';
import 'package:connect/utils/responsive_helper.dart';
import 'package:connect/features/auth/presentation/components/c_button.dart';
import 'package:connect/features/auth/presentation/components/c_text_field.dart';

class CLoginPage extends StatelessWidget {
  const CLoginPage({super.key});

  @override
  Widget build(BuildContext context) {
    final res = ResponsiveHelper(context); // Initialize helper

    return Scaffold(
      backgroundColor: Theme.of(context).scaffoldBackgroundColor,
      body: SafeArea(
        child: Padding(
          padding: EdgeInsets.all(res.width(6)), // 6% padding
          child: ListView(
            children: [
              Image.asset(
                "assets/images/login_img.png",
              ),
              SizedBox(height: res.height(2)),

              // Welcome Back text
              Center(
                child: Text(
                  'Welcome Back',
                  style: Theme.of(context).textTheme.headline6?.copyWith(
                        fontSize: res.fontSize(7), // 7% of screen width
                        fontWeight: FontWeight.bold,
                      ),
                ),
              ),

              SizedBox(height: res.height(2)),

              // Not registered text and sign-up link
              Row(
                mainAxisAlignment: MainAxisAlignment.center,
                children: [
                  Text(
                    'Not registered yet?',
                    style: TextStyle(color: Theme.of(context).colorScheme.tertiary),
                  ),
                  TextButton(
                    onPressed: () {},
                    child: Text(
                      'Sign up',
                      style: TextStyle(color: Theme.of(context).colorScheme.inversePrimary),
                    ),
                  ),
                ],
              ),

              SizedBox(height: res.height(3)),

              // Name TextField
              const CTextField(hintTxt: "Name", ispass: false),

              SizedBox(height: res.height(2)),

              // Password TextField
              const CTextField(hintTxt: "Password", ispass: true),

              SizedBox(height: res.height(4)),

              // Log In Button
              CButton(text: 'Log In', onPressed: () {}),

              SizedBox(height: res.height(2)),

              // Forgotten password text
              Center(
                child: TextButton(
                  onPressed: () {},
                  child: Text(
                    'Forgotten your password or login details?',
                    style: TextStyle(
                      color: Theme.of(context).colorScheme.tertiary,
                      fontSize: res.fontSize(3), // 3% of screen width
                    ),
                  ),
                ),
              ),
            ],
          ),
        ),
      ),
    );
  }
}
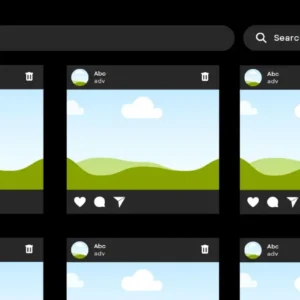
Your login page should look like this:
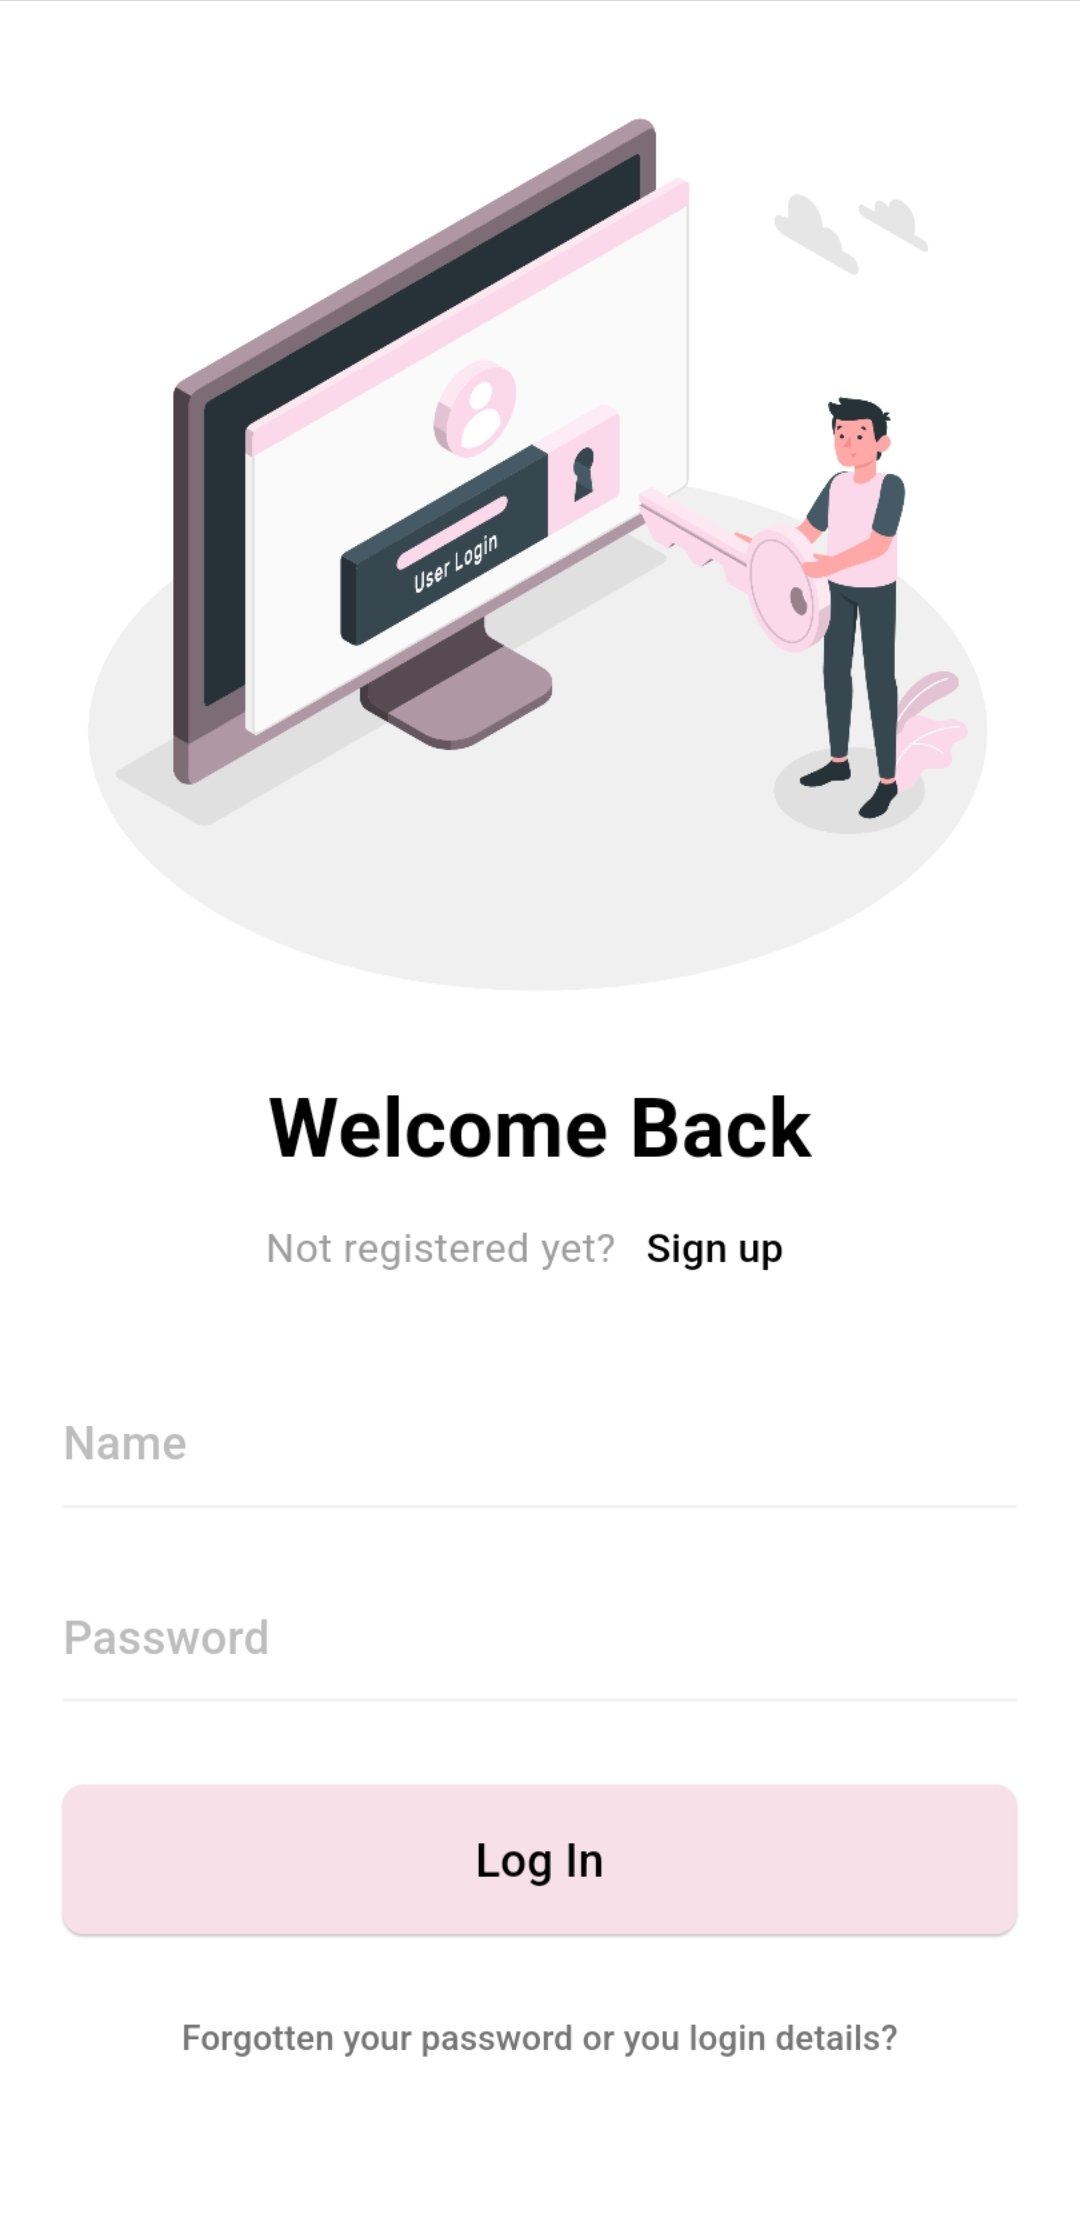
This is responsive but only for mobile phones.
Let’s now make it responsive for the desktop as well.
We will be deploying it on the web only where it needs to look good on both platforms.
Step 5: Make Login Page Desktop Responsive
Create a method _buildMobileLayout And transfer all the scaffold’s code to this method.
➡️Click To view _buildMobileLayout
 Widget _buildMobileLayout(BuildContext context, ResponsiveHelper res) {
    return Padding(
      padding: EdgeInsets.all(res.width(6)),
      child: ListView(
        shrinkWrap: true,
        children: [
          Image.asset(
            "assets/images/login_img.png",
          ),
          SizedBox(height: res.height(2)),
          Center(
            child: Text(
              'Welcome Back',
              style: Theme.of(context).textTheme.headline6?.copyWith(
                    fontSize: res.fontSize(7),
                    fontWeight: FontWeight.bold,
                  ),
            ),
          ),
          SizedBox(height: res.height(2)),
          Row(
            mainAxisAlignment: MainAxisAlignment.center,
            children: [
              Text(
                'Not registered yet?',
                style: TextStyle(
                  color: Theme.of(context).colorScheme.tertiary,
                ),
              ),
              TextButton(
                onPressed: () {},
                child: Text(
                  'Sign up',
                  style: TextStyle(
                    color: Theme.of(context).colorScheme.inversePrimary,
                  ),
                ),
              ),
            ],
          ),
          SizedBox(height: res.height(3)),
          const CTextField(hintTxt: "Name", ispass: false),
          SizedBox(height: res.height(2)),
          const CTextField(hintTxt: "Password", ispass: true),
          SizedBox(height: res.height(4)),
          CButton(text: 'Log In', onPressed: () {}),
          SizedBox(height: res.height(2)),
          Center(
            child: TextButton(
              onPressed: () {},
              child: Text(
                'Forgotten your password or login details?',
                style: TextStyle(
                  color: Theme.of(context).colorScheme.tertiary,
                  fontSize: res.fontSize(3),
                ),
              ),
            ),
          ),
        ],
      ),
    );
  }
Create another method _buildDesktopLayout here we will code it up for the desktop.
Modify the existing Scaffold to this:
// login_page.dart
import 'package:flutter/material.dart';
import 'package:connect/utils/responsive_helper.dart';
import 'package:connect/features/auth/presentation/components/c_button.dart';
import 'package:connect/features/auth/presentation/components/c_text_field.dart';

class CLoginPage extends StatelessWidget {
  const CLoginPage({super.key});

  @override
  Widget build(BuildContext context) {
    final res = ResponsiveHelper(context);
    final isDesktop = res.width(100) >= 800; // Desktop breakpoint

    return Scaffold(
      backgroundColor: Theme.of(context).scaffoldBackgroundColor,
      body: SafeArea(
        child: Center(
          child: SingleChildScrollView(
            child: isDesktop
                ? _buildDesktopLayout(context, res)
                : _buildMobileLayout(context, res),
          ),
        ),
      ),
    );
  }

  }
Now let’s edit our _buildDesktopLayout method
➡️Click To View _buildDesktopLayout
Widget _buildDesktopLayout(BuildContext context, ResponsiveHelper res) {
    return Row(
      children: [
        // Left side - Image
        Expanded(
          child: Container(
            padding: EdgeInsets.symmetric(
              horizontal: res.width(8),
              vertical: res.height(4),
            ),
            child: Image.asset(
              "assets/images/login_img.png",
              fit: BoxFit.contain,
            ),
          ),
        ),
        // Right side - Login form
        Expanded(
          child: Container(
            padding: EdgeInsets.symmetric(
              horizontal: res.width(10),
              vertical: res.height(4),
            ),
            child: Column(
              crossAxisAlignment: CrossAxisAlignment.start,
              mainAxisAlignment: MainAxisAlignment.center,
              children: [
                Center(
            child: Text(
              'Welcome Back',
              style: Theme.of(context).textTheme.headline6?.copyWith(
                    fontSize: res.fontSize(3),
                    fontWeight: FontWeight.bold,
                  ),
            ),
          ),
          SizedBox(height: res.height(2)),
          Row(
            mainAxisAlignment: MainAxisAlignment.center,
            children: [
              Text(
                'Not registered yet?',
                style: TextStyle(
                  color: Theme.of(context).colorScheme.tertiary,
                ),
              ),
              TextButton(
                onPressed: () {},
                child: Text(
                  'Sign up',
                  style: TextStyle(
                    color: Theme.of(context).colorScheme.inversePrimary,
                  ),
                ),
              ),
            ],
          ),
          SizedBox(height: res.height(3)),
          const CTextField(hintTxt: "Name", ispass: false),
          SizedBox(height: res.height(2)),
          const CTextField(hintTxt: "Password", ispass: true),
          SizedBox(height: res.height(4)),
          CButton(text: 'Log In', onPressed: () {}),
          SizedBox(height: res.height(2)),
          Center(
            child: TextButton(
              onPressed: () {},
              child: Text(
                'Forgotten your password or login details?',
                style: TextStyle(
                  color: Theme.of(context).colorScheme.tertiary,
                  fontSize: res.fontSize(1),
                ),
              ),
            ),
          ),
              ],
            ),
          ),
        ),
      ],
    );
  }
Responsive Flutter Login Page with Source Code Responsive Flutter Login Page with Source Code Responsive Flutter Login Page with Source Code Responsive Flutter Login Page with Source Code Responsive Flutter Login Page with Source Code Responsive Flutter Login Page with Source Code
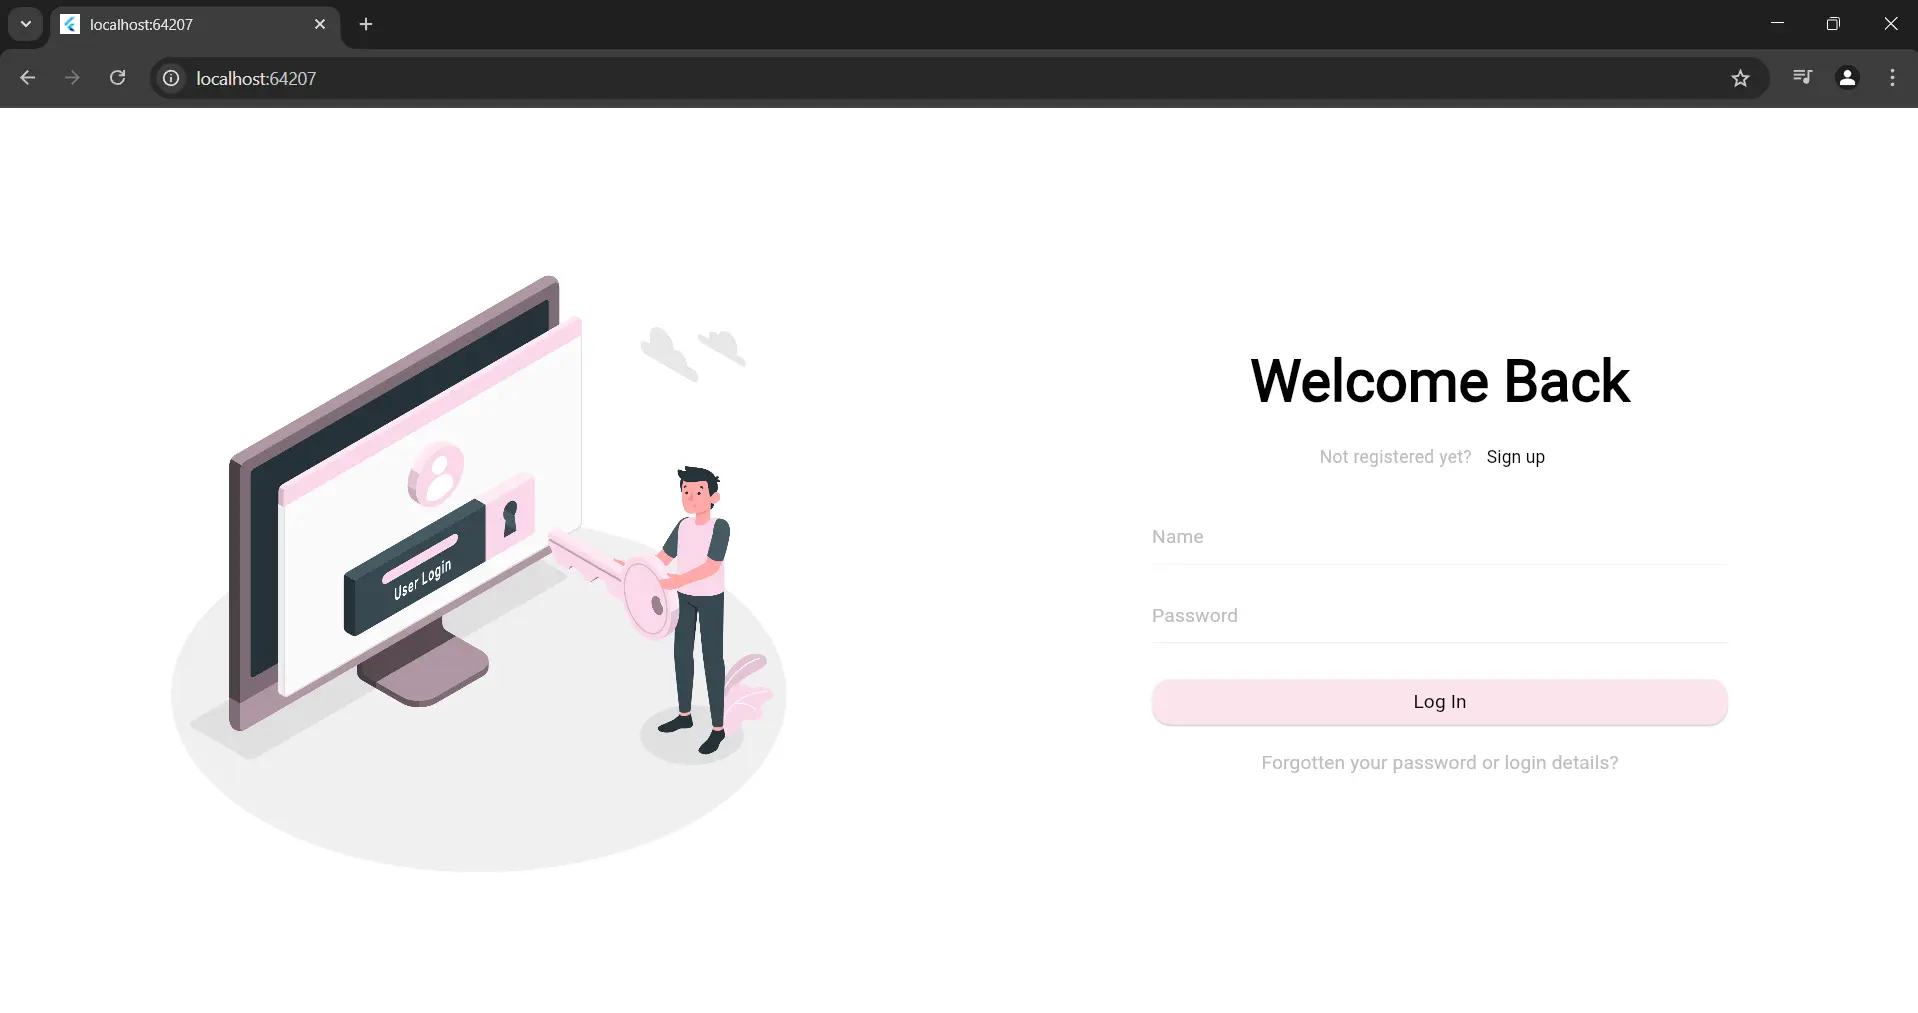
If everything goes well your web output should look like this.
We will also need to modify c_button.dart and c_text_field.dart
➡️Click To View c_button.dart
import 'package:flutter/material.dart';
import 'package:connect/utils/responsive_helper.dart';

class CButton extends StatelessWidget {
  final String text;
  final void Function()? onPressed;

  const CButton({super.key, required this.text, required this.onPressed});

  @override
  Widget build(BuildContext context) {
    final res = ResponsiveHelper(context); // Initialize responsive helper
    final isDesktop = res.width(100) >= 800;

    return SizedBox(
      width: isDesktop ? res.width(30) : res.width(100), // 100% of screen width
      child: ElevatedButton(
        onPressed: onPressed,
        style: ElevatedButton.styleFrom(
          backgroundColor: Theme.of(context).colorScheme.primary,
          padding: EdgeInsets.symmetric(vertical: isDesktop ? res.width(1) : res.height(2)), // 2% of screen height
          shape: RoundedRectangleBorder(
            borderRadius: BorderRadius.circular(isDesktop ? res.width(1) : res.width(3)), // 3% of screen width
          ),
        ),
        child: Text(
          text,
          style: TextStyle(
            color: Colors.black,
            fontSize: isDesktop ? res.fontSize(1) :  res.fontSize(4.5), // 4.5% of screen width
          ),
        ),
      ),
    );
  }
}
➡️Click To View c_text_field.dart
import 'package:flutter/material.dart';
import 'package:connect/utils/responsive_helper.dart';

class CTextField extends StatelessWidget {
  final String hintTxt;
  final bool ispass;

  const CTextField({super.key, required this.hintTxt, required this.ispass});

  @override
  Widget build(BuildContext context) {
    final res = ResponsiveHelper(context); // Initialize responsive helper
    final isDesktop = res.width(100) >= 800;

    return TextField(
      obscureText: ispass,
      decoration: InputDecoration(
        hintText: hintTxt,
        hintStyle: TextStyle(
          color: Colors.grey.shade400,
          fontSize: isDesktop ? res.fontSize(1) : res.fontSize(4), // 4% of screen width
        ),
        enabledBorder: UnderlineInputBorder(
          borderSide: BorderSide(color: Colors.grey.shade200),
        ),
        focusedBorder: UnderlineInputBorder(
          borderSide: BorderSide(color: Theme.of(context).colorScheme.inversePrimary),
        ),
      ),
    );
  }
}
➡️Click To View Final login_page.dart
// login_page.dart
import 'package:flutter/material.dart';
import 'package:connect/utils/responsive_helper.dart';
import 'package:connect/features/auth/presentation/components/c_button.dart';
import 'package:connect/features/auth/presentation/components/c_text_field.dart';

class CLoginPage extends StatelessWidget {
  const CLoginPage({super.key});

  @override
  Widget build(BuildContext context) {
    final res = ResponsiveHelper(context);
    final isDesktop = res.width(100) >= 800; // Desktop breakpoint

    return Scaffold(
      backgroundColor: Theme.of(context).scaffoldBackgroundColor,
      body: SafeArea(
        child: Center(
          child: SingleChildScrollView(
            child: isDesktop
                ? _buildDesktopLayout(context, res)
                : _buildMobileLayout(context, res),
          ),
        ),
      ),
    );
  }

  Widget _buildDesktopLayout(BuildContext context, ResponsiveHelper res) {
    return Row(
      children: [
        // Left side - Image
        Expanded(
          child: Container(
            padding: EdgeInsets.symmetric(
              horizontal: res.width(8),
              vertical: res.height(4),
            ),
            child: Image.asset(
              "assets/images/login_img.png",
              fit: BoxFit.contain,
            ),
          ),
        ),
        // Right side - Login form
        Expanded(
          child: Container(
            padding: EdgeInsets.symmetric(
              horizontal: res.width(10),
              vertical: res.height(4),
            ),
            child: Column(
              crossAxisAlignment: CrossAxisAlignment.start,
              mainAxisAlignment: MainAxisAlignment.center,
              children: [
                Center(
            child: Text(
              'Welcome Back',
              style: Theme.of(context).textTheme.headline6?.copyWith(
                    fontSize: res.fontSize(3),
                    fontWeight: FontWeight.bold,
                  ),
            ),
          ),
          SizedBox(height: res.height(2)),
          Row(
            mainAxisAlignment: MainAxisAlignment.center,
            children: [
              Text(
                'Not registered yet?',
                style: TextStyle(
                  color: Theme.of(context).colorScheme.tertiary,
                ),
              ),
              TextButton(
                onPressed: () {},
                child: Text(
                  'Sign up',
                  style: TextStyle(
                    color: Theme.of(context).colorScheme.inversePrimary,
                  ),
                ),
              ),
            ],
          ),
          SizedBox(height: res.height(3)),
          const CTextField(hintTxt: "Name", ispass: false),
          SizedBox(height: res.height(2)),
          const CTextField(hintTxt: "Password", ispass: true),
          SizedBox(height: res.height(4)),
          CButton(text: 'Log In', onPressed: () {}),
          SizedBox(height: res.height(2)),
          Center(
            child: TextButton(
              onPressed: () {},
              child: Text(
                'Forgotten your password or login details?',
                style: TextStyle(
                  color: Theme.of(context).colorScheme.tertiary,
                  fontSize: res.fontSize(1),
                ),
              ),
            ),
          ),
              ],
            ),
          ),
        ),
      ],
    );
  }

  Widget _buildMobileLayout(BuildContext context, ResponsiveHelper res) {
    return Padding(
      padding: EdgeInsets.all(res.width(6)),
      child: ListView(
        shrinkWrap: true,
        children: [
          Image.asset(
            "assets/images/login_img.png",
          ),
          SizedBox(height: res.height(2)),
          Center(
            child: Text(
              'Welcome Back',
              style: Theme.of(context).textTheme.headline6?.copyWith(
                    fontSize: res.fontSize(7),
                    fontWeight: FontWeight.bold,
                  ),
            ),
          ),
          SizedBox(height: res.height(2)),
          Row(
            mainAxisAlignment: MainAxisAlignment.center,
            children: [
              Text(
                'Not registered yet?',
                style: TextStyle(
                  color: Theme.of(context).colorScheme.tertiary,
                ),
              ),
              TextButton(
                onPressed: () {},
                child: Text(
                  'Sign up',
                  style: TextStyle(
                    color: Theme.of(context).colorScheme.inversePrimary,
                  ),
                ),
              ),
            ],
          ),
          SizedBox(height: res.height(3)),
          const CTextField(hintTxt: "Name", ispass: false),
          SizedBox(height: res.height(2)),
          const CTextField(hintTxt: "Password", ispass: true),
          SizedBox(height: res.height(4)),
          CButton(text: 'Log In', onPressed: () {}),
          SizedBox(height: res.height(2)),
          Center(
            child: TextButton(
              onPressed: () {},
              child: Text(
                'Forgotten your password or login details?',
                style: TextStyle(
                  color: Theme.of(context).colorScheme.tertiary,
                  fontSize: res.fontSize(3),
                ),
              ),
            ),
          ),
        ],
      ),
    );
  }
}
Tomorrow we will continue with the register page.
And we will be implementing login functionality through our demo user.
With a creative loading screen. And that’s all I can think of now.
How do you feel watching this app getting to life???
Challenge
I have a simple challenge for you guys to give me cool and interesting ideas for the loading screen to boost engagement on the app.
This is the first challenge so I wanted to keep it simple. But its not as simple as it sounds…
Let me know your ideas I’ll see you tomorrow.
Till then stay happy and keep coding.
Responsive Flutter Login Page with Source Code Responsive Flutter Login Page with Source Code Responsive Flutter Login Page with Source Code Responsive Flutter Login Page with Source Code Responsive Flutter Login Page with Source Code Responsive Flutter Login Page with Source Code

Highly energetic article, I enjoyed that a lot. Will
there be a part 2?
Yes of course. There will be I guess around 20+ parts until we finally deploy connect. Stay tuned…