Today our task would be to be able to log users in to our app.
Also, to design a register page.
All of this is with a little fun behind the scenes.
Login Register and Home Page Using Bloc
Contents
Login Register and Home Page Using Bloc Login Register and Home Page Using Bloc Login Register and Home Page Using Bloc Login Register and Home Page Using Bloc Login Register and Home Page Using Bloc
Step 1: Design The Register Page And Add TextControllers To Both
Let’s first convert our login page to a stateful widget. (Just click on the small yellow bulb that shows up when you click stateless. Then click convert to stateful) (You can do the same by direct coding)
Then create 2 text controllers.
➡️Click To View Modifications on the Login page
class CLoginPage extends StatefulWidget {
  const CLoginPage({super.key});

  @override
  State<CLoginPage> createState() => _CLoginPageState();
}

class _CLoginPageState extends State<CLoginPage> {
  // text controllers
  final emailController = TextEditingController();
  final passwordController = TextEditingController();

  .
  .
  .
//_buildDesktopLayout
CTextField(controller: emailController, hintTxt: "Email", ispass: false),
          SizedBox(height: res.height(2)),
          CTextField(controller: passwordController, hintTxt: "Password", ispass: true),
//_buildMobileLayout
CTextField(controller: emailController,hintTxt: "Email", ispass: false),
          SizedBox(height: res.height(2)),
          CTextField(controller: passwordController,hintTxt: "Password", ispass: true),
Add a text controller field to CTextField
➡️Click To View Modified c_text_field.dart
import 'package:flutter/material.dart';
import 'package:connect/utils/responsive_helper.dart';

class CTextField extends StatelessWidget {
  final String hintTxt;
  final bool ispass;
  final TextEditingController controller;
  const CTextField({super.key, required this.hintTxt, required this.ispass, required this.controller});

  @override
  Widget build(BuildContext context) {
    final res = ResponsiveHelper(context); // Initialize responsive helper
    final isDesktop = res.width(100) >= 800;

    return TextField(
      controller: controller,
      obscureText: ispass,
      decoration: InputDecoration(
        hintText: hintTxt,
        hintStyle: TextStyle(
          color: Colors.grey.shade400,
          fontSize: isDesktop ? res.fontSize(1) : res.fontSize(4), // 4% of screen width
        ),
        enabledBorder: UnderlineInputBorder(
          borderSide: BorderSide(color: Colors.grey.shade200),
        ),
        focusedBorder: UnderlineInputBorder(
          borderSide: BorderSide(color: Theme.of(context).colorScheme.inversePrimary),
        ),
      ),
    );
  }
}
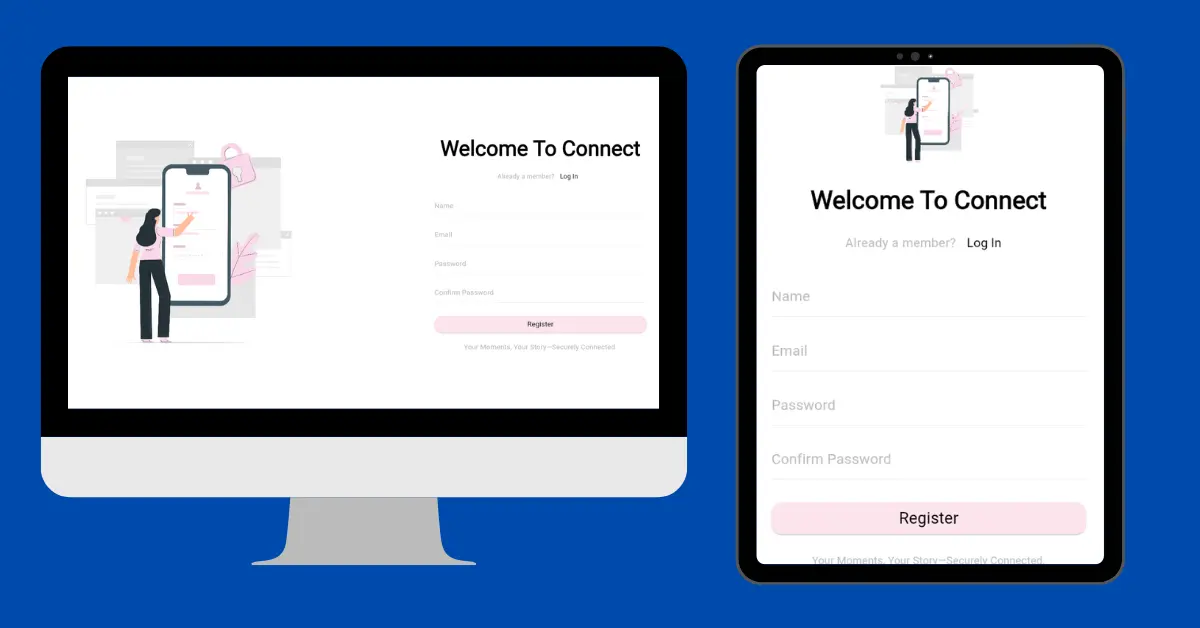
Create a Register page in the pages folder (in the same directory as the login page)
Now create a stateful widget in it.
Login Register and Home Page Using Bloc Login Register and Home Page Using Bloc Login Register and Home Page Using Bloc Login Register and Home Page Using Bloc Login Register and Home Page Using Bloc
Copy-Paste the code of the login page here. Modify parameters for the register page.
I also changed the image.
➡️Click To View the register_page.dart
import 'package:connect/features/auth/presentation/components/c_button.dart';
import 'package:connect/features/auth/presentation/components/c_text_field.dart';
import 'package:connect/utils/responsive_helper.dart';
import 'package:flutter/material.dart';

class CRegisterPage extends StatefulWidget {
  final void Function()? toggle;
  const CRegisterPage({super.key, required this.toggle});

  @override
  State<CRegisterPage> createState() => _CRegisterPageState();
}

class _CRegisterPageState extends State<CRegisterPage> {
    // text controllers
  final nameController = TextEditingController();
  final emailController = TextEditingController();
  final passwordController = TextEditingController();
  final confirmController = TextEditingController();
  // Build UI
  @override
  Widget build(BuildContext context) {
    final res = ResponsiveHelper(context);
    final isDesktop = res.width(100) >= 800; // Desktop breakpoint

    return Scaffold(
      backgroundColor: Theme.of(context).scaffoldBackgroundColor,
      body: SafeArea(
        child: Center(
          child: SingleChildScrollView(
            child: isDesktop
                ? _buildDesktopLayout(context, res)
                : _buildMobileLayout(context, res),
          ),
        ),
      ),
    );
  }

  Widget _buildDesktopLayout(BuildContext context, ResponsiveHelper res) {
    return Row(
      children: [
        // Left side - Image
        Expanded(
          child: Container(
            padding: EdgeInsets.symmetric(
              horizontal: res.width(8),
              vertical: res.height(4),
            ),
            child: Image.asset(
              "assets/images/register_img.png",
              fit: BoxFit.contain,
            ),
          ),
        ),
        // Right side - Login form
        Expanded(
          child: Container(
            padding: EdgeInsets.symmetric(
              horizontal: res.width(10),
              vertical: res.height(4),
            ),
            child: Column(
              crossAxisAlignment: CrossAxisAlignment.start,
              mainAxisAlignment: MainAxisAlignment.center,
              children: [
                Center(
            child: Text(
              'Welcome To Connect',
              style: Theme.of(context).textTheme.headline6?.copyWith(
                    fontSize: res.fontSize(3),
                    fontWeight: FontWeight.bold,
                  ),
            ),
          ),
          SizedBox(height: res.height(2)),
          Row(
            mainAxisAlignment: MainAxisAlignment.center,
            children: [
              Text(
                'Already a member?',
                style: TextStyle(
                  color: Theme.of(context).colorScheme.tertiary,
                ),
              ),
              TextButton(
                onPressed: widget.toggle,
                child: Text(
                  'Log In',
                  style: TextStyle(
                    color: Theme.of(context).colorScheme.inversePrimary,
                  ),
                ),
              ),
            ],
          ),
          SizedBox(height: res.height(3)),
          CTextField(controller: nameController, hintTxt: "Name", ispass: false),
          SizedBox(height: res.height(2)),
          CTextField(controller: emailController, hintTxt: "Email", ispass: false),
          SizedBox(height: res.height(2)),
          CTextField(controller: passwordController, hintTxt: "Password", ispass: true),
          SizedBox(height: res.height(2)),
          CTextField(controller: confirmController, hintTxt: "Confirm Password", ispass: true),
          SizedBox(height: res.height(4)),
          CButton(text: 'Register', onPressed: () {}),
          SizedBox(height: res.height(2)),
          Center(
            child: TextButton(
              onPressed: () {},
              child: Text(
                'Your Moments, Your Story—Securely Connected.',
                style: TextStyle(
                  color: Theme.of(context).colorScheme.tertiary,
                  fontSize: res.fontSize(1),
                ),
              ),
            ),
          ),
              ],
            ),
          ),
        ),
      ],
    );
  }

  Widget _buildMobileLayout(BuildContext context, ResponsiveHelper res) {
    return Padding(
      padding: EdgeInsets.all(res.width(6)),
      child: ListView(
        shrinkWrap: true,
        children: [
          Image.asset(
            "assets/images/register_img.png",
            height: res.height(20),
          ),
          SizedBox(height: res.height(2)),
          Center(
            child: Text(
              'Welcome To Connect',
              style: Theme.of(context).textTheme.headline6?.copyWith(
                    fontSize: res.fontSize(7),
                    fontWeight: FontWeight.bold,
                  ),
            ),
          ),
          SizedBox(height: res.height(2)),
          Row(
            mainAxisAlignment: MainAxisAlignment.center,
            children: [
              Text(
                'Already a member?',
                style: TextStyle(
                  color: Theme.of(context).colorScheme.tertiary,
                ),
              ),
              TextButton(
                onPressed: widget.toggle,
                child: Text(
                  'Log In',
                  style: TextStyle(
                    color: Theme.of(context).colorScheme.inversePrimary,
                  ),
                ),
              ),
            ],
          ),
          SizedBox(height: res.height(3)),
          CTextField(controller: nameController,hintTxt: "Name", ispass: false),
          SizedBox(height: res.height(2)),
          CTextField(controller: emailController,hintTxt: "Email", ispass: false),
          SizedBox(height: res.height(2)),
          CTextField(controller: passwordController,hintTxt: "Password", ispass: true),
          SizedBox(height: res.height(2)),
          CTextField(controller: confirmController,hintTxt: "Confirm Password", ispass: true),
          SizedBox(height: res.height(4)),
          CButton(text: 'Register', onPressed: () {}),
          SizedBox(height: res.height(2)),
          Center(
            child: TextButton(
              onPressed: () {},
              child: Text(
                'Your Moments, Your Story—Securely Connected.',
                style: TextStyle(
                  color: Theme.of(context).colorScheme.tertiary,
                  fontSize: res.fontSize(3),
                ),
              ),
            ),
          ),
        ],
      ),
    );
  }

}
Replace the login page with the register page in the main.dart to ensure correct formatting of it.
A Fun Behind The Scene
I faced a bug. I was only getting the login page that I created earlier in the phone version of my app.
I uninstalled and cleared the cache using flutter clean.
Nothing worked.
When I went on to test it on the browser it worked fine.
Lastly, I cleared data and cache from the mobile version of that app and then uninstalled it.
And finally, I realized that I forgot to modify the _buildmobilelayout method of the register page. 😅😅
I have no words to excuse this foolishness.🤐😶
Moving on…
Login Register and Home Page Using Bloc
Step 2: Create an Auth Page To Toggle Between Login And Register
In the pages folder create an auth_page.dart.
It should have a stateful widget.
If you are wondering Why I add C to every class’s initial. It’s cause Connect is the app’s name. So it is easy to navigate custom made classes this way. It ensures consistency.
- Create a flag that’ll help us know whether to show the login page or not.
- Create a method to toggle between show login and not.
- Inside the build method based on this flag return the page.
- Add
auth_page.dartinmain.dart
➡️Click To View auth_page.dart
import 'package:connect/features/auth/presentation/pages/login_page.dart';
import 'package:connect/features/auth/presentation/pages/register_page.dart';
import 'package:flutter/material.dart';

class CAuthPage extends StatefulWidget {
  const CAuthPage({super.key});

  @override
  State<CAuthPage> createState() => _CAuthPageState();
}

class _CAuthPageState extends State<CAuthPage> {
  //initially show login page
  bool showLoginPage = true;

  // create a method to toggle between both
  void togglePages() {
    setState(() {
      showLoginPage = !showLoginPage;
    });
  }

  @override
  Widget build(BuildContext context) {
    if(showLoginPage) {
      return const CLoginPage();
    }
    else {
      return const CRegisterPage();
    }
  }
}
Go to the login page and add a variable to the constructor that takes the toggle method.
class CLoginPage extends StatefulWidget {
  final void Function()? toggle;
  const CLoginPage({super.key, required this.toggle});
Provide this to onPressed of TextButton that says sign up in both desktop and mobile.
TextButton(
          onPressed: widget.toggle,
          child: Text(
                 'Sign up',
          style: TextStyle(
          color: Theme.of(context).colorScheme.inversePrimary,
                 ),
              ),
        ),
Do the same with the register page.
Login Register and Home Page Using Bloc Login Register and Home Page Using Bloc Login Register and Home Page Using Bloc Login Register and Home Page Using Bloc Login Register and Home Page Using Bloc
Now I believe giving complete code here might be a problem that’s why I’ll create a GitHub link to provide you access to daily work. (I’ll provide the code of every step but for complete go to the GitHub link at the end of the article.)
The first commit would be “Day 4”. Then I’ll commit every day based on that day’s work.
The build method of auth_page.dart:
@override
  Widget build(BuildContext context) {
    if(showLoginPage) {
      return CLoginPage(toggle: togglePages,);
    }
    else {
      return CRegisterPage(toggle: togglePages,);
    }
  }
Test if it works and move on.
NOTE: headline6 was depreciated. That’s why I replaced it with titleLarge
Step 3: Make Login Functioning
- Create a Login method in the login_page.dart below the text controllers.
- Get text from the text controllers
- Get the auth cubit (import bloc and auth cubit if it doesn’t happen automatically)
- If the fields do not have text raise an error in the snack bar.
- If they do have some text let the user log in
- Dispose the controllers at last.
Clean up main.dart and move MyApp Class to a new file app.dart.
You’ll see an error in widget_test.dart, import app.dart there and the issue will be resolved. Also, remove const before MyApp() in the widget_test.dart.
app.dart will be the root of our Connect.
- Create an authRepo instance in app.dart
- Provide the auth cubit to the app using bloc provider. Also, initiate the checkAuth() method.
- Make your material app a child of this bloc provider
- In the home of material app create a bloc consumer instead of CAuthPage.
- This bloc consumer would need
- Cubit
- builder
- listener
- Provide conditions inside the builder to ensure pages launch based on the states
- Create a new folder inside features and name it post. You need to create a home page here:
features/post/presentation/pages/home_page.dart
➡️Click To View login method
// text controllers
  final emailController = TextEditingController();
  final passwordController = TextEditingController();

  // login method
  void login() {
    // get text
    final String email = emailController.text;
    final String pw = passwordController.text;

    // get the auth cubit
    final authCubit = context.read<CAuthCubit>();

    // make sure we have something in email and password
    if(email.isNotEmpty && pw.isNotEmpty) {
      authCubit.login(email, pw);
    }
    // else display error
    else {
      ScaffoldMessenger.of(context).showSnackBar(const SnackBar(content: Text("Please Enter Both Email and Password!!")));
    }
  }

  // dispose controllers
  @override
  void dispose() {
    emailController.dispose();
    passwordController.dispose();
    super.dispose();
  }
➡️Click To View app.dart
import 'package:connect/features/auth/data/firebase_auth_repo.dart';
import 'package:connect/features/auth/presentation/cubits/auth_cubit.dart';
import 'package:connect/features/auth/presentation/cubits/auth_states.dart';
import 'package:connect/features/auth/presentation/pages/auth_page.dart';
import 'package:connect/features/post/presentation/pages/home_page.dart';
import 'package:connect/themes/light_mode.dart';
import 'package:flutter/material.dart';
import 'package:flutter_bloc/flutter_bloc.dart';

class MyApp extends StatelessWidget {
  final authRepo = CFirebaseAuthRepo();

  MyApp({super.key});

  @override
  Widget build(BuildContext context) {
    return BlocProvider(
      create: (context) => CAuthCubit(authRepo: authRepo)..checkAuth(),
      child: MaterialApp(
        debugShowCheckedModeBanner: false,
        theme:lightMode,
        home:BlocConsumer<CAuthCubit, CAuthState>(
          builder: (context, authState) {
            if(authState is CAuthUnauthenticatedState) {
              return const CAuthPage();
            }
            if(authState is CAuthAuthenticatedState) {
              return const CHomePage();
            }
            // loading
            else {
              return const Scaffold(
                body: Center(child: CircularProgressIndicator()),
              );
            }
          },
          listener: (context, state) {},
        ),
      ),
      );
  }
}
Now test the login functionality.
Test it using the test user that we created on Day 2.
Step 4: Create A Loading Screen
We will move on to the home screen but before that let’s first do this.
Create a loading screen for the Loading State of our app.
Right now it is just a circular progress indicator.
I’ll keep it in the utils folder as it is not specific to any feature.
This is the GIF I’ll use:
We just need to provide a column and inside it this gif along with some text.
➡️Click To View the Code of loading_screen.dart
import 'package:connect/utils/responsive_helper.dart';
import 'package:flutter/material.dart';

class CLoadingScreen extends StatelessWidget {
  const CLoadingScreen({super.key});
  @override
  Widget build(BuildContext context) {
    final res = ResponsiveHelper(context);
    final isDesktop = res.width(100) >= 800; // Desktop breakpoint
    return Scaffold(
      backgroundColor: Theme.of(context).scaffoldBackgroundColor,
      body: SafeArea(
        child: Center(
          child: SingleChildScrollView(
            child: isDesktop
                ? _buildDesktopLayout(context, res)
                : _buildMobileLayout(context, res),
          ),
        ),
      ),
    );
  }

  Widget _buildDesktopLayout(BuildContext context, ResponsiveHelper res) {
    return Column(
      children: [
        Image.asset("assets/images/loading.gif", fit: BoxFit.contain),
        Text(
          'Your Moments, Your Story—Securely Connected.',
          style: TextStyle(
            color: Theme.of(context).colorScheme.tertiary,
            fontSize: res.fontSize(1),
          ),
        ),
      ]
    );
  }

  Widget _buildMobileLayout(BuildContext context, ResponsiveHelper res) {
    return Column(
      children: [
        Image.asset("assets/images/loading.gif", fit: BoxFit.contain),
        Text(
          'Your Moments, Your Story—Securely Connected.',
          style: TextStyle(
            color: Theme.of(context).colorScheme.tertiary,
            fontSize: res.fontSize(1),
          ),
        ),
      ],
    );
  }
}
Step 5: Putting It All Together With A Simple Home Page
We are left with some error handling.
If you enter an incorrect email or password it won’t let you log in. But, will not show any errors either.
Let’s fix this.
Head over to app.dart‘s listener in your bloc consumer
Therein add this method to show the errors thrown by the CAuthState.
listener: (context, state) {
            if(state is CAuthErrorState) {
              ScaffoldMessenger.of(context).showSnackBar(SnackBar(content: Text(state.message)));
            }
          }
Now let’s write connect in the center of our home page along with a logout button at the top of it.
➡️Click To View Home Page Code:
import 'package:connect/features/auth/presentation/cubits/auth_cubit.dart';
import 'package:flutter/material.dart';
import 'package:flutter_bloc/flutter_bloc.dart';

class CHomePage extends StatefulWidget {
  const CHomePage({super.key});

  @override
  State<CHomePage> createState() => _CHomePageState();
}

class _CHomePageState extends State<CHomePage> {
  @override
  Widget build(BuildContext context) {
    return Scaffold(
      appBar: AppBar(actions: [
        IconButton(
            onPressed: () {
              context.read<CAuthCubit>().logout();
            },
            icon: const Icon(Icons.logout))
      ]),
      body: const Center(child: Text("Connect")),
    );
  }
}
Don’t just laugh at my foolishness. Share some stories of yours as well.
I am waiting to see you tomorrow.
Until then stay happy and keep coding.
Login Register and Home Page Using Bloc Login Register and Home Page Using Bloc Login Register and Home Page Using Bloc Login Register and Home Page Using Bloc Login Register and Home Page Using Bloc
My relatives all the time say that I am wasting my time here
at net, however I know I am getting knowledge every day by reading
thes pleasant content.
Good to know you are learning from here!
Outstanding post however I was wanting to know if you could write a little more
on this topic? I’d be very thankful if you could elaborate a little bit more.
Thank you!
Can you kindly let me know what seems confusing so that I can elaborate that specific part?