Welcome to the 200th article on python-hub.com!
For this milestone, we’re bringing you something special as part of our Build & Challenge Series—a Real-Time Rock-Paper-Scissors Game in Python.
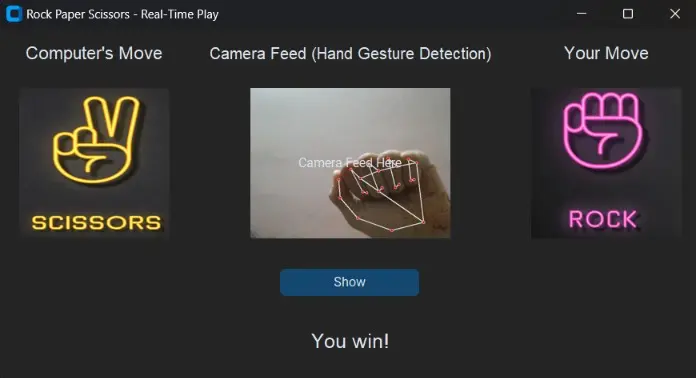
For this milestone, I wanted to do something different—so instead of the usual Rock-Paper-Scissors game with a simple GUI, we’re taking things up a notch with a real-time version that uses hand gesture recognition!
This is our second project in the series, following the Hangman game, and it’s perfect for beginners who want to dive a little deeper into Python.
We’ll be combining CustomTkinter for the user interface with OpenCV and MediaPipe for hand detection.
By the end, you’ll have a game that lets you play Rock-Paper-Scissors using your actual hand gestures in front of the camera—how cool is that?
In this article, I’ll walk you through each step so you can follow along and build your own version from scratch.
Trust me, it’s going to be fun and a great learning experience!
What you’ll build:
Contents
Real-Time Rock-Paper-Scissors Game in Python
1. Importing Libraries
➡️ Click For Code
from customtkinter import *  # Import customtkinter to create the GUI (Graphical User Interface).
from PIL import Image  # Import PIL (Python Imaging Library) to handle images.
import random  # Import random to randomly select the computer's move.
import cv2  # Import OpenCV to capture the video feed from the camera.
import mediapipe as mp  # Import MediaPipe for hand gesture detection.
2. Creating the Main Application Class
➡️ Click For Code
class RockPaperScissorsApp(CTk):
    def __init__(self):
super().__init__()- The
RockPaperScissorsAppclass inherits fromCTk(a widget from CustomTkinter). - The
__init__function initializes the app’s main window and the core setup when the app starts.
3. Setting Up the Window
➡️ Click For Code
self.title("Rock Paper Scissors - Real-Time Play")
self.geometry("700x350")- The
title()method sets the window’s title. geometry()specifies the window size (700×350 pixels).
4. Defining Image Paths
➡️ Click For Code
self.waiting_image_path = "path_to_waiting_image"
self.rock_image_path = "path_to_rock_image"
self.paper_image_path = "path_to_paper_image"
self.scissors_image_path = "path_to_scissors_image"
These variables hold the file paths of the images used to represent “waiting”, “rock”, “paper”, and “scissors”.
5. Setting Up Moves and Variables
➡️ Click For Code
self.moves = ["rock", "paper", "scissors"]
self.player_move = Nonemovesholds the possible choices in the game.player_moveis initially set toNone, as the player hasn’t chosen yet.
6. Loading Default Images
➡️ Click For Code
self.computer_image = CTkImage(Image.open(self.waiting_image_path), size=(150, 150))
self.player_image = CTkImage(Image.open(self.waiting_image_path), size=(150, 150))
These lines load the “waiting” image for both the player and the computer until a move is made.
7. Creating Labels for the Moves
➡️ Click For Code
self.computer_move_label = CTkLabel(self, text="Computer's Move", font=("Arial", 18))
self.player_move_label = CTkLabel(self, text="Your Move", font=("Arial", 18))
self.computer_move_label.grid(row=0, column=0, padx=20, pady=10)
self.player_move_label.grid(row=0, column=2, padx=20, pady=10)
CTkLabel creates text labels to indicate the computer’s move and the player’s move. These labels are placed on the window using the grid() layout manager.
8. Displaying the Move Images
➡️ Click For Code
self.computer_move_image_label = CTkLabel(self, image=self.computer_image, text="")
self.player_move_image_label = CTkLabel(self, image=self.player_image, text="")
self.computer_move_image_label.grid(row=1, column=0, padx=20, pady=10)
self.player_move_image_label.grid(row=1, column=2, padx=20, pady=10)
The CTkLabel displays images of the computer’s and player’s moves, starting with the “waiting” image.
9. Setting Up Camera Feed
➡️ Click For Code
self.camera_label = CTkLabel(self, text="Camera Feed (Hand Gesture Detection)", font=("Arial", 16))
self.camera_frame = CTkLabel(self, text="Camera Feed Here", width=200, height=150, fg_color="gray")
self.camera_label.grid(row=0, column=1, padx=20, pady=10)
self.camera_frame.grid(row=1, column=1, padx=20, pady=10)
A label camera_label is placed to indicate where the camera feed will appear. The camera_frame is a placeholder for the camera stream.
10. Adding a “Show” Button
➡️ Click For Code
self.show_button = CTkButton(self, text="Show", command=self.show_move)
self.show_button.grid(row=2, column=1, pady=20)
This button starts the process of showing the computer’s move and checking the result.
11. Creating Result Label
➡️ Click For Code
self.result_label = CTkLabel(self, text="", font=("Arial", 20))
self.result_label.grid(row=3, column=1, pady=10)
This label will display the result of the game (who wins or if it’s a tie).
12. Initializing Video Capture and Hand Detection
➡️ Click For Code
self.capture = cv2.VideoCapture(0)
self.mp_hands = mp.solutions.hands
self.hands = self.mp_hands.Hands(max_num_hands=1)
self.mp_draw = mp.solutions.drawing_utils
self.update_camera_feed()cv2.VideoCapture(0)opens the webcam for video input.- MediaPipe (
mp_hands) is set up to detect hand gestures. update_camera_feed()starts the continuous video stream processing.
13. Updating Camera Feed
The update_camera_feed function handles the continuous video feed from the camera, processes the frames, detects hand landmarks, and updates the game UI accordingly.
Here’s an in-depth explanation:
➡️ Click For Code
def update_camera_feed(self):
    ret, frame = self.capture.read()  # 1. Capture the current frame from the video stream.
    if not ret:
        return  # 2. If the frame is not captured correctly, return (skip processing).

    frame = cv2.flip(frame, 1)  # 3. Flip the frame horizontally (to mimic mirror image behavior).

    # 4. Convert the frame from BGR (OpenCV format) to RGB format (for MediaPipe).
    rgb_frame = cv2.cvtColor(frame, cv2.COLOR_BGR2RGB)

    # 5. Process the RGB frame through the MediaPipe Hands model.
    results = self.hands.process(rgb_frame)

    # 6. Check if any hand landmarks were detected in the frame.
    if results.multi_hand_landmarks:
        for hand_landmarks in results.multi_hand_landmarks:
            # 7. Draw the hand landmarks on the frame.
            self.mp_draw.draw_landmarks(frame, hand_landmarks, self.mp_hands.HAND_CONNECTIONS)

            # 8. Detect the player's move based on the hand landmarks.
            self.player_move = self.detect_move(hand_landmarks)

    # 9. Resize the frame to fit in the GUI.
    frame = cv2.resize(frame, (200, 150))

    # 10. Convert the frame back to a format suitable for Tkinter.
    img = Image.fromarray(frame)
    imgtk = ImageTk.PhotoImage(image=img)

    # 11. Update the camera feed display on the GUI.
    self.camera_frame.configure(image=imgtk)
    self.camera_frame.image = imgtk

    # 12. Schedule the next frame update (run the function continuously).
    self.after(10, self.update_camera_feed)
Step-by-Step Breakdown:
- Capture the Frame:
ret, frame = self.capture.read()captures the current frame from the webcam video feed. Theretflag indicates if the frame was successfully captured.
- Check for Frame Success:
- If the frame is not successfully captured (e.g., the webcam is not functioning), the function exits early (
return).
- If the frame is not successfully captured (e.g., the webcam is not functioning), the function exits early (
- Flip the Frame:
cv2.flip(frame, 1)flips the video horizontally. This gives the user a mirrored view, so their hand appears as it would in a mirror (more intuitive interaction).
- Convert Frame to RGB:
- OpenCV captures frames in BGR format. MediaPipe, however, requires RGB images. So, the frame is converted from BGR to RGB using
cv2.cvtColor().
- OpenCV captures frames in BGR format. MediaPipe, however, requires RGB images. So, the frame is converted from BGR to RGB using
- Hand Detection:
self.hands.process(rgb_frame)uses MediaPipe’sHandsmodel to analyze the RGB frame and detect hand landmarks (key points on the hand). The result is stored inresults.
- Check for Hand Landmarks:
results.multi_hand_landmarksholds the detected hand landmarks, if any. If there are no hand landmarks, this part is skipped.
- Draw Hand Landmarks:
- If landmarks are detected,
self.mp_draw.draw_landmarks()draws the hand key points and connections on the frame for visual feedback.
- If landmarks are detected,
- Detect the Player’s Move:
- The
self.detect_move()function is called, which analyzes the hand landmarks to determine if the player is showing “rock”, “paper”, or “scissors”. The result is stored inself.player_move.
- The
- Resize the Frame:
cv2.resize(frame, (200, 150))resizes the frame to fit the specific area of the GUI where the camera feed is displayed.
- Convert for Tkinter:
- The frame is converted from a NumPy array (used by OpenCV) to a
PhotoImageobject (used by Tkinter) viaImageTk.PhotoImage().
- The frame is converted from a NumPy array (used by OpenCV) to a
- Update the Camera Feed in GUI:
- The
self.camera_frame.configure(image=imgtk)updates the displayed image in the GUI.
- The
- Loop Continuously:
self.after(10, self.update_camera_feed)ensures that the function keeps running every 10 milliseconds to continuously update the camera feed.
14. Detecting Hand Gestures
The detect_move function is responsible for analyzing the hand landmarks to identify whether the player is showing a “rock”, “paper”, or “scissors” gesture.
Here’s how this works:
➡️ Click For Code
def detect_move(self, hand_landmarks):
    # 1. Extract landmark positions for the relevant fingers (index, middle, ring, and pinky).
    index_tip = hand_landmarks.landmark[self.mp_hands.HandLandmark.INDEX_FINGER_TIP]
    middle_tip = hand_landmarks.landmark[self.mp_hands.HandLandmark.MIDDLE_FINGER_TIP]
    ring_tip = hand_landmarks.landmark[self.mp_hands.HandLandmark.RING_FINGER_TIP]
    pinky_tip = hand_landmarks.landmark[self.mp_hands.HandLandmark.PINKY_TIP]

    # 2. Extract the position of the wrist to compare the finger positions.
    wrist = hand_landmarks.landmark[self.mp_hands.HandLandmark.WRIST]

    # 3. Define logic to determine the gesture (rock, paper, scissors).

    # Check if all fingers are curled (rock gesture).
    if (index_tip.y > wrist.y and middle_tip.y > wrist.y and
        ring_tip.y > wrist.y and pinky_tip.y > wrist.y):
        return "rock"

    # Check if all fingers are extended (paper gesture).
    if (index_tip.y < wrist.y and middle_tip.y < wrist.y and
        ring_tip.y < wrist.y and pinky_tip.y < wrist.y):
        return "paper"

    # Check if index and middle finger are extended, but ring and pinky are curled (scissors gesture).
    if (index_tip.y < wrist.y and middle_tip.y < wrist.y and
        ring_tip.y > wrist.y and pinky_tip.y > wrist.y):
        return "scissors"

    # If the gesture is not clearly identified, return None.
    return None
Step-by-Step Breakdown:
- Extract Landmark Positions:
- The position of each finger tip is extracted from the hand landmarks provided by MediaPipe.
hand_landmarks.landmark[]accesses specific points on the hand. In this case:INDEX_FINGER_TIP→ The tip of the index finger.MIDDLE_FINGER_TIP→ The tip of the middle finger.RING_FINGER_TIP→ The tip of the ring finger.PINKY_TIP→ The tip of the pinky finger.
WRISTis also extracted to compare the relative position of the fingers (since gestures depend on the relationship between finger positions and the wrist).
- Check for Rock Gesture:
- For the “rock” gesture, all fingers should be curled. This is determined by checking if the y-coordinate of all the finger tips (
index_tip,middle_tip,ring_tip,pinky_tip) is greater than the wrist’s y-coordinate. This indicates that the fingers are below the wrist (curled downwards).
- For the “rock” gesture, all fingers should be curled. This is determined by checking if the y-coordinate of all the finger tips (
- Check for Paper Gesture:
- For the “paper” gesture, all fingers should be extended. This is determined by checking if the y-coordinates of all the fingers are above the wrist (indicating they are extended upwards).
- Check for Scissors Gesture:
- For the “scissors” gesture, only the index and middle fingers should be extended, while the ring and pinky fingers should be curled. This is detected by checking if the y-coordinates of the index and middle fingers are above the wrist, but the ring and pinky fingers are below the wrist.
- Return the Detected Gesture:
- If one of the conditions is satisfied (rock, paper, or scissors), the corresponding gesture is returned.
- If no clear gesture is detected, the function returns
None.
15. Showing Computer’s Move and Checking the Result
➡️ Click For Code
def show_move(self):
    computer_move = random.choice(self.moves)
    self.update_computer_image(computer_move)
    if not self.player_move:
        self.player_move = random.choice(self.moves)
    result = self.check_winner(self.player_move, computer_move)
    self.result_label.configure(text=result)
    self.after(2000, self.reset_game)
This function randomly picks the computer’s move and checks who wins based on the player’s move and the computer’s move. After showing the result, the game is reset after 2 seconds.
16. Reset Game Method
The reset_game method is responsible for resetting the game’s state so that the player can start a new round. It clears the player’s move, computer’s move, and resets the game interface to its initial state.
Here’s the method:
➡️ Click For Code
def reset_game(self):
    # 1. Clear the player's move and computer's move.
    self.player_move = None
    self.computer_move = None

    # 2. Reset the player and computer images to their default state.
    self.update_player_image("default.png")
    self.update_computer_image("default.png")

    # 3. Clear the result message (winner text).
    self.result_label.config(text="")
Step-by-Step Breakdown:
- Clear Moves:
self.player_move = Noneandself.computer_move = Nonereset both the player’s and computer’s moves, clearing any existing moves from the previous round.
- Reset Images:
- The player’s and computer’s move images are reset to their default state (using placeholder images like
"default.png") by callingself.update_player_image("default.png")andself.update_computer_image("default.png").
- The player’s and computer’s move images are reset to their default state (using placeholder images like
- Clear Result Message:
self.result_label.config(text="")clears any result text (such as “Player Wins!” or “Computer Wins!”) that was displayed in the previous round. The result label is set to an empty string, effectively removing any previous result.
This method resets the game environment, allowing the player to start fresh without any residual data from the previous round.
Real-Time Rock-Paper-Scissors Game in Python Real-Time Rock-Paper-Scissors Game in Python Real-Time Rock-Paper-Scissors Game in Python Real-Time Rock-Paper-Scissors Game in Python
17. Update Computer Image
The update_computer_image method is responsible for updating the image representing the computer’s chosen move in the GUI.
➡️ Click For Code
def update_computer_image(self, image_file):
    # 1. Load the image file for the computer's move.
    img = Image.open(f"images/{image_file}")

    # 2. Resize the image to fit in the game window.
    img = img.resize((150, 150))

    # 3. Convert the image to a Tkinter-compatible format.
    imgtk = ImageTk.PhotoImage(image=img)

    # 4. Update the computer image label in the GUI.
    self.computer_image_label.configure(image=imgtk)

    # 5. Keep a reference to the image to prevent garbage collection.
    self.computer_image_label.image = imgtk
Step-by-Step Breakdown:
- Load the Image:
- The
Image.open(f"images/{image_file}")line opens the image file from the directory where the computer’s move images are stored. The images would be named something like"rock.png","paper.png", or"scissors.png".
- The
- Resize the Image:
img.resize((150, 150))resizes the image to fit in the designated space in the game interface. Here, the image is resized to a 150×150 pixel square.
- Convert for Tkinter:
ImageTk.PhotoImage(image=img)converts the image into a format that Tkinter can display. Without this conversion, the image cannot be shown in the GUI.
- Update Image Label:
self.computer_image_label.configure(image=imgtk)updates the GUI label to show the computer’s move.
- Prevent Garbage Collection:
self.computer_image_label.image = imgtkkeeps a reference to the image to prevent Python’s garbage collector from removing it. Without this line, the image may not display correctly.
This function is triggered after the computer selects its move (rock, paper, or scissors), and it visually updates the game’s interface to show the corresponding image.
Real-Time Rock-Paper-Scissors Game in Python Real-Time Rock-Paper-Scissors Game in Python Real-Time Rock-Paper-Scissors Game in Python Real-Time Rock-Paper-Scissors Game in Python Real-Time Rock-Paper-Scissors Game in Python
18. Update Player Image
The update_player_image method works similarly to update_computer_image, but it updates the image for the player’s move instead.
➡️ Click For Code
def update_player_image(self, image_file):
    # 1. Load the image file for the player's move.
    img = Image.open(f"images/{image_file}")

    # 2. Resize the image to fit in the game window.
    img = img.resize((150, 150))

    # 3. Convert the image to a Tkinter-compatible format.
    imgtk = ImageTk.PhotoImage(image=img)

    # 4. Update the player image label in the GUI.
    self.player_image_label.configure(image=imgtk)

    # 5. Keep a reference to the image to prevent garbage collection.
    self.player_image_label.image = imgtk
Step-by-Step Breakdown:
The steps here are exactly the same as the update_computer_image method, but the difference is that the image for the player’s move is being updated.
- The image file is loaded from the appropriate path (
"images/{image_file}"), resized, and converted for Tkinter. - The player image label (
self.player_image_label) is updated to display the selected move (rock, paper, or scissors). - As with the computer image, a reference is kept to avoid garbage collection.
This function is called when the player makes their move, updating the game interface to display the player’s corresponding image.
Real-Time Rock-Paper-Scissors Game in Python Real-Time Rock-Paper-Scissors Game in Python Real-Time Rock-Paper-Scissors Game in Python Real-Time Rock-Paper-Scissors Game in Python Real-Time Rock-Paper-Scissors Game in Python
19. Check Winner
The check_winner method compares the player’s move and the computer’s move to determine the winner. It then updates the game interface to display the result.
➡️ Click For Code
def check_winner(self):
    # 1. If either the player or computer move is missing, do not proceed.
    if not self.player_move or not self.computer_move:
        return

    # 2. Compare player and computer moves to determine the winner.
    if self.player_move == self.computer_move:
        result_text = "It's a tie!"
    elif (self.player_move == "rock" and self.computer_move == "scissors") or \
         (self.player_move == "scissors" and self.computer_move == "paper") or \
         (self.player_move == "paper" and self.computer_move == "rock"):
        result_text = "Player Wins!"
    else:
        result_text = "Computer Wins!"

    # 3. Update the result label with the winner text.
    self.result_label.config(text=result_text)
Step-by-Step Breakdown:
- Check for Missing Moves:
- If either
self.player_moveorself.computer_moveisNone, the function exits early. This prevents the program from trying to check a winner when one of the moves is missing.
- If either
- Determine the Winner:
- The function compares the player’s move and the computer’s move using basic rock-paper-scissors rules:
- If the moves are the same (
self.player_move == self.computer_move), it’s a tie. - If the player’s move beats the computer’s move (based on the game rules), the player wins.
- Otherwise, the computer wins.
- If the moves are the same (
- The result is stored in
result_text.
- The function compares the player’s move and the computer’s move using basic rock-paper-scissors rules:
- Update the Result Label:
self.result_label.config(text=result_text)updates the text label on the GUI to display the result (e.g., “Player Wins!”, “Computer Wins!”, or “It’s a tie!”).
The logic here follows the traditional rock-paper-scissors game rules, determining the winner based on which move beats the other.
Real-Time Rock-Paper-Scissors Game in Python Real-Time Rock-Paper-Scissors Game in Python Real-Time Rock-Paper-Scissors Game in Python Real-Time Rock-Paper-Scissors Game in Python Real-Time Rock-Paper-Scissors Game in Python
20. Main Loop to Run the App
➡️ Click For Code
if __name__ == "__main__":
    app = RockPaperScissorsApp()
    app.mainloop()
This starts the app and keeps the window open until you manually close it.
Real-Time Rock-Paper-Scissors Game in Python Real-Time Rock-Paper-Scissors Game in Python Real-Time Rock-Paper-Scissors Game in Python Real-Time Rock-Paper-Scissors Game in Python Real-Time Rock-Paper-Scissors Game in Python
Ending Challenge
For this challenge, I want you to take this project and add your own creative twist!
Once you’ve built the real-time Rock-Paper-Scissors game, try enhancing it.
You could add sound effects, keep track of your score, or improve gesture accuracy with more detailed hand movements.
The goal is to make it your own and share your creation with others!
Full Source Code
Once you’ve nailed the challenge, share your updated version here in the project’s repository GitHub! Let’s grow the project together and learn as a community.
The complete source code is in the GitHub link provided above.
Real-Time Rock-Paper-Scissors Game in Python Real-Time Rock-Paper-Scissors Game in Python Real-Time Rock-Paper-Scissors Game in Python Real-Time Rock-Paper-Scissors Game in Python Real-Time Rock-Paper-Scissors Game in Python