Welcome to Day Seven of my 21-day project series!
Now, today I made something that all of us as programmers have implemented at a basic level. It’s quite nostalgic…
A Mini Calculator GUI with Python.
Contents
Project Contents
I will make a simple Mini Calculator GUI with Python. I’ll use Customtkinter for this purpose. It would work on clicks only. I haven’t included key binding in this.
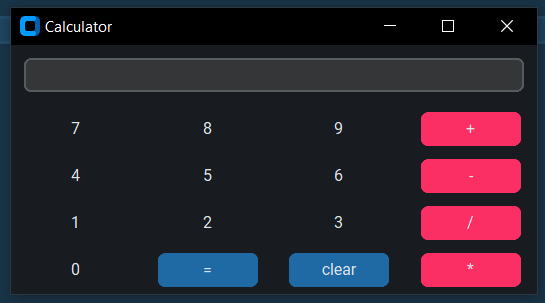
Here’s how it will look like:
If you want a step-by-step explanation I have explained it in this article.👇
Full Source Code
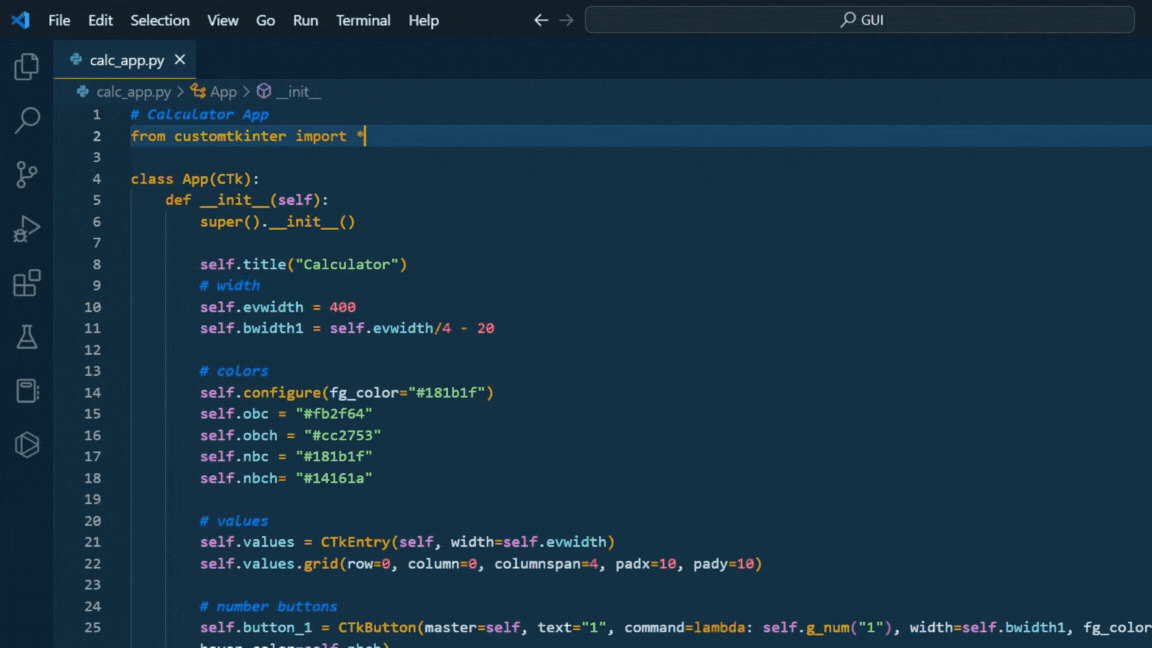
Here’s the full source code of Mini Calculator GUI with Python.
# Calculator App
from customtkinter import CTk, CTkEntry, CTkButton

class App(CTk):
    def __init__(self):
        super().__init__()

        self.title("Calculator")
        # width
        self.evwidth = 400
        self.bwidth1 = self.evwidth/4 - 20

        # colors
        self.configure(fg_color="#181b1f")
        self.obc = "#fb2f64"
        self.obch = "#cc2753"
        self.nbc = "#181b1f"
        self.nbch= "#14161a"

        # values
        self.values = CTkEntry(master=self, width=self.evwidth)
        self.values.grid(row=0, column=0, columnspan=4, padx=10, pady=10)

        # number buttons
        self.button_1 = CTkButton(master=self, text="1", command=lambda: self.g_num("1"), width=self.bwidth1, fg_color=self.nbc, hover_color=self.nbch)
        self.button_2 = CTkButton(master=self, text="2", command=lambda: self.g_num("2"), width=self.bwidth1, fg_color=self.nbc, hover_color=self.nbch)
        self.button_3 = CTkButton(master=self, text="3", command=lambda: self.g_num("3"), width=self.bwidth1, fg_color=self.nbc, hover_color=self.nbch)
        self.button_4 = CTkButton(master=self, text="4", command=lambda: self.g_num("4"), width=self.bwidth1, fg_color=self.nbc, hover_color=self.nbch)
        self.button_5 = CTkButton(master=self, text="5", command=lambda: self.g_num("5"), width=self.bwidth1, fg_color=self.nbc, hover_color=self.nbch)
        self.button_6 = CTkButton(master=self, text="6", command=lambda: self.g_num("6"), width=self.bwidth1, fg_color=self.nbc, hover_color=self.nbch)
        self.button_7 = CTkButton(master=self, text="7", command=lambda: self.g_num("7"), width=self.bwidth1, fg_color=self.nbc, hover_color=self.nbch)
        self.button_8 = CTkButton(master=self, text="8", command=lambda: self.g_num("8"), width=self.bwidth1, fg_color=self.nbc, hover_color=self.nbch)
        self.button_9 = CTkButton(master=self, text="9", command=lambda: self.g_num("9"), width=self.bwidth1, fg_color=self.nbc, hover_color=self.nbch)
        self.button_0 = CTkButton(master=self, text="0", command=lambda: self.g_num("0"), width=self.bwidth1, fg_color=self.nbc, hover_color=self.nbch)

        # displaying number buttons
        self.button_1.grid(row=3, column=0, pady=5, padx=10)
        self.button_2.grid(row=3, column=1, pady=5, padx=10)
        self.button_3.grid(row=3, column=2, pady=5, padx=10)

        self.button_4.grid(row=2, column=0, pady=5, padx=10)
        self.button_5.grid(row=2, column=1, pady=5, padx=10)
        self.button_6.grid(row=2, column=2, pady=5, padx=10)

        self.button_7.grid(row=1, column=0, pady=5, padx=10)
        self.button_8.grid(row=1, column=1, pady=5, padx=10)
        self.button_9.grid(row=1, column=2, pady=5, padx=10)
        self.button_0.grid(row=4, column=0, pady=5, padx=10)

        # operation buttons
        self.add = CTkButton(master=self, text="+", command=lambda: self.operate("+"), width=self.bwidth1, fg_color=self.obc, hover_color=self.obch)
        self.sub = CTkButton(master=self, text="-", command=lambda: self.operate("-"), width=self.bwidth1, fg_color=self.obc, hover_color=self.obch)
        self.div = CTkButton(master=self, text="/", command=lambda: self.operate("/"), width=self.bwidth1, fg_color=self.obc, hover_color=self.obch)
        self.mul = CTkButton(master=self, text="*", command=lambda: self.operate("*"), width=self.bwidth1, fg_color=self.obc, hover_color=self.obch)

        self.equal = CTkButton(master=self, text="=", command=self.evaluate, width=self.bwidth1)
        self.clear = CTkButton(master=self, text="clear", command=self.all_clear, width=self.bwidth1)

        # displaying operation buttons
        self.add.grid(row=1, column=3, pady=5, padx=10)
        self.sub.grid(row=2, column=3, pady=5, padx=10)
        self.div.grid(row=3, column=3, pady=5, padx=10)
        self.mul.grid(row=4, column=3, pady=5, padx=10)

        self.equal.grid(row=4, column=1, pady=5, padx=10)
        self.clear.grid(row=4, column=2, pady=5, padx=10)


    def g_num(self, n):
        new_n = self.values.get()+n
        self.values.delete(0, END)
        self.values.insert(0, new_n)

    def all_clear(self):
        self.values.delete(0, END)

    def operate(self, o):
        self.f_num = int(self.values.get())
        self.op = o
        self.values.delete(0, END)

    def evaluate(self):
        s_num = int(self.values.get())
        self.values.delete(0, END)

        if self.op == "+":
            self.values.insert(0, self.f_num + s_num)
        elif self.op == "-":
            self.values.insert(0, self.f_num - s_num)
        elif self.op == "*":
            self.values.insert(0, self.f_num * s_num)
        elif self.op == "/":
            self.values.insert(0, self.f_num / s_num)


if __name__ == "__main__":
    app = App()
    app.mainloop()
Demo
Possible Improvements (That I’ll add after 21 days)
So, here are the possible improvements in the Mini Calculator GUI with Python:
- Memory Functions
- Square Root
- Order of Operations (PEMDAS/BODMAS)
- Backspace
- History
- Multiple Operators
And a lot more…
Experience of the day
In case you don’t know this project is a part of the brand new series that I have started. #21days21projects in python. To read more about it you can check out this page.
And for those who already know here’s my experience of the day.
I was super tired and on the urge of giving up. By the way, this is the longest I have ever stuck to a commitment. I always end up procrastinating by this time.
I am glad to push my limits this time. So, because I really did not want to give in I took a very very very simple project.
That I have made at a basic level in almost every language I learned. So, making a working GUI with it was a very easy idea. I did work on that too earlier.
But it’s cool as I worked on it again.
Do let me know whether you liked this Mini Calculator GUI with Python or not. Also, let me know if there are any suggestions.
And most importantly how was your DAY 7?
Tired and ready to give up like I was?
Well, I hope it was fun. And remember it’s perfectly awesome if you missed out. Continue to work from tomorrow.
And today just write one line of code as simple as making a variable or printing something.
Your suggestions are welcomed!
Happy coding…
And wait, if you have some ideas for the upcoming projects do let me know that too. Even when the series ends do let me know what you like…